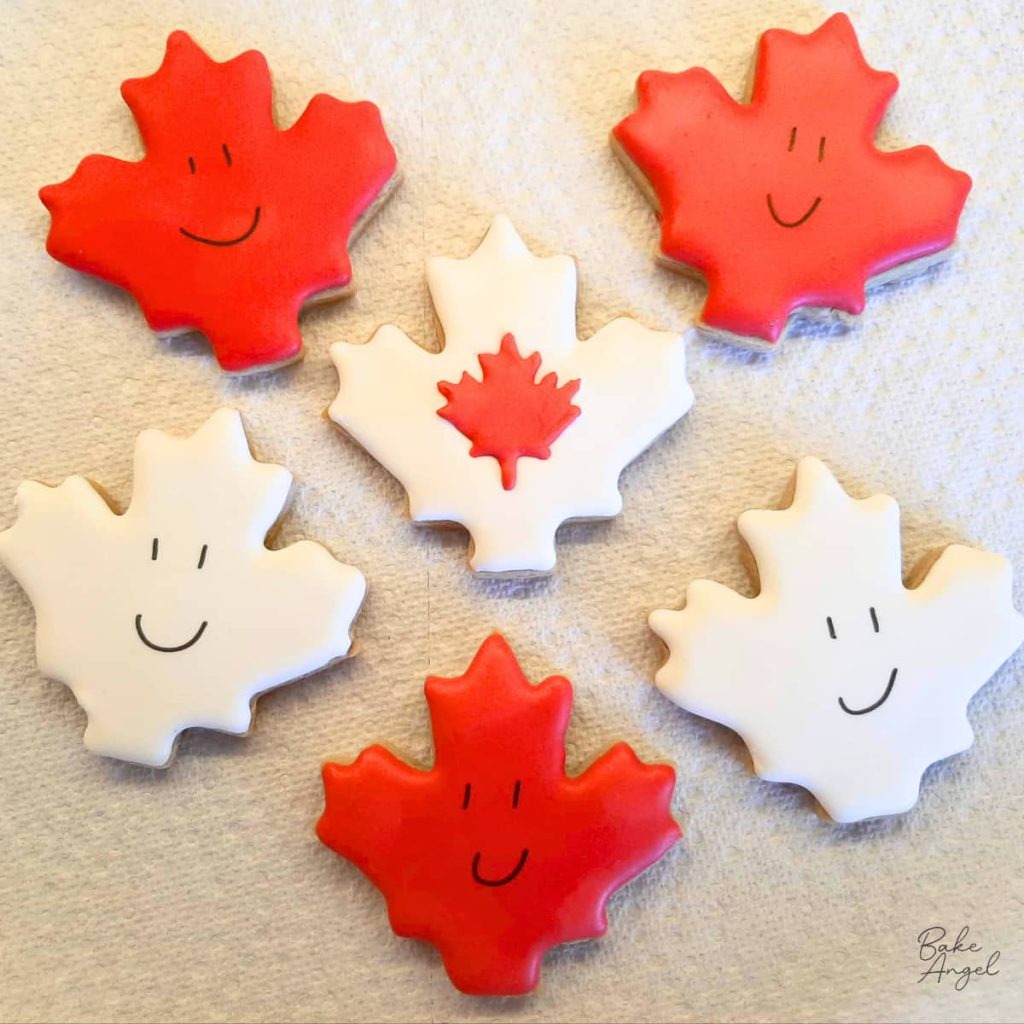
These Canada Day sugar cookies are one of my favourite ways to celebrate summer baking. With crisp edges, a soft centre, and smooth royal icing, they’re perfect for decorating with a festive maple leaf design in classic red and white. In this step-by-step tutorial, you’ll learn how to decorate simple sugar cookies using my no-spread, no-chill sugar cookie recipe and a small batch of royal icing. You’ll also find ideas for creating maple leaf cookies with fun smiling faces and how to use royal icing transfers.
These cookies are ideal for Canada Day parties, BBQs, cottage weekends or a fun baking and decorating activity with kids. Even if you are new to cookie decorating, this is a great design to try.
Decorating Ideas for Canada Day
For this tutorial, I used a simple maple leaf cookie cutter and decorated the cookies in red and white themes. You can keep designs minimal or get creative with faces, transfers, and layered designs.
Here are the main decorating techniques you’ll learn:
- How to outline a cookie with royal icing
- How to flood a cookie smoothly (in red or white icing)
- Creating and adding maple leaf royal icing transfers to cookies
What You’ll Need
This Canada Day sugar cookie tutorial uses basic cookie decorating tools, which will help you create your cookie set, and I personally use each item. Disclaimer: I may make a small commission on them if you click the links. Don’t worry – it doesn’t cost you a penny more, but I appreciate the support.
- Sugar Cookies – use my no-spread sugar cookie recipe, which gives crisp, sharp edges every time. If you’re new to baking sugar cookies, this detailed recipe post contains all of my tips and tricks for successful cookie baking.
- Maple Leaf Cookie Cutter – My favourite maple leaf cookie cutter from Ann Clark.
- Icing – My small batch royal icing recipe is great when you are working on a small project like this one. If you need an egg-free option, I also have a vegan royal icing recipe which works the same way.
- Food Colouring – After years of trying different reds, Americolor Super Red is still my go-to shade for the most vibrant colour. Adding a touch of Americolor Bright White to your uncoloured icing will make it pop against the red, but it’s not essential.
- Piping Bags – I love tipless piping bags, which have a slight texture – perfect for beginners to ensure you don’t lose grip of the bag while piping.
- Piping Tip/Nozzle – Any small round tip will work. I like to use a tip 4 for outlining and flooding. You can also snip a small amount from the tip of the bag if you are comfortable piping without a tip. Feel free to use a coupler with the piping tip if preferred.
- Scribe Tool – An essential item for tweaking your icing into position and popping any bubbles. If you don’t have one already, you can use a toothpick.
- Parchment Paper – For the royal icing transfers.
- Transfer Sheet – a printed template for piping the mini maple leaf design.
Step-by-step Decorating Tutorial
Cookie decorating doesn’t need to be intimidating. After teaching more than 1000 students in decorating classes, I’ve found that breaking cookie decorating into simple steps is the easiest way to build confidence. Taking it slow and steady is always recommended, and setting your workspace up before you start will help you be more efficient when decorating.
Don’t stress if things aren’t perfect. Every cookie is still edible, and even decorating mistakes still taste delicious.
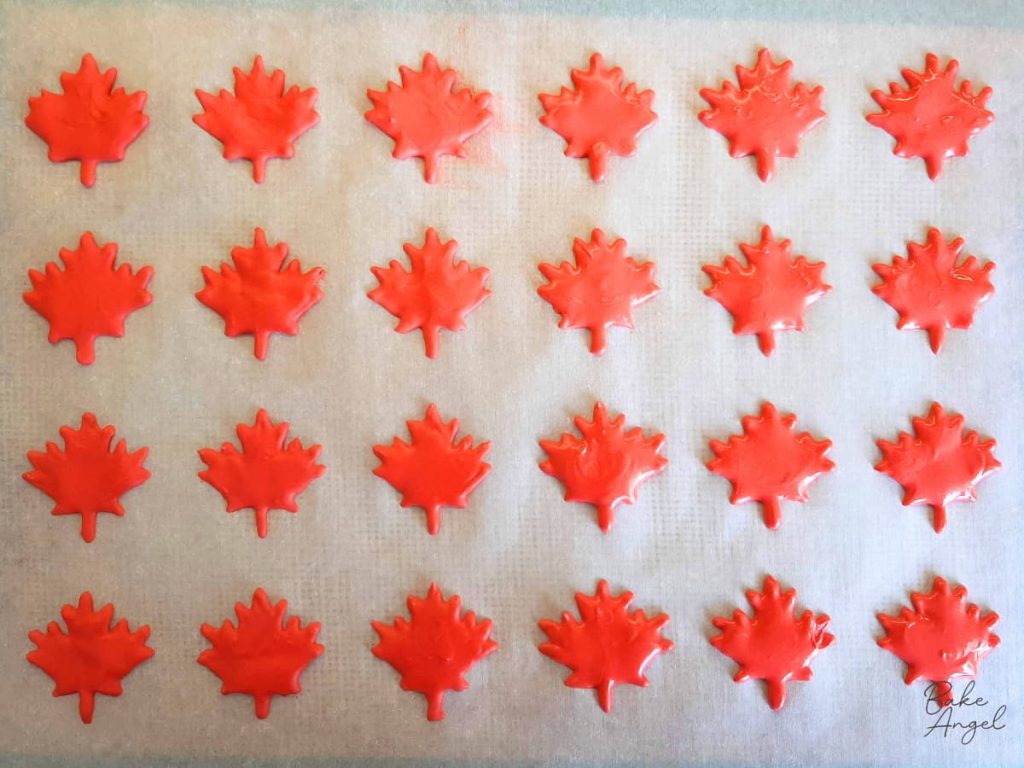
Baker’s Tip: If you are planning to add mini maple leaves to the cookies, make these at least one day before decorating your cookies. The transfers may take up to 24 hours to dry completely, depending on humidity. You can also speed up the drying process using a dehydrator. Not using transfers? Skip to step 4.
Step 1: Prepare your Royal Icing
Make your small batch royal icing to hybrid consistency and divide it into two, colouring half of it red.

Make up your piping bags, adding just under half a bag of each colour to the bags – don’t forget to add your coupler and piping tip first if you are using them.
Step 2: Set up your workspace
Grab your supplies before you sit down to decorate, so that you are not scrambling for anything mid-decorating. I like to set up a tray with everything I need: piping bags with icing, scribe tool, parchment paper, transfer template, and a damp cloth (to wipe your piping tip and scribe tool).
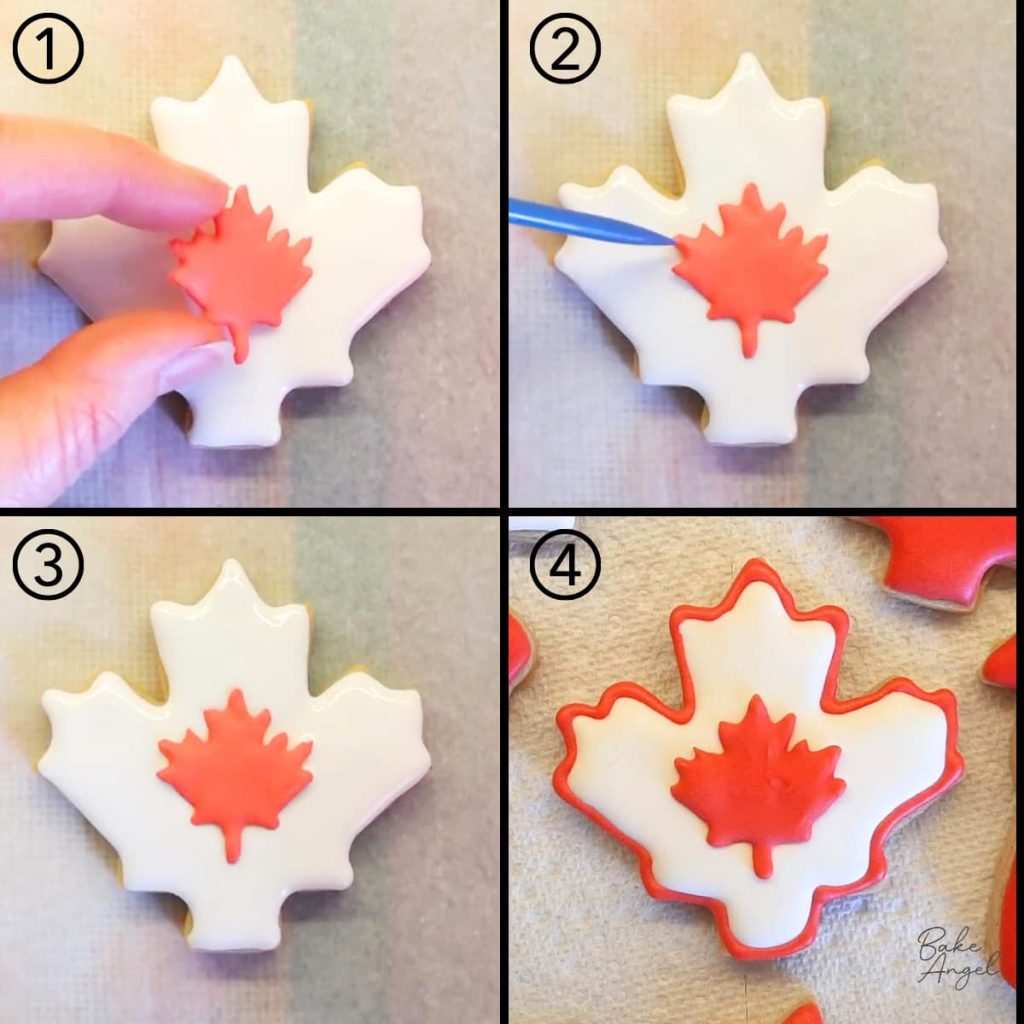
Step 3: Make the Maple Leaf Transfer
Place a piece of parchment paper over the royal icing template page, then pipe the shape onto the parchment.
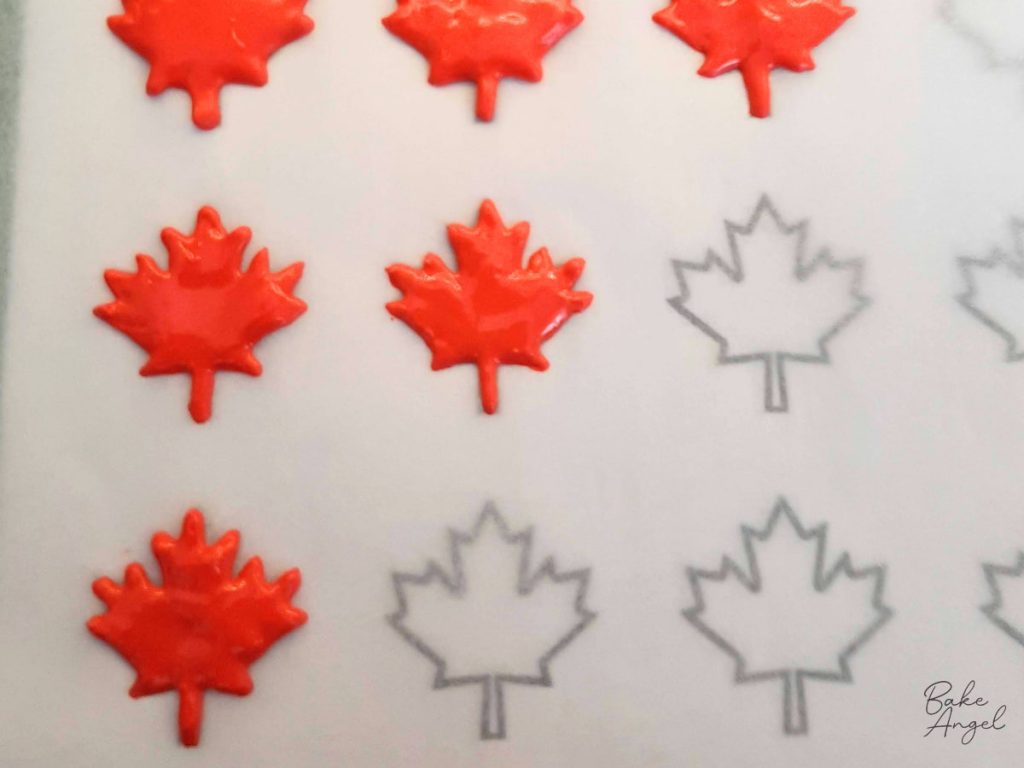
Allow to dry completely before gently peeling off the parchment and placing it onto your flooded cookie (see step 7).
Step 4: Bake your Sugar Cookies
Prepare your no-spread sugar cookie dough and roll it to an even thickness (hint – I cover all of this in the recipe post, so check it out!). Cut out maple leaf shapes and bake until the edges are just lightly golden.
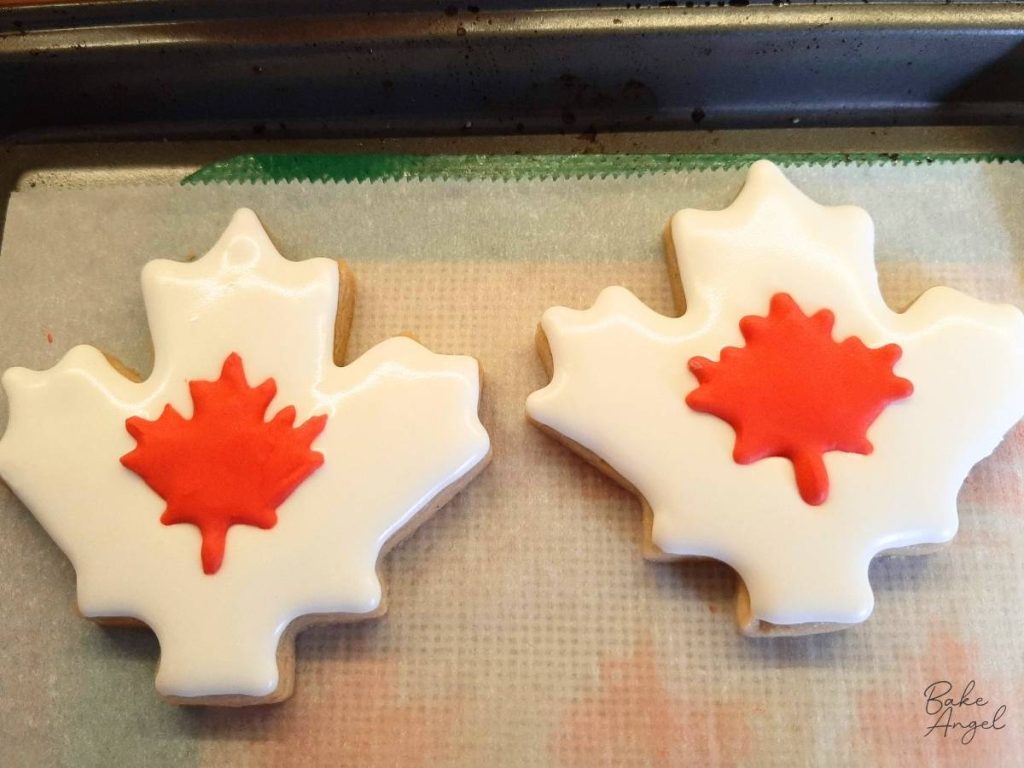
Allow the maple leaf sugar cookies to cool completely before decorating with your Canada Day designs.
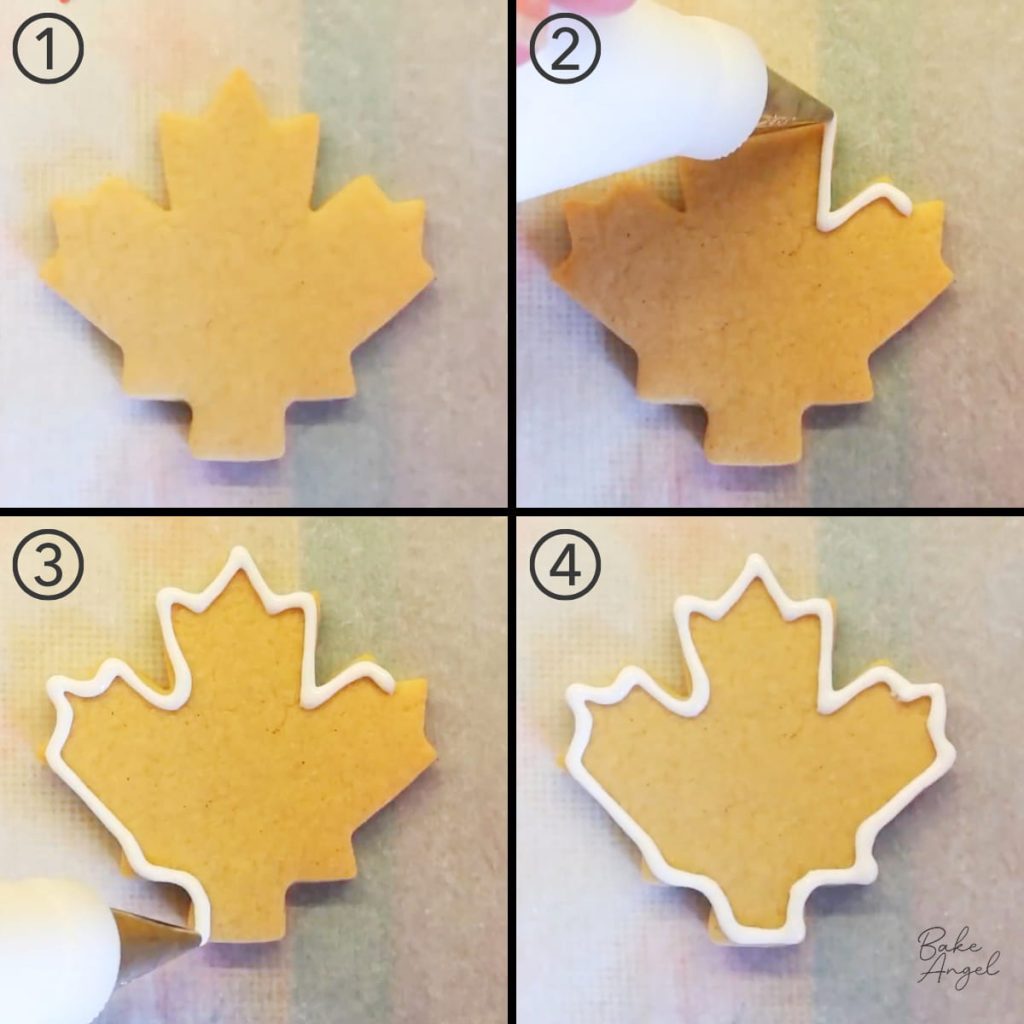
Step 5: Outline the Maple Leaf Cookie
Pipe a clean outline around one cookie, keeping the piping tip slightly above the surface to allow the icing to flow smoothly from the bag. An outline helps keep your flood icing in place and creates crisp edges. As you become more confident with royal icing, you may skip outlining, although I often still outline when covering more intricate-shaped cookies.
Step 6: Flood the Cookie
Immediately fill the outlined area with royal icing. I recommend piping in a spiral shape from outside in. Don’t worry if you miss some spots – use a scribe tool to gently spread the icing evenly and reshape the edges if needed. You can also carefully pick up the cookie and give it a gentle shake side to side to help flatten the icing.
Got bubbles? Use the scribe tool to pop the bubbles. Tapping the cookie lightly on the surface will also help pop bubbles and smooth the surface.

Step 7: Add the Royal Icing Transfer
Once flooded, place a maple leaf transfer onto the icing and reposition with the scribe tool if needed. This creates a layered professional look without needing advanced piping skills. You can even go one step further and outline the cookie with red (or white) to make it pop even more.
Tips for Perfect Canada Day Sugar Cookies
A few small details can make a big difference when decorating sugar cookies. Here are my favourite tips for achieving professional-looking results:
- Make sure cookies are completely cool before decorating
- Use consistent icing thickness for clean results
- Make royal icing transfers ahead of time, and make extras in case of breakages
- Keep designs simple for the best visual impact
Video Tutorial
Watch me decorate this maple leaf cookie in real time in this short tutorial.
Make Ahead and Storage Tips
Sugar cookies are great for making ahead, as they have a good shelf life when stored correctly. If you’re a planner like me and like to prep ahead of a cottage weekend or Canada Day party, follow these storage tips:
- Decorated cookies keep well in an airtight container for up to 7 days
- Baked and decorated cookies can be frozen for up to 3 months.
- Individually package cookies to preserve for up to 2 weeks at room temperature or 6 months in the freezer
Whenever I make a batch of sugar cookie dough, I love to bake and freeze generic shapes, such as circles, to have on hand for last-minute decorating. Freeze in an airtight container and pull from the freezer as needed. Just allow to defrost fully before decorating, to ensure that excess moisture has time to disperse.
Canada Day Cookies FAQs
If you’re making sugar cookies for the first time, here are some answers to common questions that may help.
Royal icing transfers can be made several days or even weeks ahead and stored in an airtight container at room temperature. I recommend storing in layers on kitchen paper, away from direct light or heat.
Yes – my 2 ingredient vegan royal icing works beautifully for both flooding and transfers.
Royal icing consistency is key to achieving a smooth, flooded cookie. If your icing is a little too thick, add a few drops of water at a time and test again until the icing smooths itself out within 10-15 seconds. Air bubbles can also cause an uneven surface, so pop them immediately after flooding with a scribe tool or toothpick.
Canada Day Baking Inspiration
These decorated sugar cookies are part of my Canada Day Dessert Collection, featuring easy and festive summer recipes perfect for BBQs, cottage weekends, and family celebrations.
❤️ View the full dessert roundup for butter tarts, maple honeycomb, red and white desserts, and more.
More Cookie Decorating Ideas
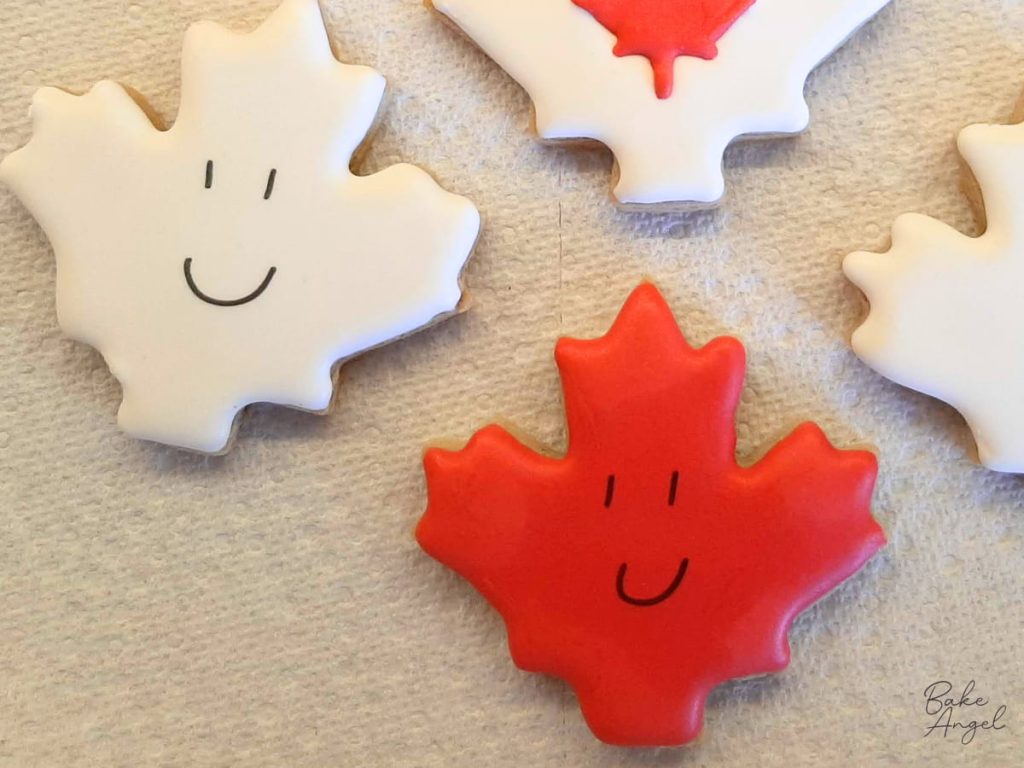
These cookies were part of a larger set of cookies that I made for a previous Canada Day celebration. Use edible markers to add cute faces to the cookies – ensure the icing is fully dry (at least 10 hours, preferably 24 hours) to avoid cracking the icing with the pen.
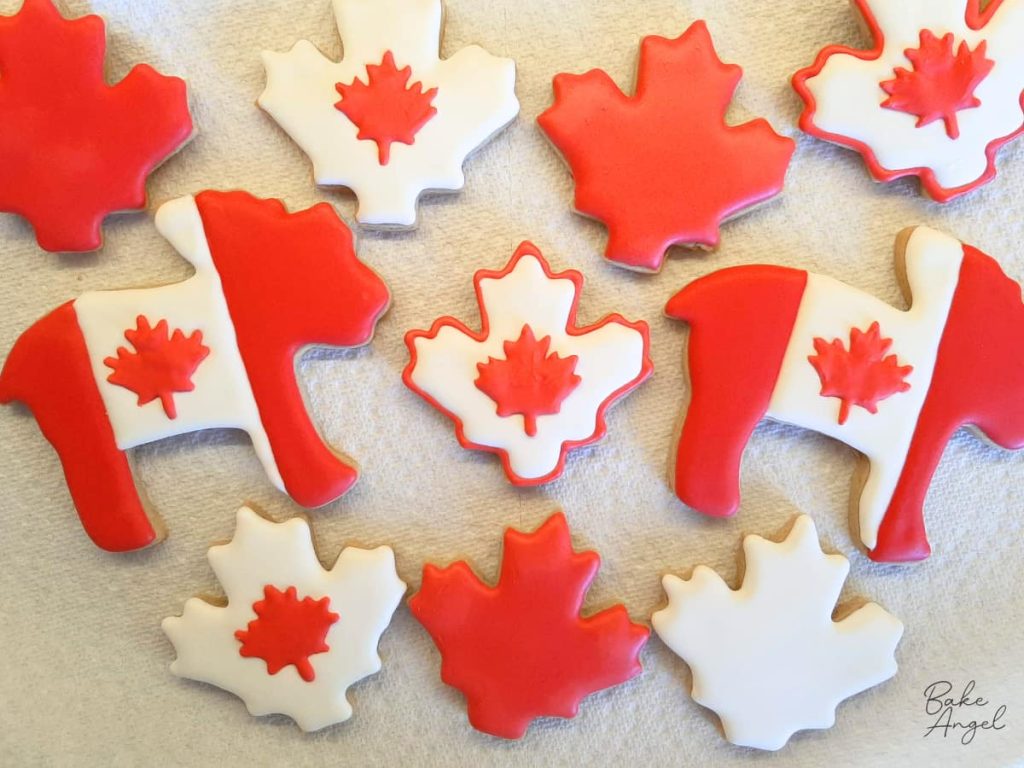
The cute moose cookie was inspired by Canada’s flag, and uses the same royal icing transfer technique. Check out the video tutorial to see how it was made.
And if you’re looking for more cookie decorating tips, check out my Cookie Decorating Basics post and Decorating Collection.
O Canada!
These Canada Day sugar cookies are a fun and creative way to celebrate the holiday. Whether you keep them simple with red and white icing or add a playful, fun face, they always bring a festive touch to any Canadian dessert table.
If you try this tutorial, I’d love to hear how your cookies turned out! Better yet, tag me on socials @itsbakeangel so I can see your finished designs.
Happy Decorating!


Leave a Reply