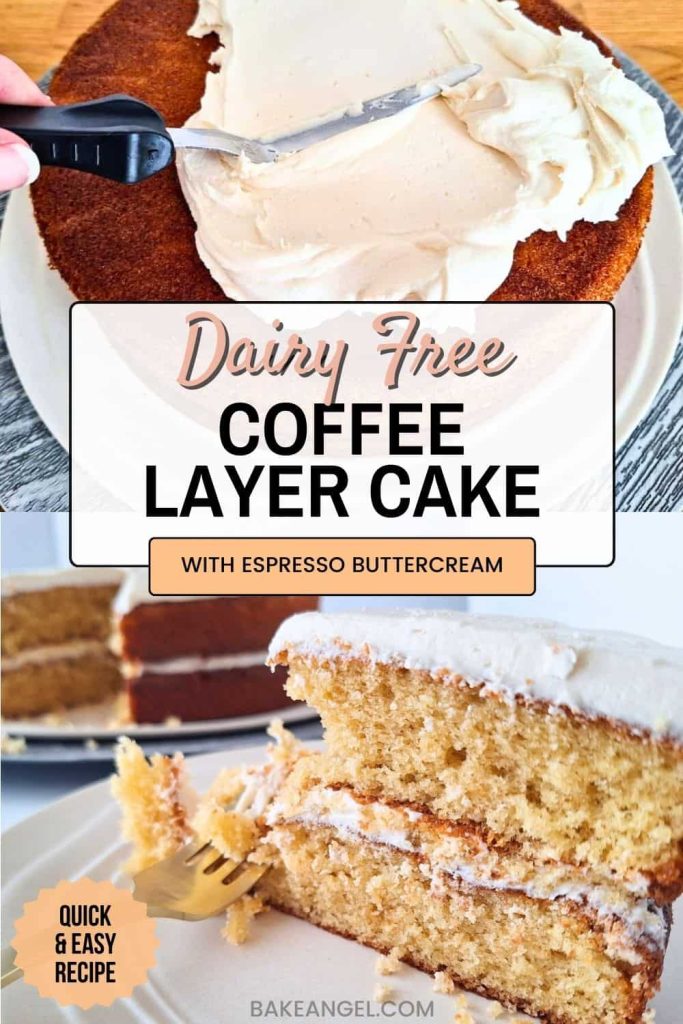
This easy dairy-free coffee maple layer cake is a family favourite that’s perfect for birthdays or afternoon tea. Moist, fluffy, and topped with creamy coffee buttercream, it’s a cake everyone will love. My eldest always asks for it on his birthday, and I’m so excited to finally share it with you!

March 2024: This recipe was originally published on April 19, 2022, and has been updated to include new photos and more helpful tips.
Why I Made This Recipe
This dairy-free coffee maple layer cake is a family favourite and a classic British bake that’s been passed down through generations. My mum always made it for us, and I’ve continued the tradition, updating it over the years to be allergy-friendly. If you love coffee-flavoured cakes, you’re going to adore this one!
A quick note for my North American readers: in Canada and the US, “coffee cake” usually means a cake served with coffee – but it often doesn’t include any coffee! We’re sticking with the classic British version, which is rich, moist, and full of coffee flavour.
Why You’ll Love This Cake
This is a classic recipe which is full of flavour, perfectly moist, and so scrumptious that you might find yourself going back for a second slice! Even my non-baking hubby has successfully made this cake, so if he can do it, so can you.
Here’s why this cake is so great:
- Quick and simple: Uses a one-bowl mixing method, perfect for busy bakers.
- Versatile: Swap out the coffee for vanilla or butterscotch for a new twist.
- Perfect for any occasion: Ideal for birthdays, afternoon tea, or celebrations.
- Family-friendly: Loved by kids and adults alike.
- Adaptable for dietary needs – easily made egg-free or gluten-free.
Ingredients and Substitutions
Here’s everything you need to make this easy dairy-free coffee maple layer cake, along with helpful tips and substitutions for vegan, egg-free, or gluten-free baking.
I’ve created this recipe in grams with US cups included for convenience. Using a scale is highly recommended, as it ensures consistent results every time.
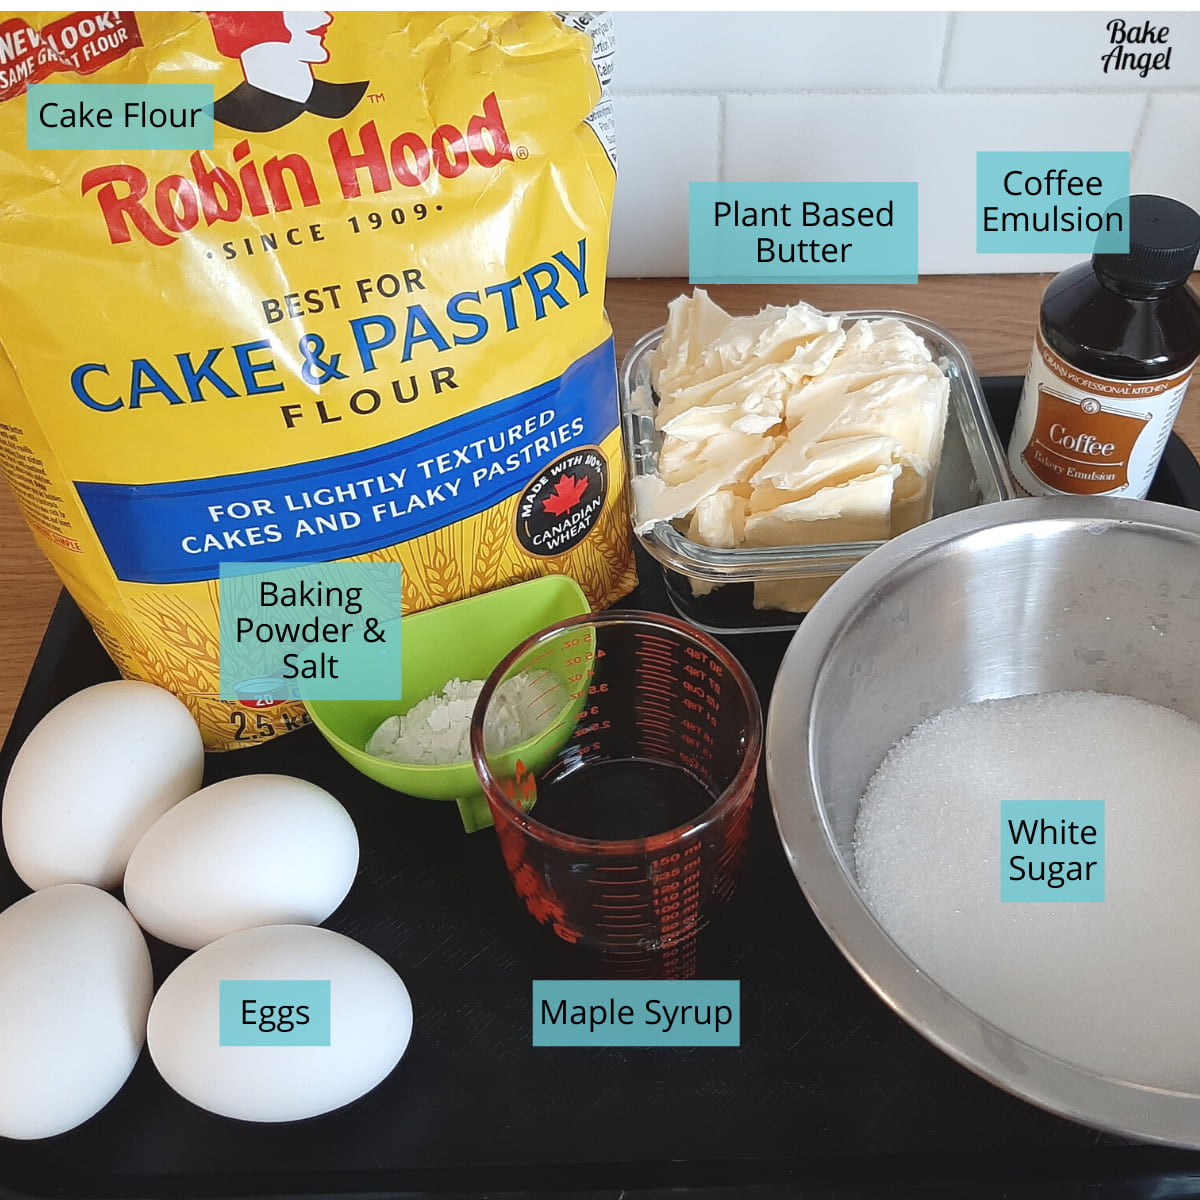
Dry Ingredients
Cake Flour: Creates a light and fluffy texture thanks to its lower protein content. If you don’t have cake flour, you can make your own by replacing 2 tablespoons of all-purpose flour with 2 tablespoons of cornflour and sifting it twice. For gluten-free, swap the all-purpose flour for a 1-to-1 gluten-free blend. Check out this full Homemade Cake Flour guide for more info.
Baking Powder: Gives the cake lift and a soft, airy crumb.
Salt: Balances sweetness and enhances all the flavours in the cake.
Sugar: Provides sweetness and structure. For a subtle caramel note, golden or light brown sugar works beautifully.
Wet Ingredients
Plant-Based Butter: Adds richness and moisture while keeping the cake dairy-free. Can be substituted with neutral oil or regular unsalted butter if you’re not dairy-free.
Eggs: Provide structure, moisture, and leavening. For an egg-free option, use flax eggs (4 tbsp flax meal mixed with 180 ml (12 tbsp) of water). Applesauce (my usual egg replacement) is not recommended here due to extra moisture.
Maple Syrup: Adds a natural sweetness and complements the coffee flavour. If you prefer, swap with 50ml plant-based milk.
Coffee Emulsion: Gives a concentrated coffee flavour and a gorgeous colour. Brewed espresso or strong coffee can be used as a substitute.
How to Make Coffee Layer Cake
This easy dairy-free coffee maple layer cake comes together quickly. Make sure your butter and eggs are at room temperature, and your oven is preheated. Greasing and lining your pans with parchment will help the cakes release easily once baked.
Making the Cake Batter
Add butter, sugar, maple syrup, and eggs to your mixing bowl.

Mix on low speed with the paddle attachment just until combined – overmixing can make the cake dense.
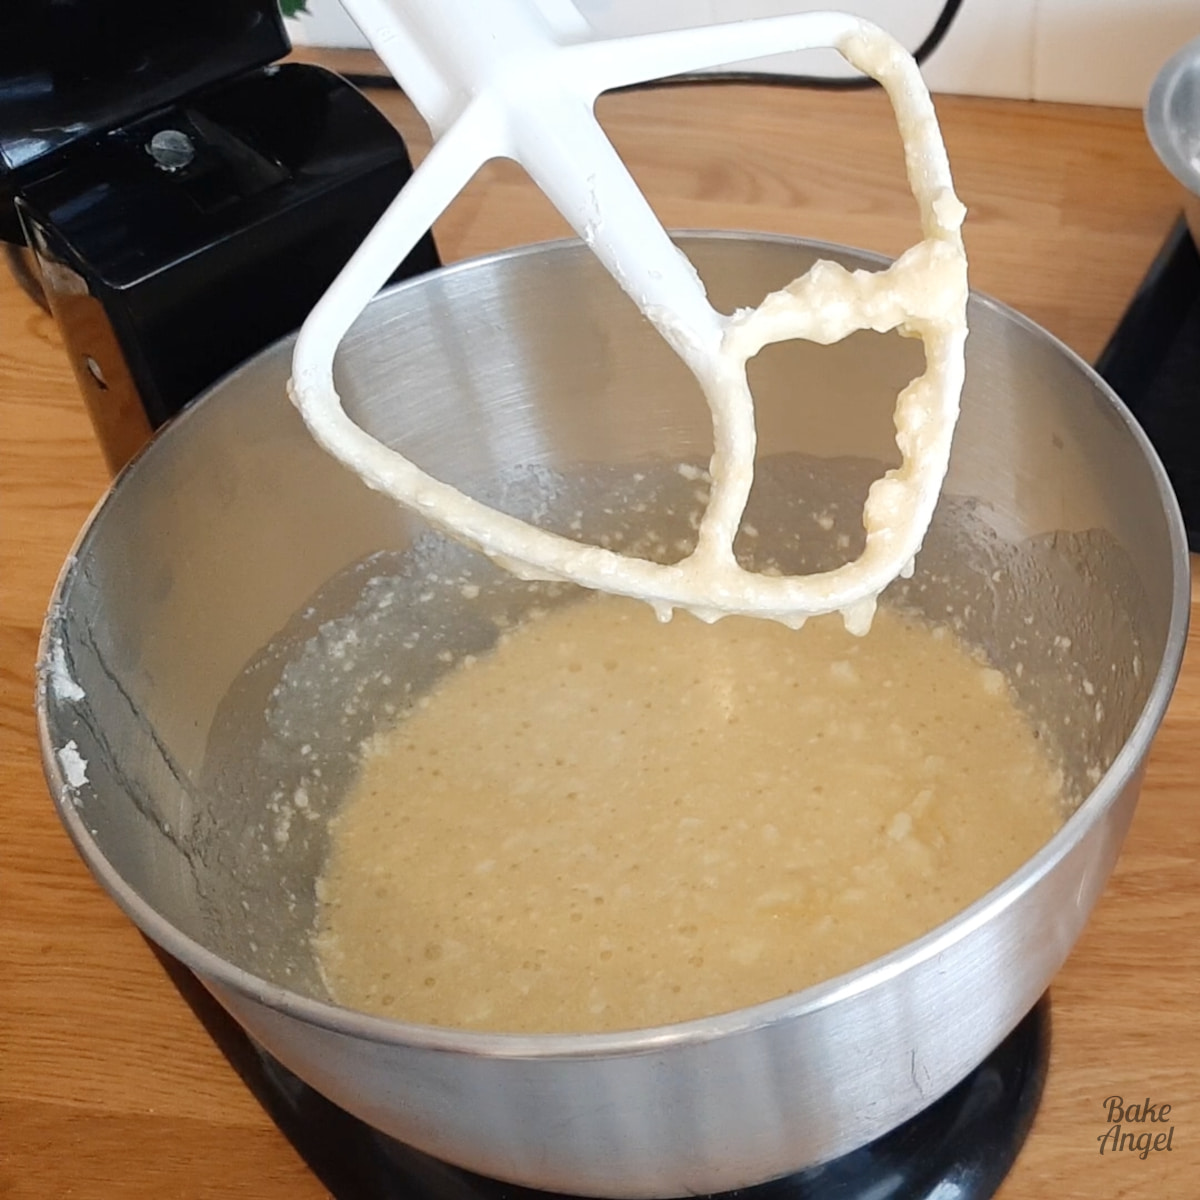
Add the dry ingredients: salt, baking powder and cake flour. For flavouring, add coffee emulsion. This will give us that amazing coffee aroma and also a gorgeous, rich colour to our batter.

Mix gently until the batter is light and homogeneous.

Baking the Cake
Divide the batter evenly between two nine-inch cake pans.

Smooth the tops with a spatula and gently tap the pans on the counter a few times to remove any air bubbles.

Bake at 350 Fahrenheit for about 25 minutes – keep an eye on the cakes around the 22-minute mark in case your oven runs a little warmer.
The cakes will be well risen, slightly golden and springy in the centre. Let the cakes cool completely in the pans before turning them out onto a cooling rack.

Coffee Buttercream Filling
To make the gorgeous filling and topping for this cake, we’re using my coffee buttercream frosting recipe. With just 3 simple ingredients (espresso coffee, icing sugar and plant-based butter), you will fall in love with the buttercream.
Whip the butter for 30 seconds, then add half the icing sugar, whip again, then add the remaining icing sugar and espresso. Seriously, it’s that easy, takes 5 minutes and makes the perfect filling and topping for this cake.

Levelling the Cake
Level the cakes, if necessary. Most bake fairly flat, so this is a personal preference.
I like to use a wire cake leveller to level my cakes and use the offcuts to make cake pops (or just eat them with some buttercream).

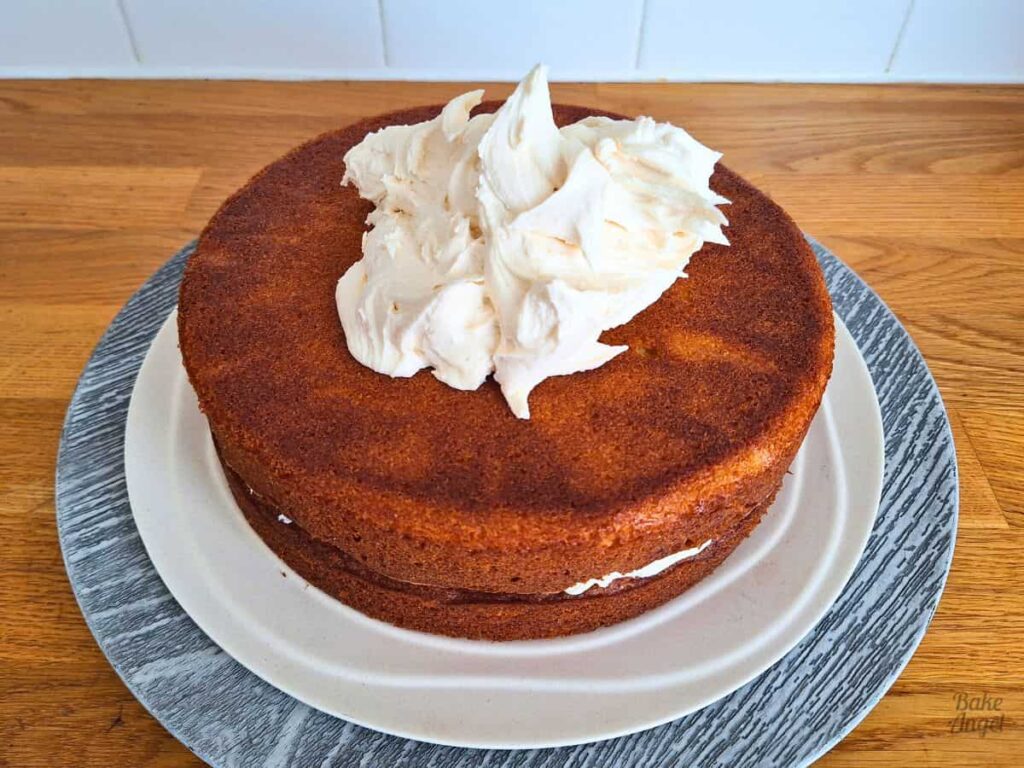
Our layers are levelled and ready to stack.

Decorating the Cake
Place one cake layer on a serving plate or cake board with a small amount of buttercream underneath to hold in place. Using an offset spatula, spread coffee buttercream all over the top of the first layer.
Don’t worry if you get crumbs in the buttercream at this stage – no one is going to see it until it’s cut.

Place the second layer on top, crumb side down to hide the loose crumbs. This gives a cleaner finish when we add the buttercream.

Let’s just pause and look at the buttercream peeking out of the side. I love the rustic style of this cake and that rich golden colour.

Add a generous dollop of buttercream on top. More is better at this stage, as you are less likely to touch the cake when you are spreading the buttercream, which also reduces crumbs in the frosting.
Spread the buttercream across the top of the cake with an offset spatula. Don’t worry about perfection here!

I went for a simple, rustic look.

Don’t want buttercream on top? Dust the top with icing sugar instead. This is the traditional British way to decorate coffee cake, and great if you want to cut back on the buttercream. Check out the video in the recipe card for this style of decorating.
Storage and Freezing
This cake is best enjoyed on the day of baking for the best flavour and texture. It also stores well if you need to save some for later.
Storage: Store in an airtight container at room temperature for 2 to 3 days. If your kitchen is warm or humid, place the container in the fridge.
Freezer: Wrap individual slices in plastic wrap and place in a freezer-safe container for up to 3 months. Allow to defrost at room temperature before removing the plastic wrap, then serve.

Flavour Variations
This is my go-to basic dairy-free layer cake recipe, and you can easily switch up the flavouring with a couple of easy substitutions.
- Vanilla Cake: Sub the coffee essence with 1 tbsp vanilla bean paste and use water or plant-based milk instead of the maple syrup. For vanilla buttercream, use 1tsp vanilla bean paste instead of coffee essence. Fill with jam for a classic Victoria Sponge Cake.
- Butterscotch Cake: Swap the white sugar for 200g golden yellow sugar and add 1 tbsp vanilla bean paste instead of the coffee essence. Omit the maple syrup and add 50 ml plant-based milk. Pair with the buttercream from my butterscotch slab cake.
Coffee Cake FAQs
This cake makes 8 generous slices (triangular) or 16 regular-sized slices. You can also make about 12 cupcakes with this recipe. Reduce baking time to 18-22 minutes.
Yes! Simply weigh out 240 grams of all-purpose flour, remove 2 tablespoons and replace it with 2 tablespoons of cornflour. Sift twice to ensure it is incorporated fully.
Absolutely. This recipe already uses plant-based milk and butter. Replace the eggs with 4 flax eggs (4 tbsp flax meal mixed with 180 ml (12 tbsp) of water). Read more about egg substitutions in this comprehensive guide.
Yes. Replace the all-purpose flour with your preferred gluten-free blend. Remove 2 tablespoons and replace with 2 tablespoons of cornflour to create the cake flour substitute. Sift well to ensure a light texture.
Traditionally, walnuts can be added on top for decoration. We usually avoid nuts, but you can fold them into the buttercream or sprinkle them on top if you like.
Absolutely! Brew your favourite coffee pod, measure 3 tablespoons (2 for the cake, 1 for the buttercream) and enjoy the rest as you bake.
Doesn’t this slice get your tastebuds going? With the perfect ratio of buttercream and cake, plus the right amount of sweetness from the espresso, it’s pure perfection.

More Classic British Cake Recipes
If you loved this recipe, you might enjoy these family favourites:
- Vanilla Layer Cake with scrumptious buttercream (vegan) – a soft, fluffy classic.
- Mini Victoria Sponge Cakes (dairy-free) – perfect for afternoon tea or little celebrations.
- Butterscotch Sheet Cake (dairy-free) – a rich and buttery crowd pleaser for any occasion.
- Chocolate Fudge Slab Cake (DF, GF) – indulgent, fudgy, and allergy-friendly.
If you make this coffee maple layer cake, please leave a comment to share your thoughts. I love hearing from you, and your feedback helps me improve and create more delicious allergy-friendly recipes. Happy Baking!

Easy Dairy-Free Coffee Maple Layer Cake
Equipment
- Stand Mixer (can use a hand mixer)
- Cake Leveller (can use a knife if preferred)
Angela’s Top Tip
Weigh your dry ingredients in grams with a scale for best results!
Ingredients
For the Coffee Cake
- 240 grams Plant Based Butter (unsalted) (8 tbsp or 1 US Cup plus 1 tbsp)
- 200 grams White Sugar (1 US Cup)
- 50 ml Maple Syrup (3 tbsp + 1 tsp)
- 4 Eggs
- 2 tsp Baking Powder
- 0.5 tsp Salt
- 240 grams Cake Flour (2 US Cups – see note)
- 30 ml Coffee Emulsion (2 tbsp – see notes)
For the buttercream:
- 350 grams Icing Sugar (3 US Cups – divided)
- 150 grams Plant Based Butter (unsalted) (1 1/3 sticks)
- 15 ml Espresso Coffee (1 tbsp)
Instructions
Prep:
- Preheat oven to 350°F (175°C). Remove butter and eggs from the fridge to bring to room temperature.
- Grease and line two 9-inch cake pans with parchment paper.
Make the Cake:
- Mix 240 grams Plant Based Butter (unsalted), 200 grams White Sugar, 50 ml Maple Syrup, and 4 Eggs until just combined. Do not overmix.
- Add 240 grams Cake Flour, 2 tsp Baking Powder, 0.5 tsp Salt, and 30 ml Coffee Emulsion. Mix until smooth.
- Divide the batter evenly between the pans and tap them on the counter a few times to remove any air bubbles.
- Bake 22–25 minutes, until lightly golden and springy in the centre.
- Cool completely before removing from the pans.
Buttercream
- Whip 150 grams Plant Based Butter (unsalted) for 30 seconds, then add half of the 350 grams Icing Sugar. Pulse a few times to incorporate, then whip for 30 seconds.
- Add the remaining icing sugar and 15 ml Espresso Coffee and whip for another 30 seconds, until light and fluffy.
Fill and Frost
- Level the cakes if needed. Use the offcuts to make cake pops (or just eat them with some buttercream).
- Place one layer on a serving plate or cake board. Spread buttercream over the cake, then place the second layer on top, crumb side down.
- Add remaining buttercream to the top and spread with an offset spatula.
- Slice and serve.
Video
Notes
- Yield: 8 generous slices or 16 smaller slices. Makes approx 12 cupcakes – reduce baking time to 18-22 minutes.
- Coffee Substitute: Replace coffee emulsion with 3 tbsp of strong brewed espresso (2 for the cake, 1 for the buttercream) and then drink the rest.
- Cake Flour: To make cake flour, weigh 240 grams all-purpose flour, remove 2 tbsp and replace with 2 tbsp of cornflour. Sift twice to fully incorporate. Check out my full post on cake and pastry flour.
- Egg Free Option: Use 4 flax eggs (4 tbsp flax meal mixed with 180 ml (12 tbsp) of water).
- Gluten Free Option: Measure 240 grams of GF 1-to-1 Baking Blend flour, remove 2 tablespoons and replace with 2 tablespoons of cornflour. Sift two times.
- Storage: Store in an airtight container at room temperature for 2-3 days.
- Freezing: Wrap each slice in plastic wrap and freeze in an airtight container for up to 3 months. Allow to defrost at room temperature before serving.


This coffee cake came out perfect and so moist! I just love that there are so many dairy free options available – might just have to make this again for my own birthday this year!
So pleased that you enjoyed it Lauren!
I am loving the flavor of this delightful and delicious cake. I can’t wait to make one. Yum!
Thanks Andrea – its so good! Hope you enjoy it.
Fantastic recipe. I made this for a brunch I hosted and it was a huge hit. Everyone asked for the recipe. Thanks for sharing and adding such a unique addition to my brunch.
Holly, I’m so happy to hear that. It’s a great cake for brunch.
This was delicious! The combination of coffee and maple is so yummy and that coffee buttercream…WOWZA!
Thanks Kimberly! The buttercream is my favourite part as well.
I love anything coffee infused. So this cake is a win for me. Thanks!
Thanks Ann!
This is my absolute favourite cake! Just made it for the third time and it’s always perfect.
So happy to hear that – it’s our favourite too!
Sending Birthday Wishes from Cape Town.✨
May your day be filled with the happiest of memories and of course a delicious cake 🎂