This vegan vanilla layer cake is soft, fluffy, and perfect for birthdays, kids’ parties, or any small celebration. Topped with smooth dairy-free buttercream and colourful sprinkles, it’s beginner-friendly and easy to make. Whether you’re new to baking or looking for a reliable go-to vanilla cake, this recipe has you covered. Not vegan? No problem – I’ve included substitution tips so everyone can enjoy it!

Post updated on November 5, 2025, to add more helpful content and tips from my kitchen.
History of Vanilla Cake: From Europe to Your Kitchen
Vanilla cake is one of the most classic and iconic cake flavours, dating back to at least the 17th century. Europeans were among the first to make sponge cakes thanks to early oven technology. Hernán Cortés introduced vanilla to Europe from Central America in the 16th century, and Mexican vanilla is still regarded as one of the highest-quality and most expensive spices worldwide.
Over time, vanilla cakes have become a staple for celebrations, from birthdays to weddings. Its versatility and neutral yet rich flavour make it a perfect canvas for frostings, fillings, and decorations.
Cake Ingredients and Substitutions
I always weigh ingredients for perfect results, but US cup equivalents are included in the recipe card. This section includes detailed ingredient notes and substitution ideas to ensure your cake comes out perfectly every time.
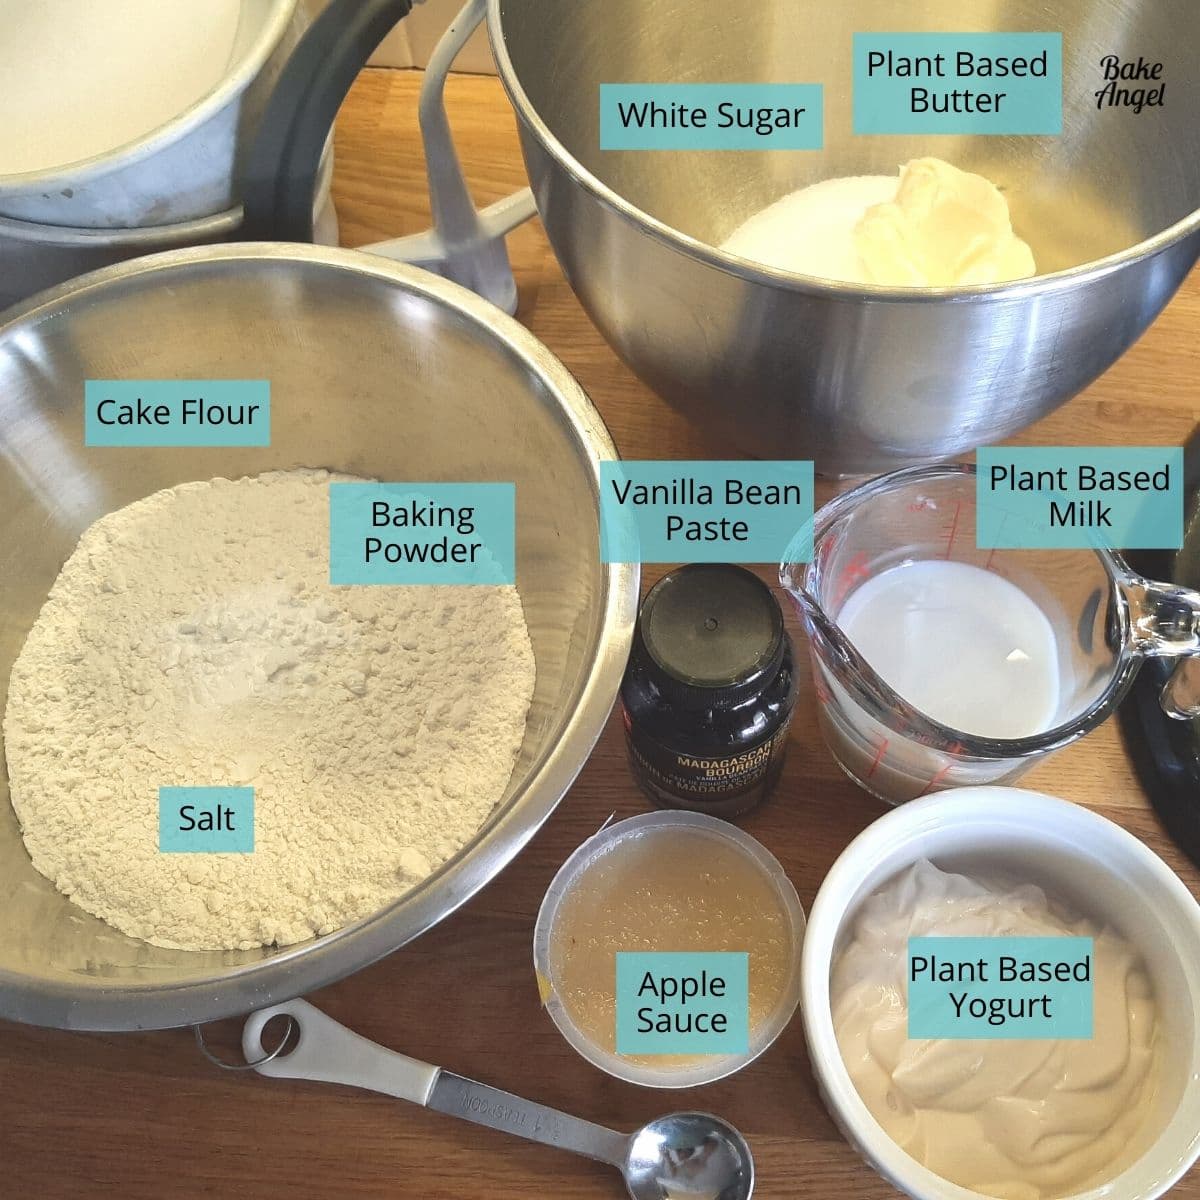
Dry Ingredients
- Cake Flour: Low-protein cake flour produces a soft, tender crumb. To make your own: weigh 200g all-purpose flour, remove 1.5 tbsp, replace with 1.5 tbsp cornflour, and sift twice. Check out this handy guide to make your own cake flour, including a gluten-free option.
- White Sugar: Adds sweetness and structure. You can substitute with golden sugar or light brown sugar for a mild caramel undertone. Coconut sugar works too, though it may darken the cake slightly.
- Baking Powder & Salt: Baking powder gives the cake lift; salt balances sweetness and enhances flavour.
Wet Ingredients
- Plant-Based Butter: Unsalted, room temperature for creaming. Substitutes: canola oil, coconut oil, or regular unsalted butter if not vegan. Avoid tub butter as extra water affects the texture.
- Apple Sauce: Main binding agent, replacing 2 eggs. Alternative egg substitutes include flaxseed meal or chia eggs. Learn more about egg substitutions in my comprehensive post.
- Plant-Based Yogurt & Milk: Almond yogurt and milk create a light crumb and soft texture. Use soy, oat, or coconut milk if preferred. Dairy milk or yogurt also works if not vegan.
- Vanilla Bean Paste: Adds flavour depth and enhances the cake’s colour. Vanilla extract is a suitable alternative; try almond or lemon extract for a twist.
Pro Tip: Measuring by weight ensures consistent results. Lightly scoop cups if using volume measures to avoid dense cake layers.
Buttercream Ingredients and Substitutions
For this cake, we’re making my favourite creamy vegan vanilla buttercream – completely dairy-free and egg-free, yet still rich, smooth, and perfect for piping or coating layer cakes.

Plant-Based Butter: Use unsalted vegan block butter at room temperature – it creates the best structure for spreading and decorating. Avoid soft “tub-style” butters since they contain more water and can make your frosting too loose. Not vegan? Traditional unsalted butter works just as well.
Plant Based Milk: A splash of almond milk adds lightness and helps the buttercream whip up beautifully. Any neutral dairy-free milk will do (like oat or soy), or use regular milk if you’re not dairy-free.
Icing Sugar: Choose icing sugar with a fine texture so it blends smoothly. If it isn’t pre-sifted, pass it through a sieve first to avoid lumps in the final frosting.
Salt: Just a pinch makes a big difference – it balances the sweetness and brings out the vanilla flavour.
Vanilla Bean Paste: Gives the buttercream that classic bakery-style vanilla taste and pretty flecks throughout. Vanilla extract or even a different flavouring can be used if you want to switch things up.
How to Make Vegan Vanilla Cake
Making this vegan vanilla layer cake is wonderfully simple, especially if you’re using a stand mixer to handle all the hard work for you. We’ll be baking three soft and fluffy vanilla layers using just 9 pantry-friendly ingredients.
Preheat your oven to 350°F / 170°C and grease/line three 8-inch round cake pans. Then, using a stand mixer with the paddle attachment (or a handheld mixer), cream together the plant-based butter and sugar on medium speed for 2–3 minutes until light and fluffy.
Add the apple sauce, yogurt and vanilla bean paste and mix to combine. This batter may look slightly curdled at this stage, but don’t worry, that is completely normal in vegan baking, and everything will come together beautifully once the dry ingredients are added.
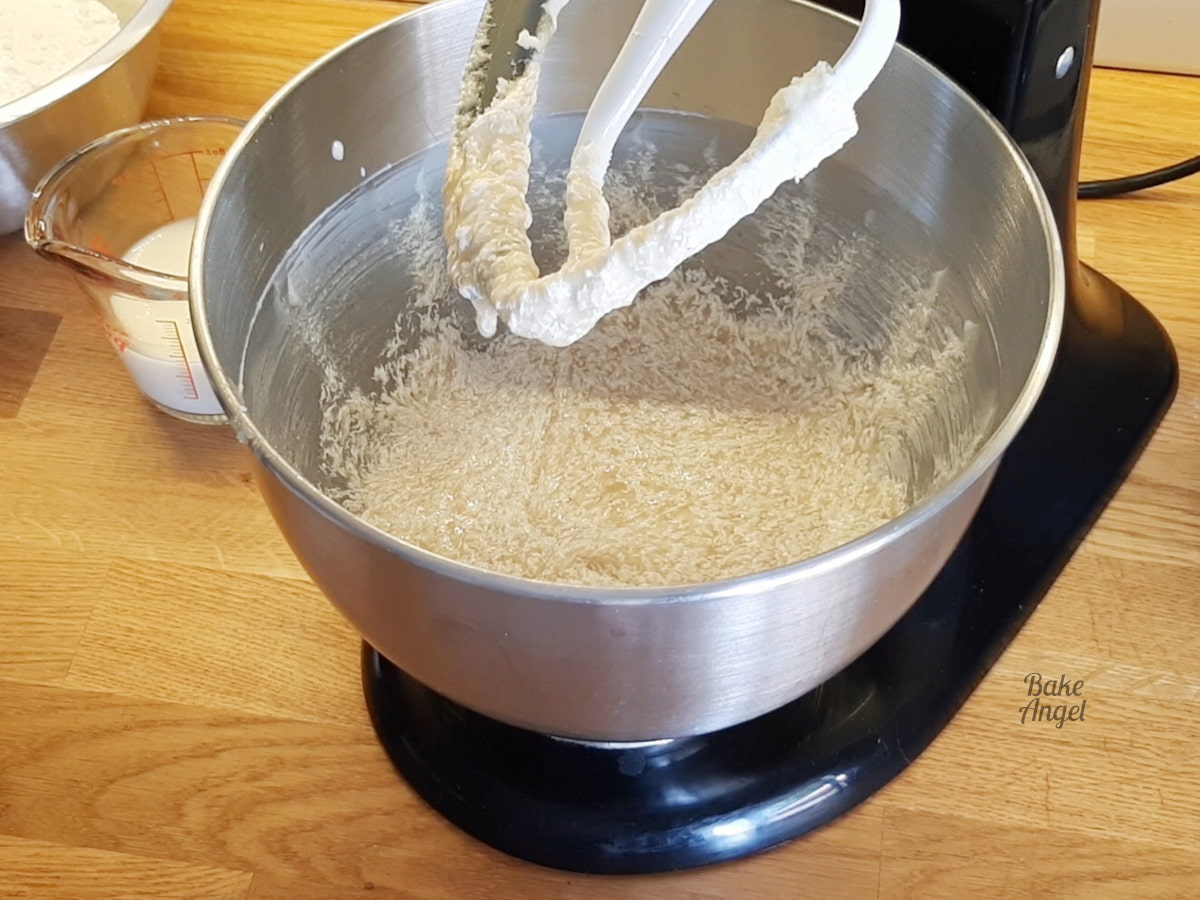
In a separate bowl, stir together the flour, baking powder and salt. Add about a quarter of the dry mixture to the mixing bowl and blend until just incorporated.
Follow with a splash of milk, mixing after each addition and continue alternating until everything is just combined. Make sure to scrape down the bowl at least once to ensure everything is fully combined.
Top Tip: Avoid overmixing – this helps keep the cake soft and fluffy.
Use an ice cream scoop or a large spoon to evenly distribute the batter into the three prepared pans.
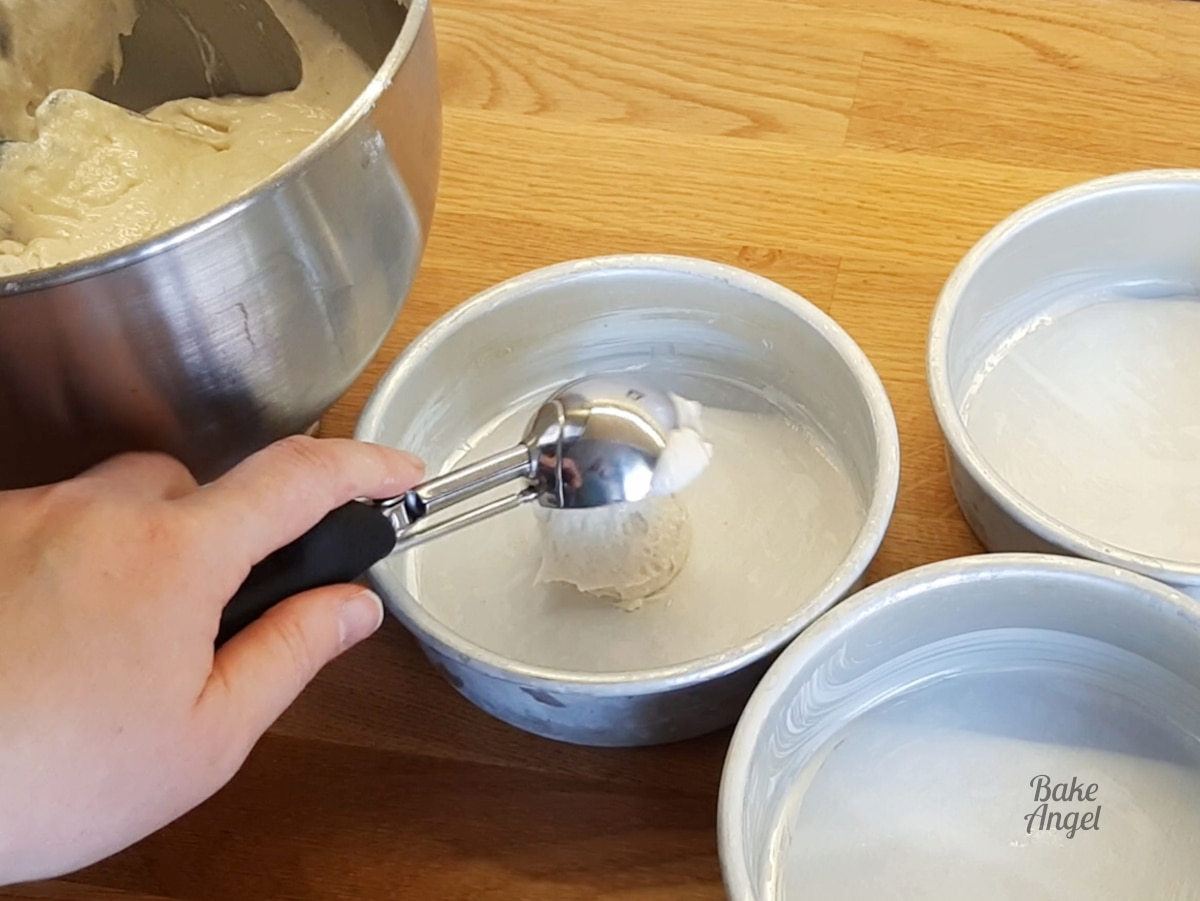
Level the tops gently, then tap the pans with your hand or on the counter to release any trapped air bubbles.
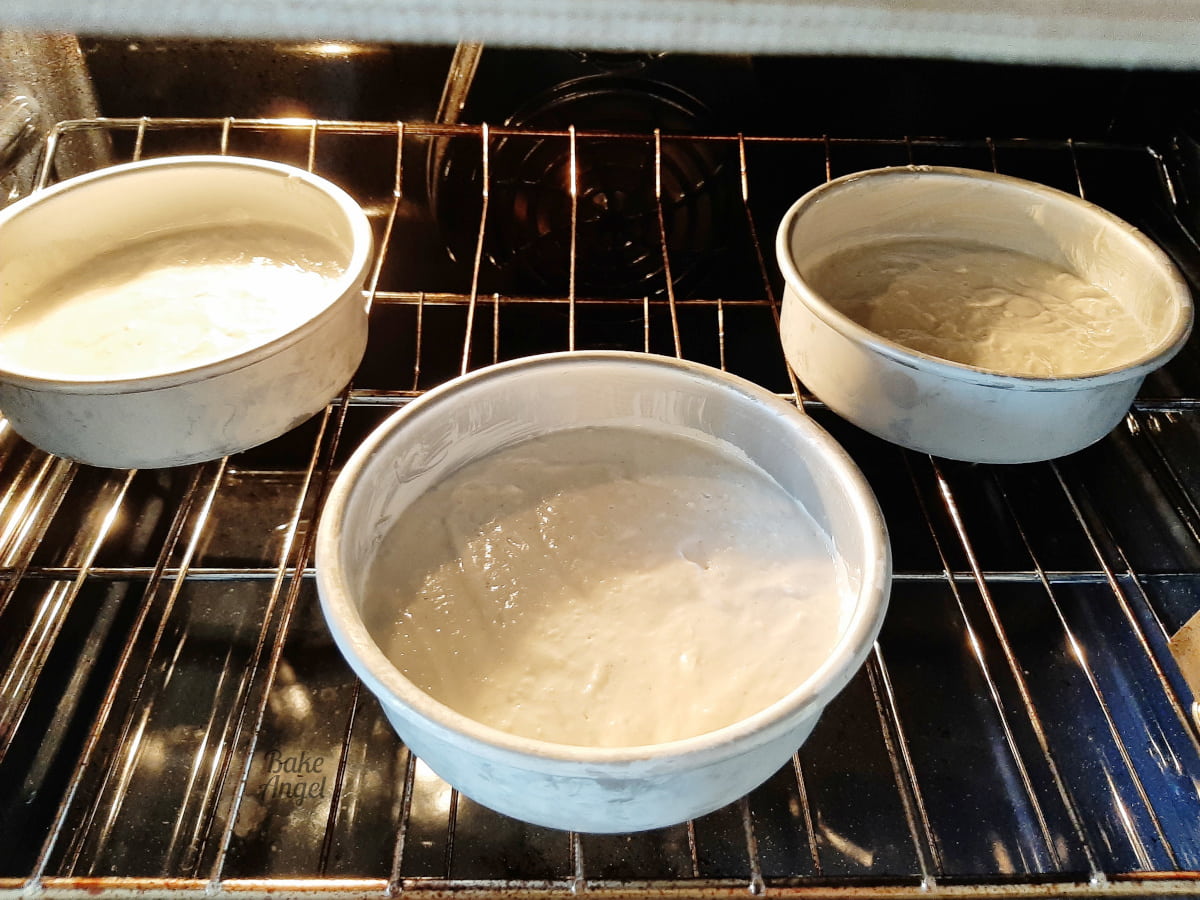
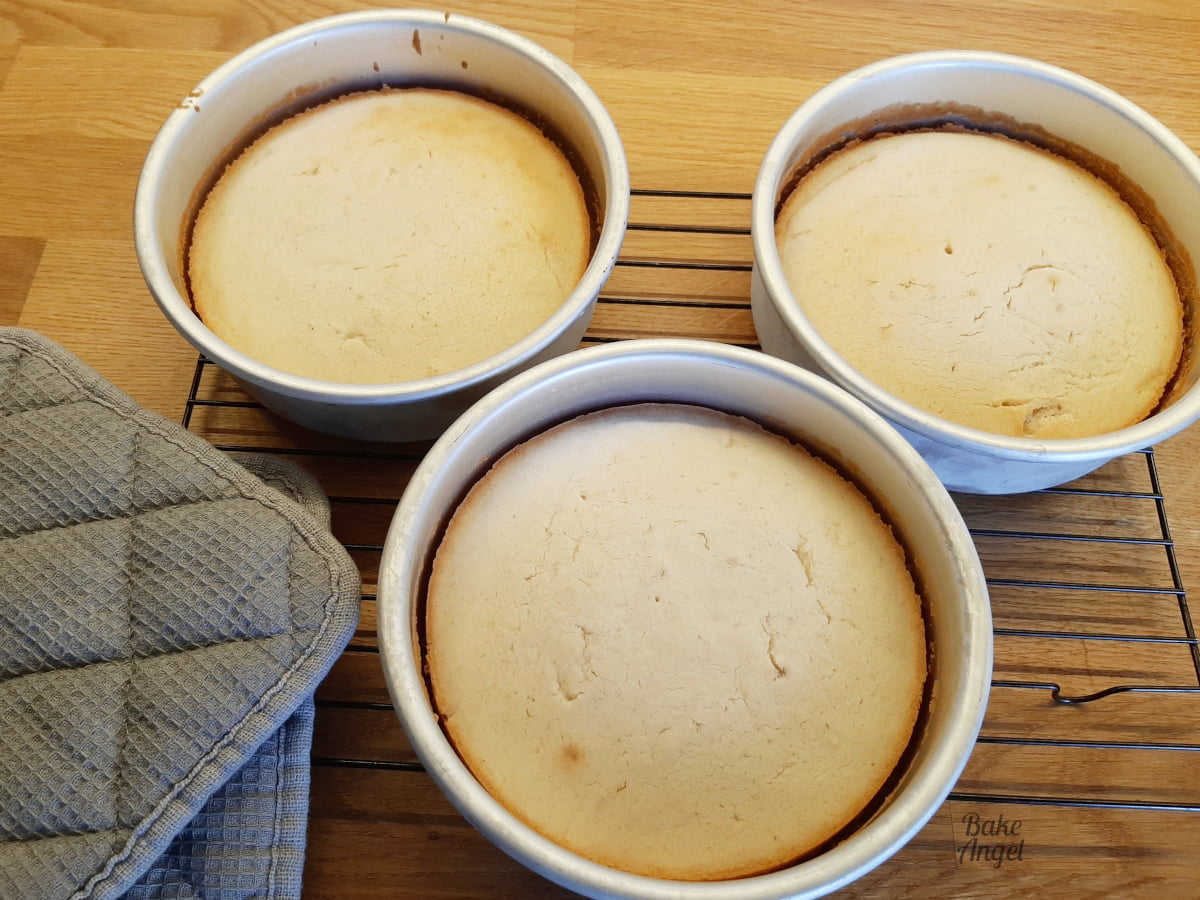
Bake at 350°F / 175C°C for 20-25 minutes until the cakes are lightly risen, pale but set and slightly pulling away from the sides of the pan. You can also do the toothpick check, which will come out clean once they are baked.
Let the cakes cool in their pans for 10 minutes, then transfer to a rack to cool completely before frosting.
Vegan Vanilla Buttercream: Easy & Silky
This is just the most gloriously silky smooth buttercream, and I absolutely adore using it with my baked goods. It is perfect for covering cakes and also works well for piping.
Start by adding the room temperature vegan block butter to the bowl of your stand mixer. Using the paddle attachment, beat the butter on medium speed for about 2 minutes, or until it becomes noticeably lighter in colour and creamy in texture. (Using the paddle helps avoid adding unnecessary air, which can create large air pockets in your final coating.)
Next, mix in the salt and half of the icing sugar. Once fully combined, continue to add the remaining icing sugar along with the vanilla bean paste and a little plant-based milk to loosen and smooth out the buttercream. Increase to medium-high speed and whip just until everything is fully combined and silky.
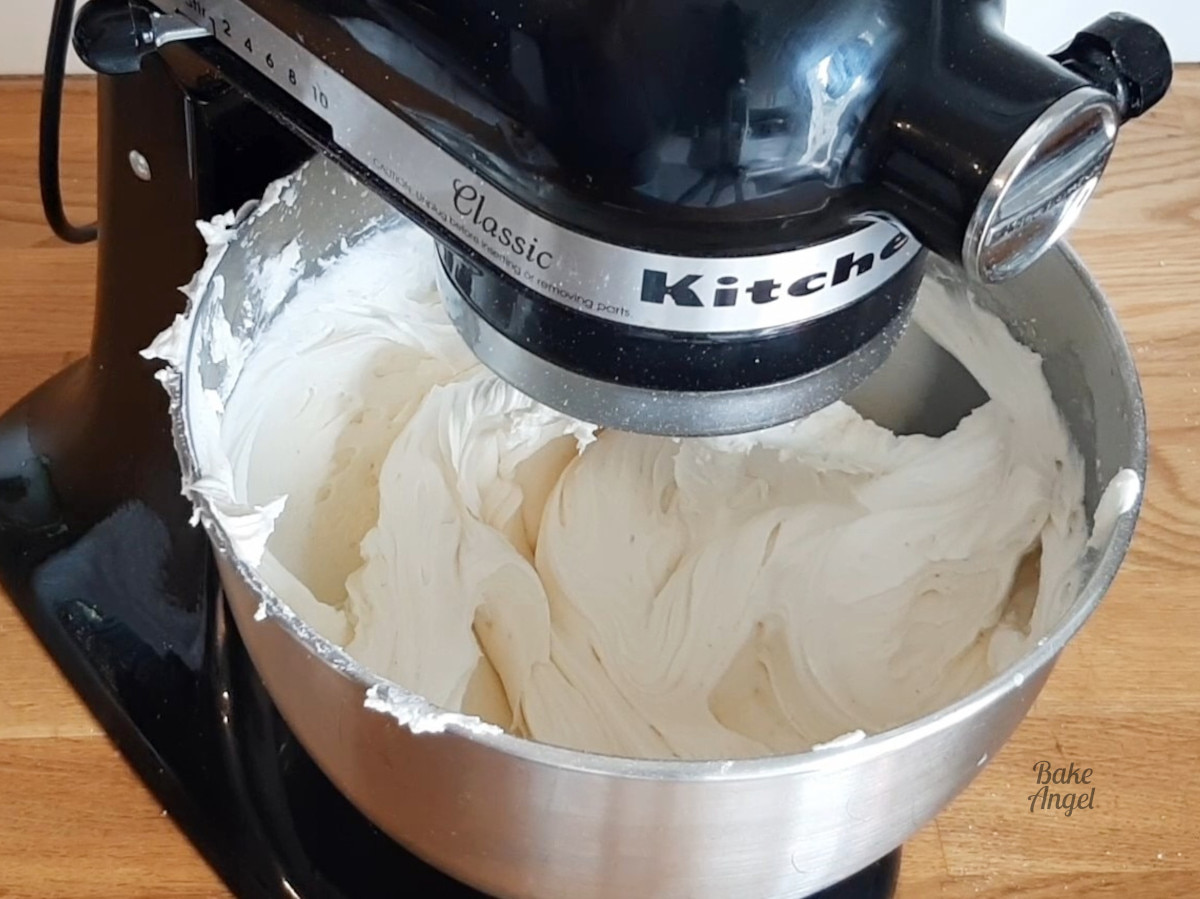
Your finished buttercream should be smooth, pale, and easy to spread. This recipe yields a little over 830g of frosting, which is plenty to fill and cover all three cake layers with some left over for simple decorations.
Filling & Stacking the Cake
Decorating a layer cake doesn’t have to feel overwhelming – especially when working with buttercream, which is wonderfully forgiving and easy to adjust as you go. While perfectly smooth sides are always an option, a relaxed, textured finish is just as beautiful and very on-trend.
Set your cake up on a turntable to make rotating easier and reduce arm strain. Lifting the cake slightly (using a cake stand or riser) will help you reach the bottom edges cleanly. If your cake layers have the slightest dome, you can level them with a serrated knife or cake leveller – although this recipe typically bakes nice and flat, so you may not need to.
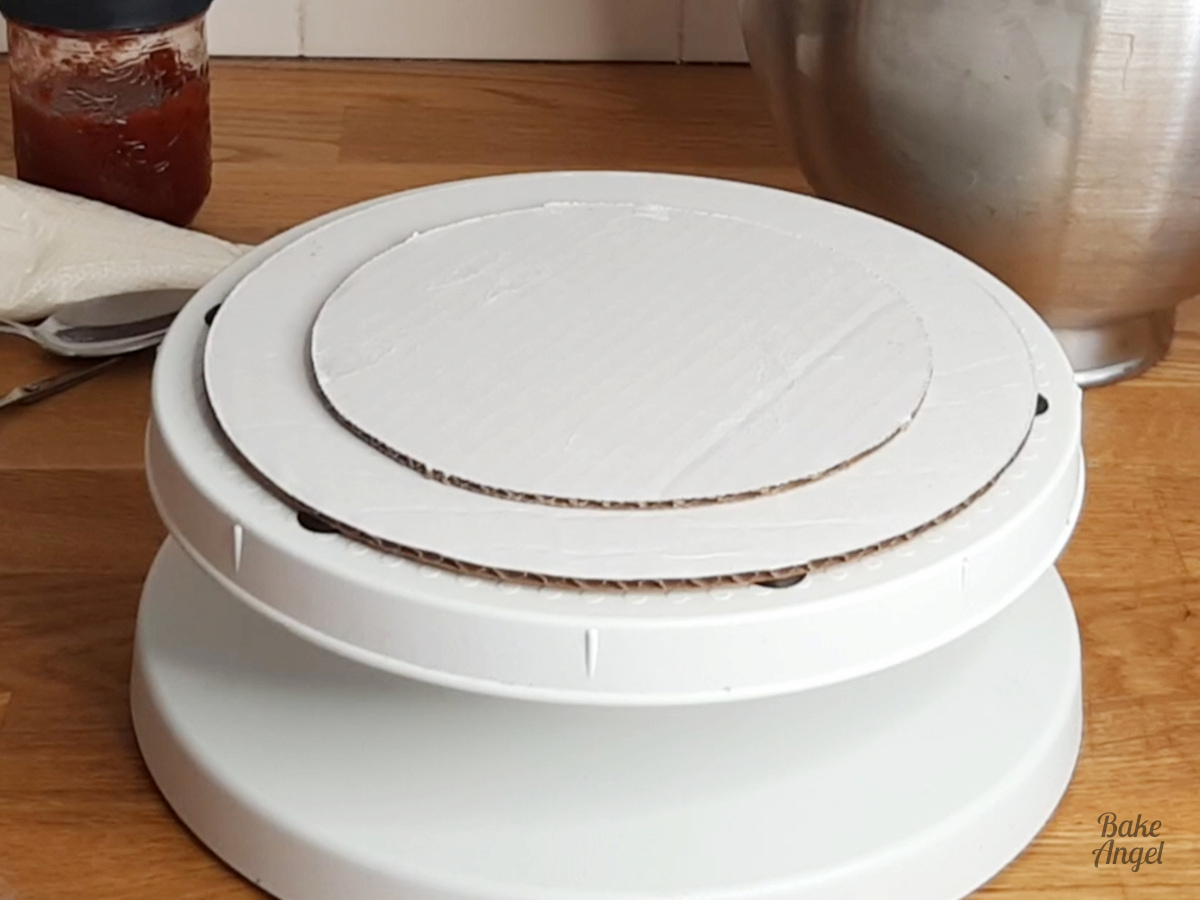
Spread a small dab of buttercream onto your cake board and place the first layer centred on top – this keeps the cake from sliding.
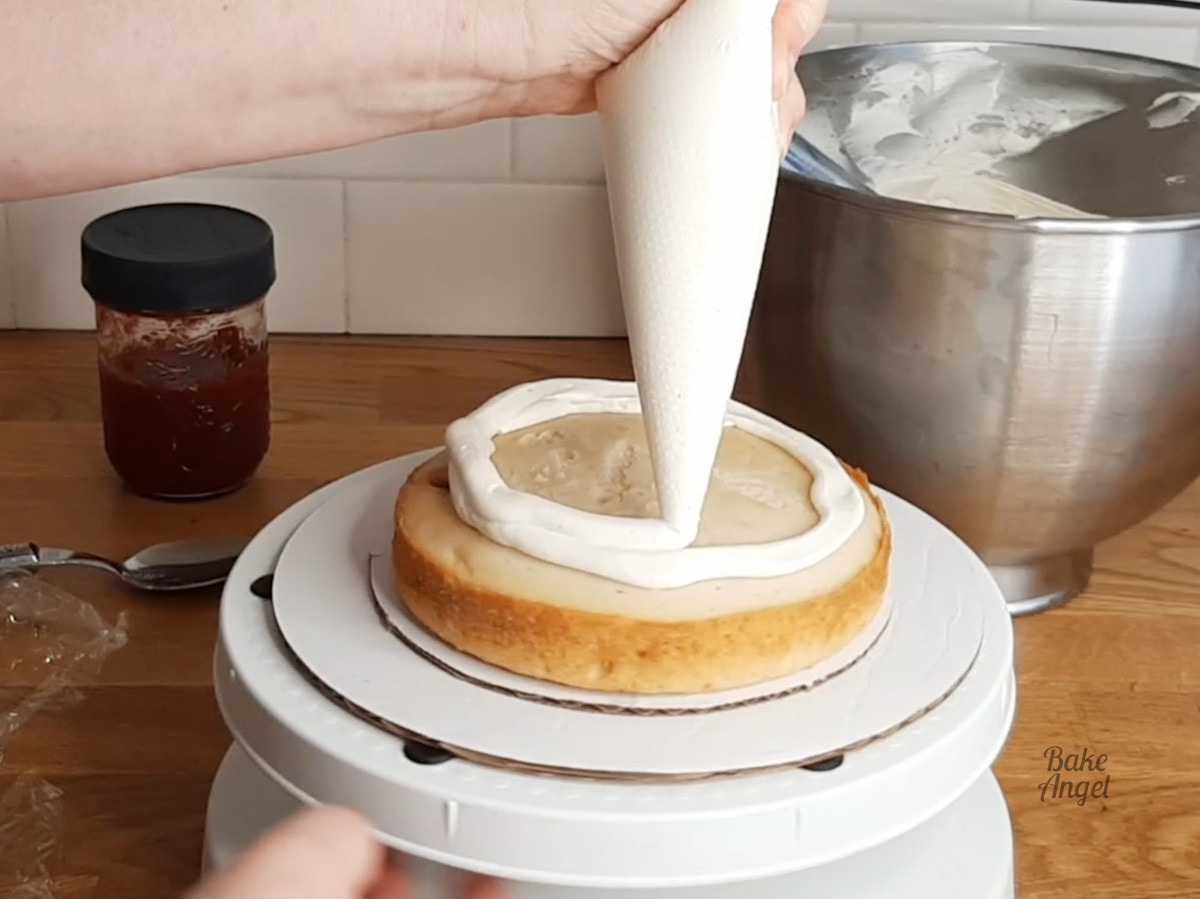
Pipe a buttercream dam around the edge of the cake and fill the centre with jam. You can alternate fillings if you like, but I’m a classic strawberry jam and buttercream girl through and through. Try my super-easy 2-ingredient jam recipe here.
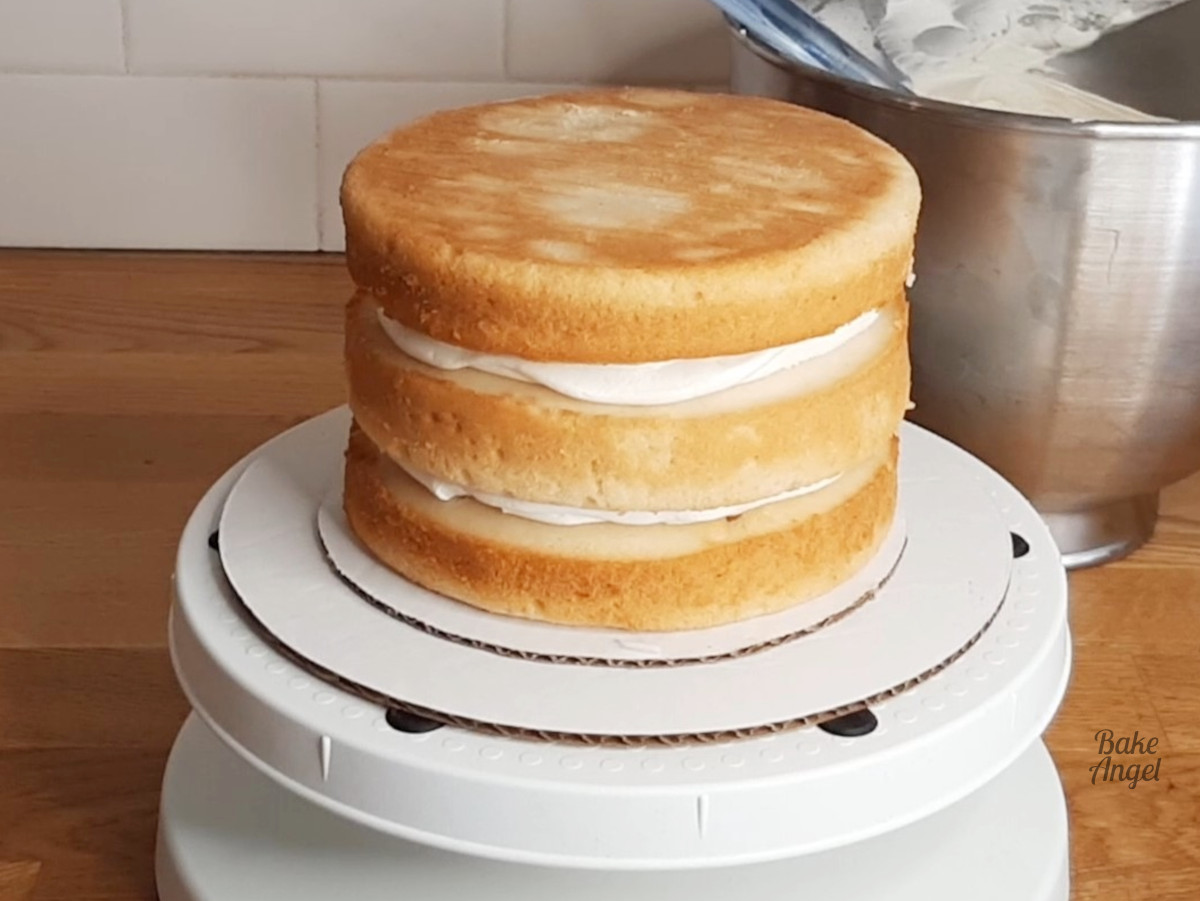
Add the second layer on top and repeat the filling step.
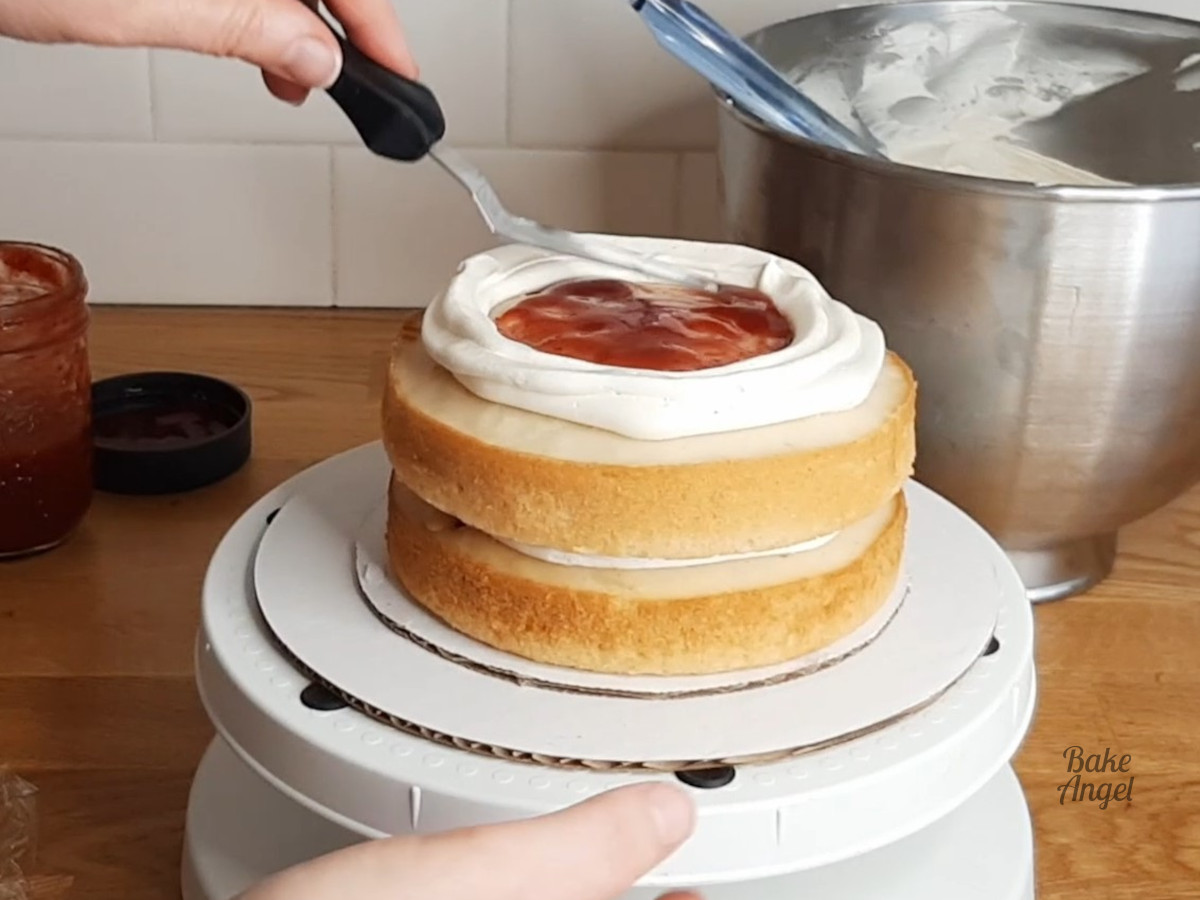
Place the final layer on top, crumb-side down. This helps lock in crumbs and gives you the smoothest surface for icing the cake.
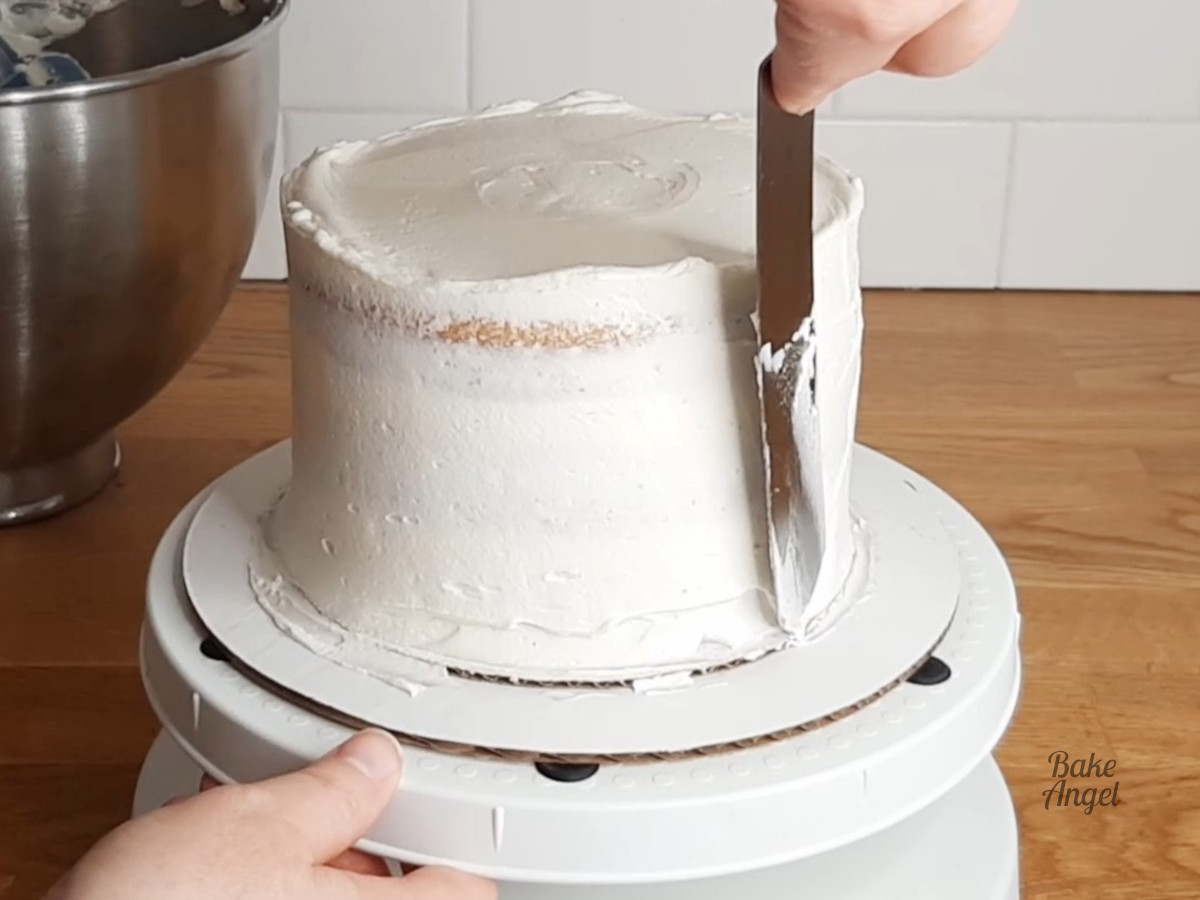
Apply a thin layer of buttercream around the top and sides using an offset spatula. Smooth it with a scraper then chill the cake in the fridge for 30 minutes.
Top Tip: This method is called a crumb coat, and while this step can be skipped, I highly recommend it when you want to ensure a smooth cake finish.
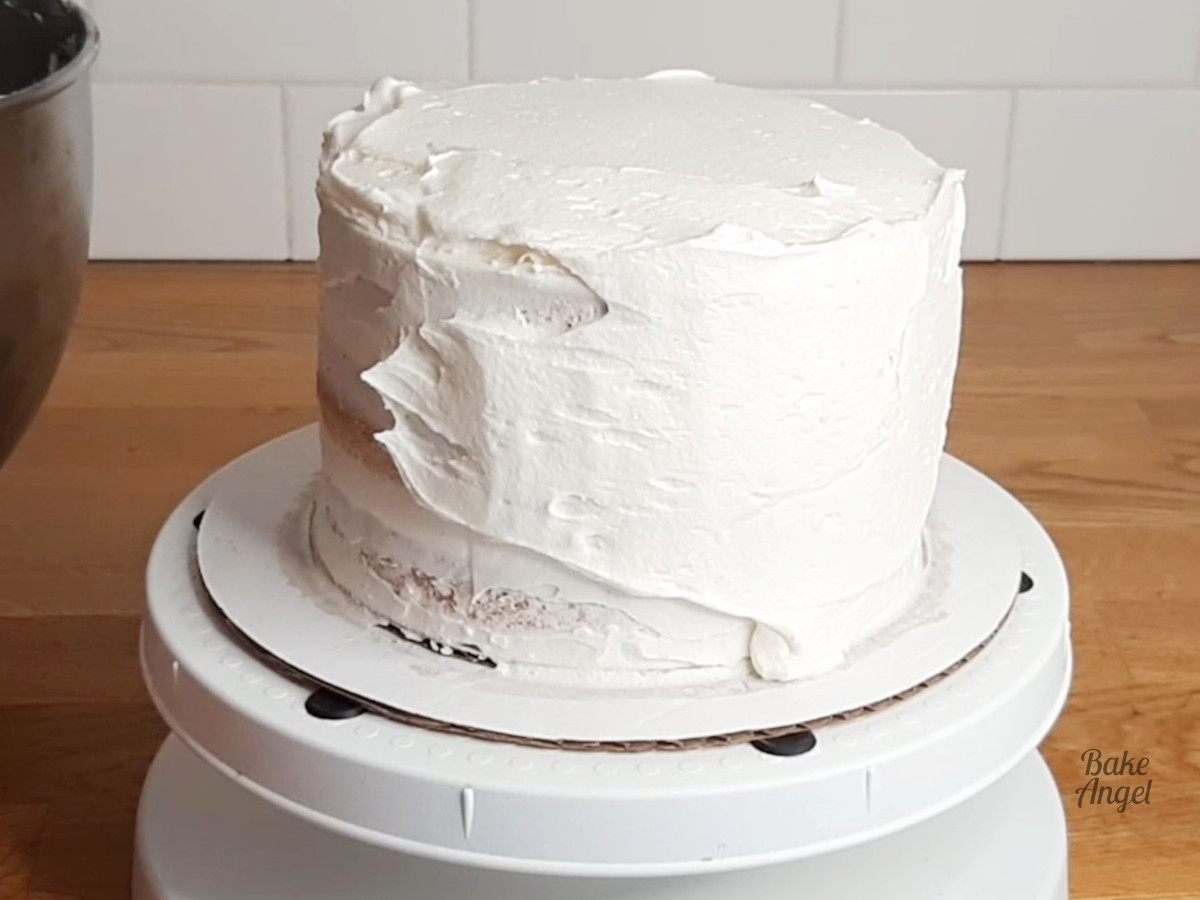
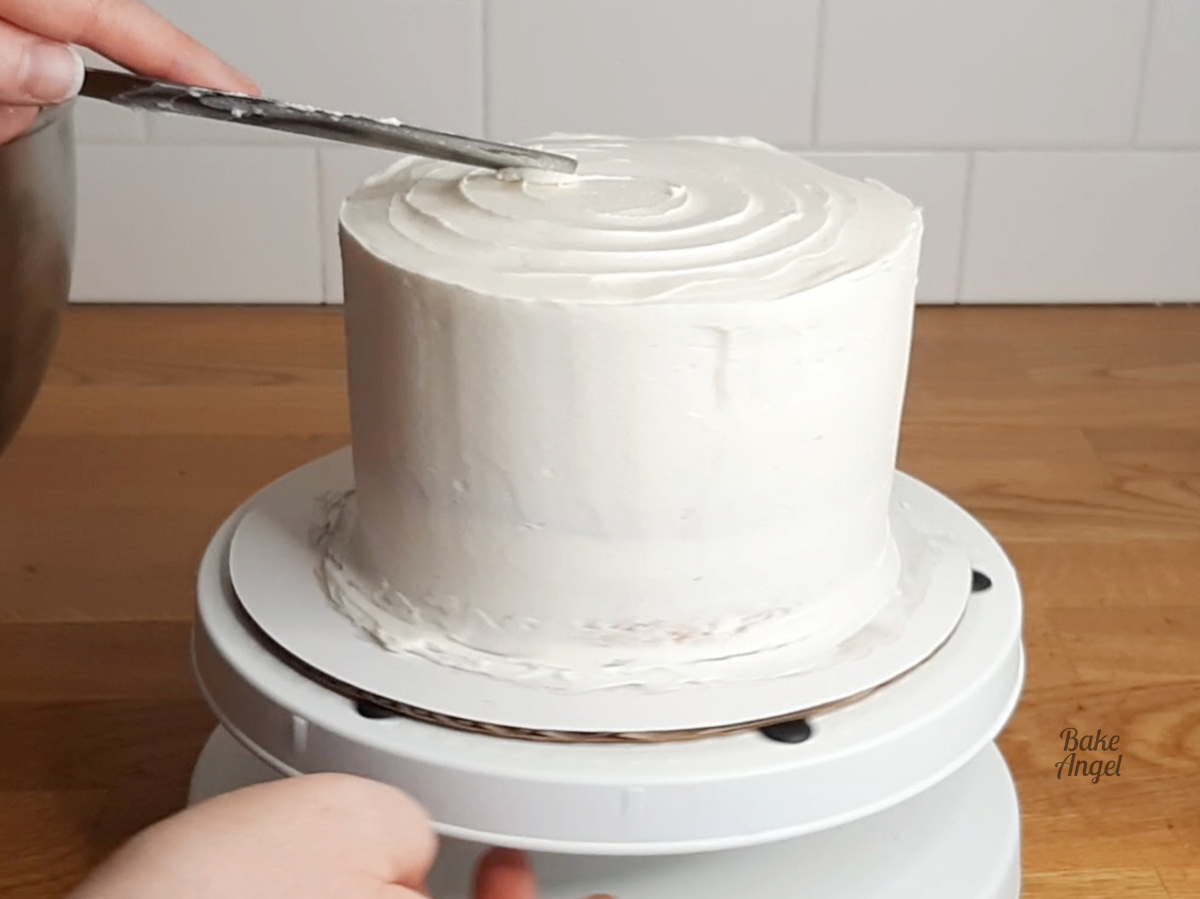
Cover the chilled cake with your final layer of buttercream. You can keep the edges soft and rustic if you prefer, or use a scraper to sharpen the sides – both styles look gorgeous.
To add a spiral to the top of the cake, lightly touch the spatula to the surface, then spin the turntable while slowly moving the spatula towards the centre. Hello, bakery-style finish!
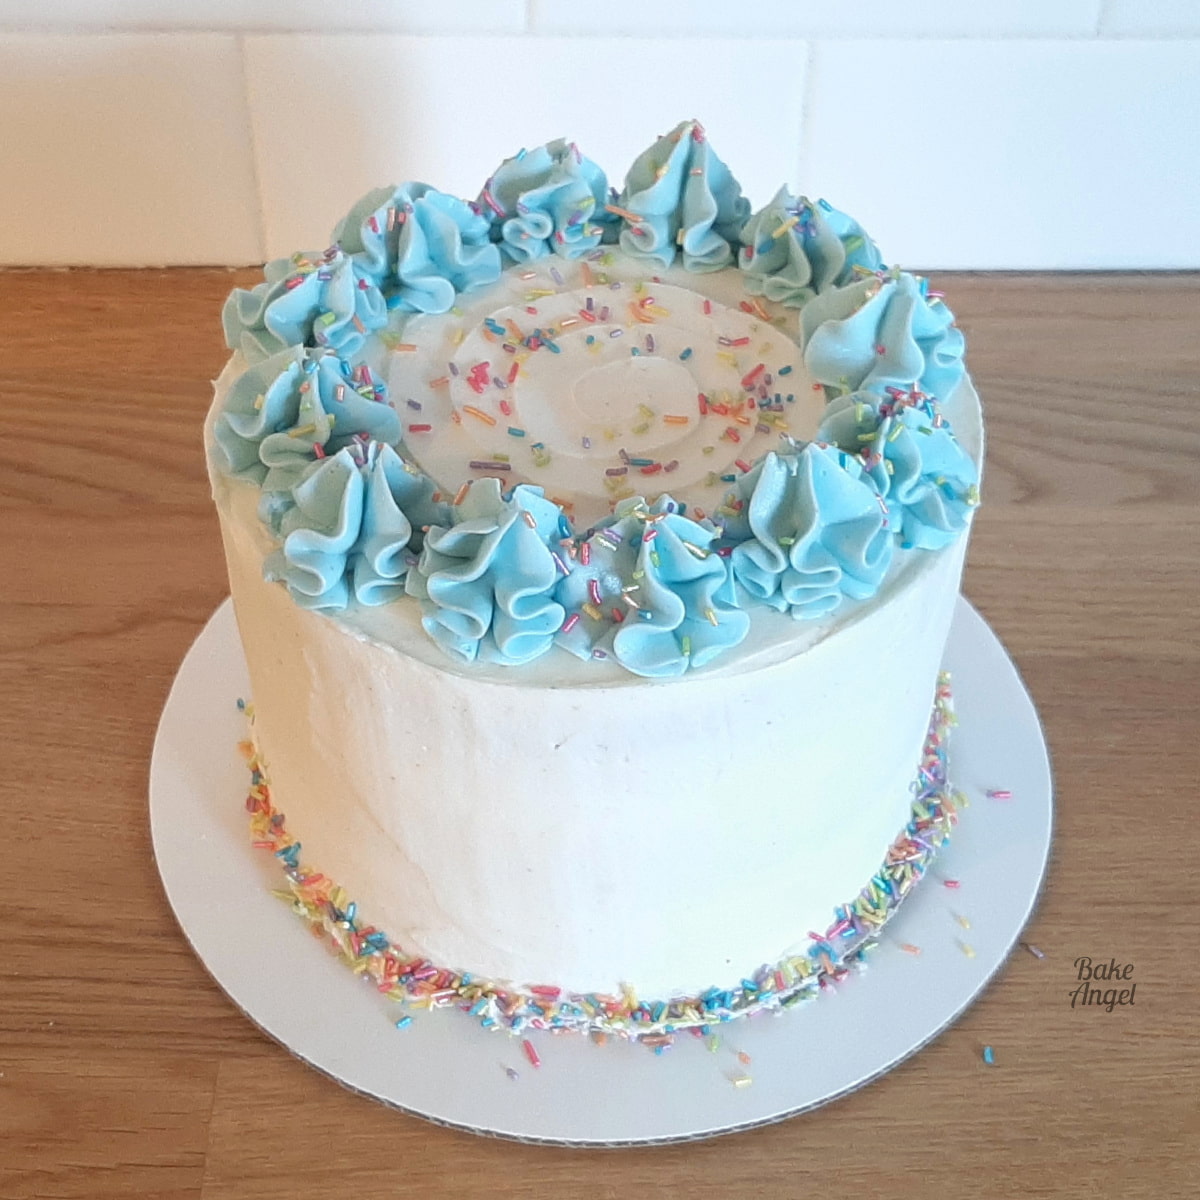
Let’s Decorate!
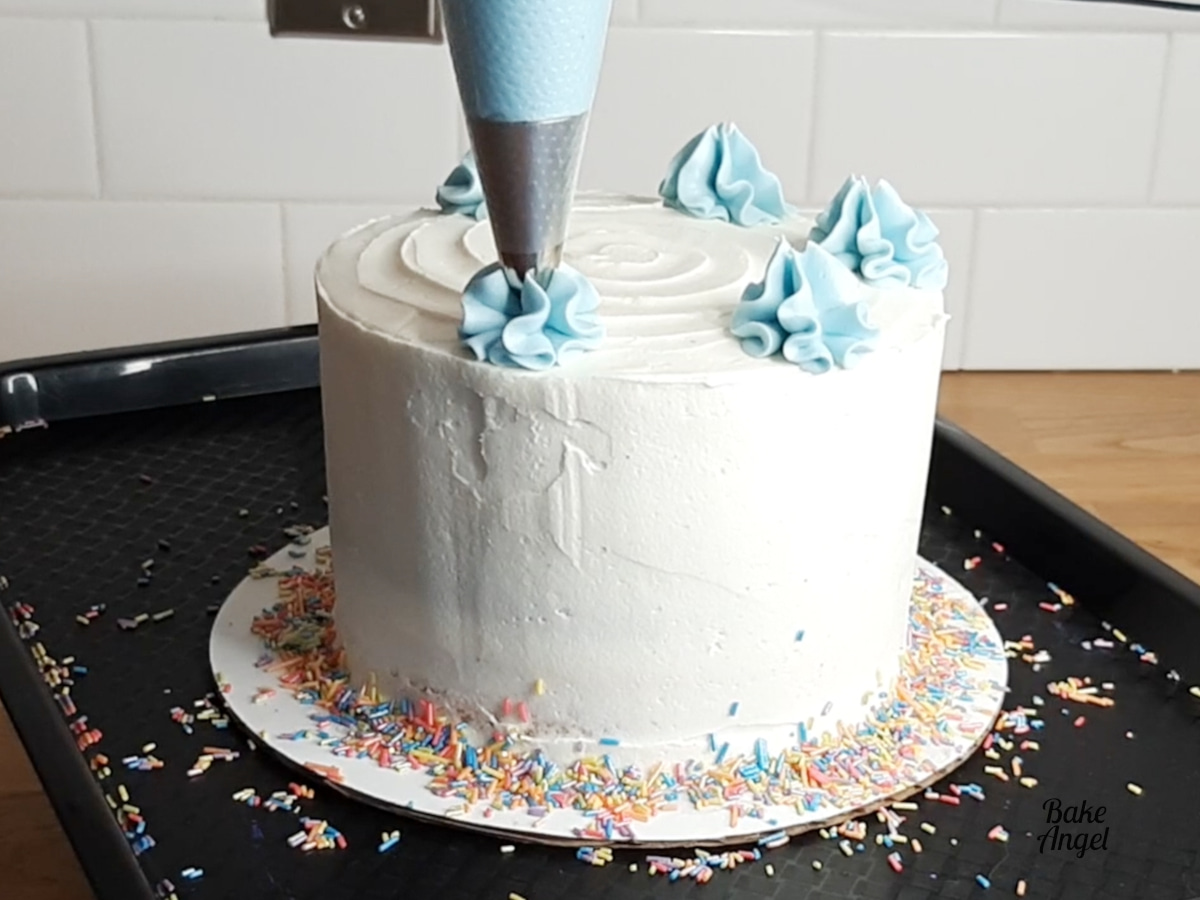
Once your cake is fully frosted, carefully move it onto a serving tray or cake board to prepare for decorating. Start by adding vegan sprinkles around the base for a playful, festive touch. Next, colour a small portion of your buttercream with blue (or any colour you like) using an oil-based food colouring such as Color Mill. Oil-based colours work best in buttercream because they blend smoothly without separating from the fat.
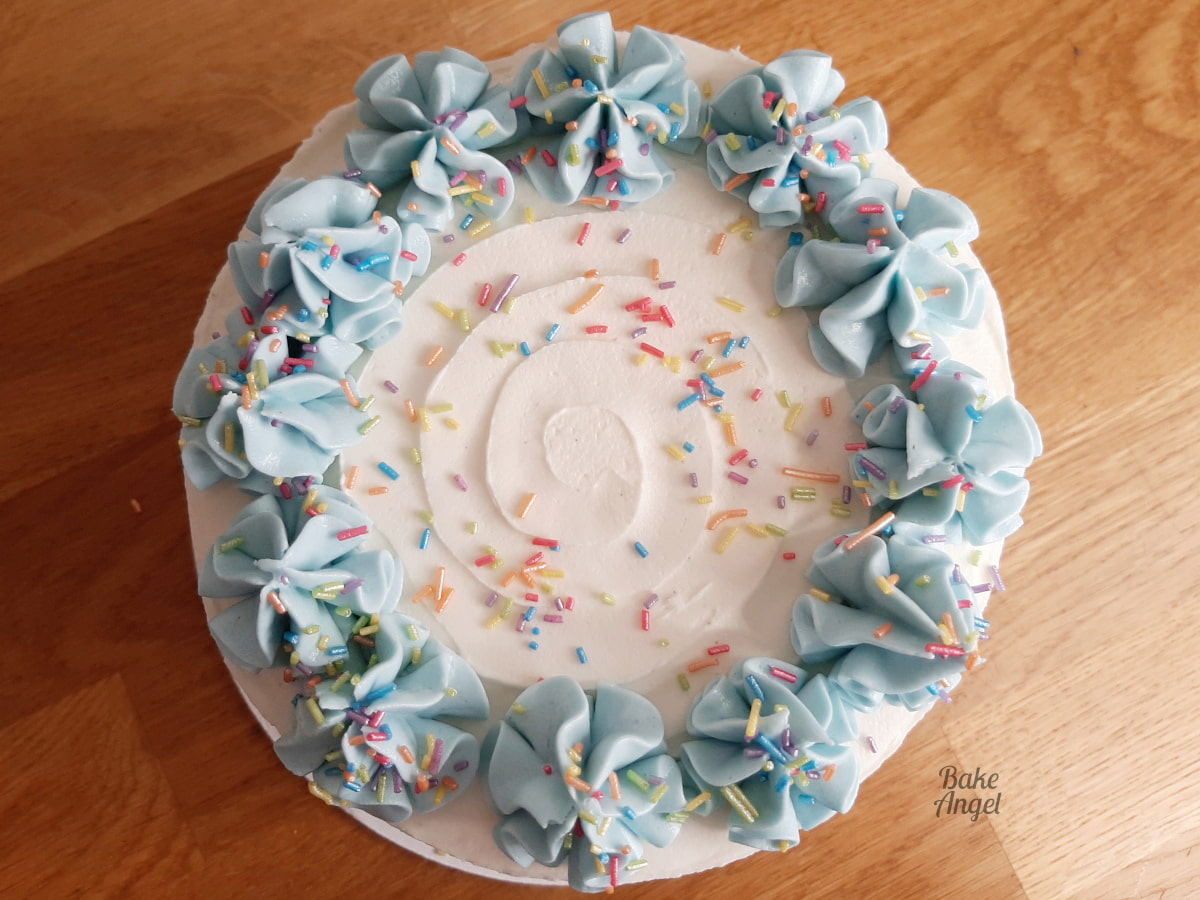
Fit a piping bag with a 1M tip, and to make it easier, place your small coloured icing bag inside the larger bag. Pipe swirls across the top of the cake, letting your creativity guide the design, and finish by scattering a few extra sprinkles for a cheerful, celebratory look.
And just like that, your vegan vanilla layer cake is complete – a beautiful, beginner-friendly dessert that’s perfect for parties, birthdays, or any small celebration.
Slicing & Serving
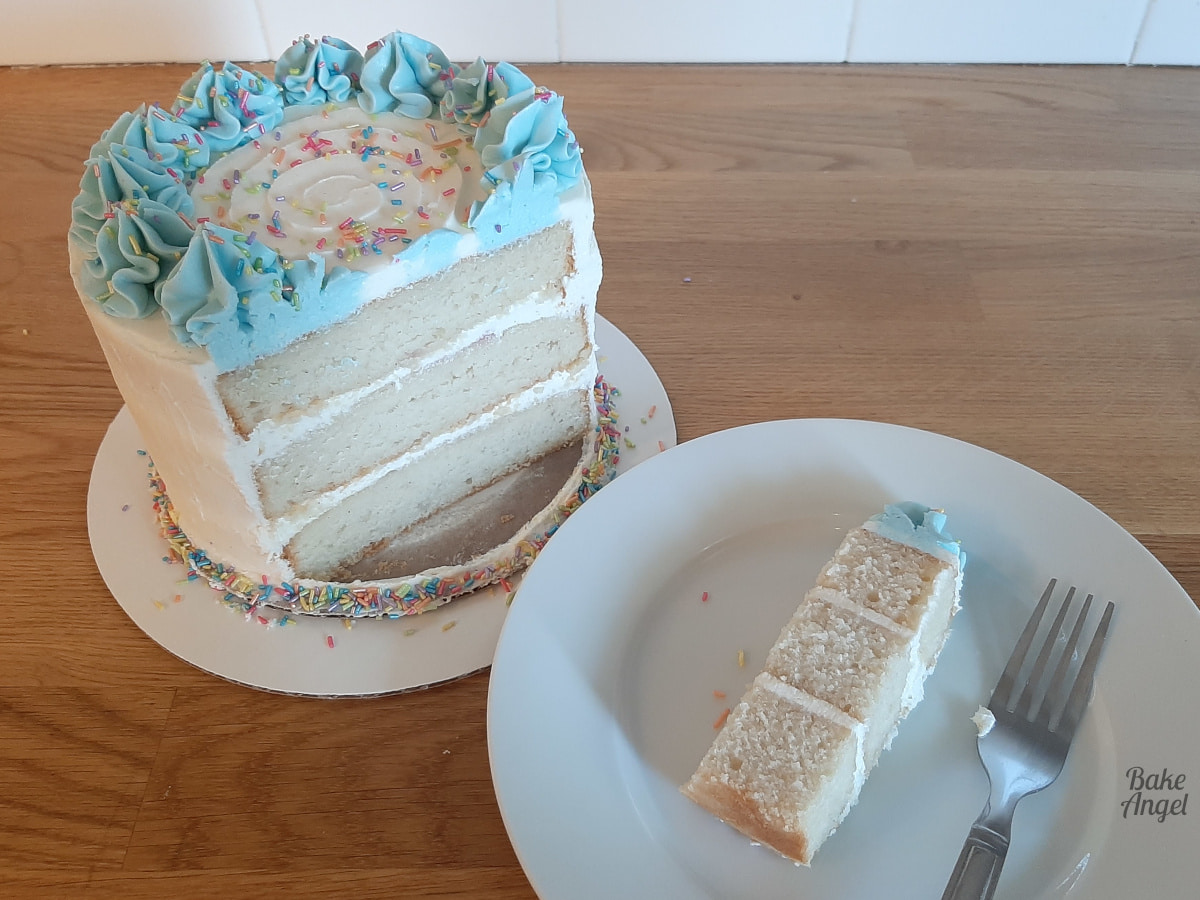
This cake will provide 8 generously sized triangular-shaped slices – or 4 really large ones if you have a small gathering. Trust me, that’s what we do as we’re a family of 4 and our kids love this cake!
For parties, I highly recommend using the side-cutting method shown below, which will give up to 20 slices from this cake.
Common Vegan Cake Questions
I highly recommend using an unsweetened plant-based yogurt. I use almond yogurt as it adds a nice creaminess to the batter. Other plant-based yogurts will also work.
Stor at room temperature in a cake box or sealed container for 2-3 days. To freeze, cut up slices, cover with plastic wrap and place them in a sealed container. To defrost, remove from the freezer and allow to come to room temperature before unwrapping.
I recommend using oil-based food colouring to colour the buttercream. Brands such as Color Mill will not repel from the oils in the butter and will provide a smoother finish to your coloured buttercream.
Absolutely! No adjustments are needed – simply bake the cupcakes for 12-15 minutes at 350F/175C.
Don’t worry! This is perfectly normal when combining multiple wet ingredients. Once you incorporate the dry ingredients and bake the cake, the texture will be smooth and fluffy.
Yes – regular unsalted butter and 2 eggs (instead of apple sauce) can be used to replace the vegan alternatives.
Buttercream FAQs
This can happen if the butter or plant-based milk is too warm. If this occurs, chill your buttercream in the fridge for 10–15 minutes, then re-whip before spreading. If it’s still too soft, add a small amount of sifted icing sugar, a tablespoon at a time, until it reaches the desired consistency.
Absolutely! Vanilla bean paste is classic, but you can swap in almond, lemon, or other extracts. For colour, use oil-based food colouring to avoid the butter repelling water-based colours, ensuring smooth, vibrant results.
Store at room temperature for up to 2 days, or in an airtight container in the fridge for up to a week. Re-whip before using if it becomes too firm after refrigeration.
This vegan vanilla layer cake is soft, fluffy, and perfect for any celebration. If you bake this cake, tag me @itsbakeangel on Instagram — I love seeing your creations.
Want more cake inspiration?
Check out some of our favourite regular bakes:
- Great British Bake Off inspired Red Velvet Layer Cake (dairy free)
- My childhood favourite – Chocolate Fudge Cake (DF and GF)
- The perfect party tray bake Butterscotch Cake (DF)
And learn how to decorate cakes on my Cake Decorating 101 page.

The Best Vegan Vanilla Layer Cake
Equipment
- Teaspoon Measure
- Sellotape
- Cake Scraper optional
- Tray optional but recommended to catch runaway sprinkles
Angela’s Top Tip
Weigh your dry ingredients in grams with a scale for best results!
Ingredients
Vanilla Cake
- 200 grams Plant Based Butter (unsalted) (Just under 1 US cup or 1 3/4 sticks)
- 200 grams White Sugar (1 US Cup)
- 100 grams Apple Sauce (1/2 US Cup)
- 1 tsp Vanilla Bean Paste
- 120 grams Plant Based Yogurt (See note. 1/2 US Cup)
- 200 grams Cake Flour (1 2/3 US Cups)
- 1 tsp Baking Powder
- 0.5 tsp Salt
- 120 ml Plant Based Milk (1/2 US Cup)
Buttercream
- 480 grams Icing Sugar (4 US Cups)
- 225 grams Plant Based Butter (unsalted) (1 US Cups)
- 50 ml Plant Based Milk (Just under 1/4 US Cup)
- Pinch Salt
- 1 tsp Vanilla Bean Paste
Decoration:
- Strawberry Jam for filling the cake
- Sprinkles
- Blue Food Colouring see note
Instructions
Prep:
- Gather all ingredients and equipment. All ingredients should be at room temperature.
- Grease then line the cake pans with parchment paper.
Making the Cake
- Cream together 200 grams Plant Based Butter (unsalted) and 200 grams White Sugar. Add 100 grams Apple Sauce, 120 grams Plant Based Yogurt and 1 tsp Vanilla Bean Paste. Mix to combine. The batter will look curdled at this point but don't worry!
- In a separate bowl, stir together 200 grams Cake Flour, 1 tsp Baking Powder and 0.5 tsp Salt then add about a quarter to the mixing bowl. Stir to combine.
- Alternate between adding 120 ml Plant Based Milk and the remaining dry ingredients to the cake batter, mixing it with each addition. Scrape down the bowl to ensure everything is fully combined.
- Using an ice cream scoop, evenly distribute the cake batter between the 3 cake pans. Level the batter and tap the pans with your hand or on the counter to remove any trapped air bubbles.
- Bake at 350°F for 20-25 minutes until the cakes are well risen and slightly firm to the touch. They will be pale in colour and slightly removed from the sides of the pan. Let the cakes cool for 10 minutes before removing from the pans and cooling completely on a wire rack.
Making the Buttercream
- Add 225 grams Plant Based Butter (unsalted) to the mixing bowl and mix for 2 minutes until light and fluffy.
- Add in a Pinch Salt and half the 480 grams Icing Sugar. Mix until combined.
- Add the remaining icing sugar, 50 ml Plant Based Milk and 1 tsp Vanilla Bean Paste. Mix until fully combined. The buttercream should be smooth and pale in colour.
Decorating
- Add a small amount of buttercream to your cake circle and attach the first layer. Pipe a dam of icing and fill the centre with Strawberry Jam.
- Add the second layer on top and repeat the filling as before. Then place the final layer on top, crumb side down.
- Crumb coat with buttercream then chill in the fridge for 30 minutes. TOP TIP – use an offset spatula to add the buttercream to the top and sides and finish off the sides with the cake scraper.
- Add your final layer of buttercream. To add a swirl to the top of the cake, angle your spatula so that it slightly touches the cake and then spin the turntable while bringing the spatula slowly towards the centre.
- Move the cake onto a tray then add Sprinkles to the bottom of the cake.
- Colour a small amount of icing with Blue Food Colouring and add to a piping bag. Add a 1M piping tip to a piping bag, cut the end off your blue icing bag and then drop it in the 1M bag. Pipe swirls on top of the cake and add sprinkles.
- Cut the cake and enjoy!
Video
Notes
- Ingredient Prep: For best results, make sure all ingredients are at room temperature before starting. This helps the cake batter come together smoothly and ensures even baking.
- Yogurt Tips: I recommend using an unsweetened plant-based yogurt for creaminess. Almond yogurt works wonderfully, but soy, oat, or coconut yogurt are also great alternatives.
- Yield: This recipe makes 8–10 generously sized triangular slices, or up to 20 smaller party slices. Refer to the full post for tips on cutting methods.
- Storage: Store the cake at room temperature in a cake box or airtight container for 2–3 days to maintain freshness.
- Freezing: Slice the cake first, then wrap each piece in plastic wrap and place in a sealed container. Allow to thaw at room temperature before serving.
- Buttercream Colouring: Use oil-based food colouring for smooth, vibrant buttercream. Water-based colours may separate from the fat in vegan buttercream.
- Measuring Tips: Weighing ingredients is best for consistent results. US cup equivalents are included, but be sure to lightly scoop flour and sugar rather than packing them, as this can affect the texture of your cake.


Leave a Reply