Learn how to pipe a beautiful 3D royal icing flower on sugar cookies with this easy, step-by-step decorating tutorial. Perfect for beginners, this simple technique uses layered petals to create a soft, realistic floral design.

I just adore piping flowers with royal icing, and with a few simple techniques, you can create them too.
If you’ve ever felt intimidated by royal icing, you’re not alone. The good news? Flowers are one of the most forgiving designs to pipe. Each one is naturally unique, so there’s no pressure to make them look perfect.
These flower cookies are ideal for gift-giving – especially for Mother’s Day, weddings, or a special someone’s birthday. With a piping bag and a palette of vibrant royal icing, you can design stunning cookies that look as beautiful as they taste.
In this tutorial, I’ll walk you through how to pipe a 3D royal icing flower step by step, so you can confidently decorate cookies that truly stand out.
Quick Guide: 3D Royal Icing Flower on Cookies
- Skill Level: Beginner-friendly
- Time to Decorate: ~15–20 minutes per cookie (plus drying time)
- Main Technique: Layered petal piping with a petal tip
- Best Icing Consistency: Stiff for petals, leaves and pollen
- Tools Needed: Piping bags, petal tip (e.g. 104), leaf tip, scribe tool
- Perfect For: Spring cookies, Mother’s Day, weddings, and afternoon tea
💡 Tip: Royal icing flowers are very forgiving – don’t worry about perfect petals. Slight imperfections actually make them look more natural and realistic.
Before you start piping your 3D royal icing flower, let’s take a quick look at the tools and ingredients you’ll need to decorate your sugar cookies successfully.
Tools & Supplies for Decorating Royal Icing Flower Cookies
With just a few basic cookie decorating items, you can recreate this gorgeous cookie. Make sure that you bake your cookies in advance so that they have time to cool before you start decorating.

Cookie: I baked up a batch of my favourite no-spread, no-chill sugar cookie recipe. If you’re new to cookie baking, check out all of my helpful tips and tricks in the detailed recipe post.
Icing (not pictured): I am using a stiff consistency vegan royal icing recipe, as this will maintain the shape of the petals and leaf. You can also use stiff buttercream to recreate this cookie.

Cookie cutter: This cookie cutter is from a Sweet Sugarbelle set, and I just adore it as it gives you enough room to pipe multiple layers of petals on your cookie and has an area for a leaf as well.
Piping Bags: I like using tipless piping bags when I am working with royal icing and buttercream. These are disposable and recyclable, and if you wash them, you can use them a few times. I buy them in bulk from Amazon. This particular bag is slightly textured, which is perfect to ensure you don’t lose grip of the bag while piping.
Piping Tip: Tip 104 is one of my absolute favourites. You can create not only flowers but also ruffles and fun borders on cookies and cakes.
Mini Turntable: A mini turntable can make a world of difference when you are decorating individual cookies. Instead of having to turn your wrist in awkward angles, you can turn the cookie instead and trust me, it’s a game-changer. I use them when I’m decorating cupcakes as well.
Food Colouring: I always use gel food colouring when I am decorating my baked goods. I like the ease of squeezing drops into my icing. Just make sure that you are not using any oil-based colours with royal icing, as it will cause the icing to split. I am using leaf green, dusty rose and lemon yellow on this cookie.
How to Pipe a Leaf
Leaves don’t need to be complicated and for this particular leaf, I am using a tipless piping bag. Yes, that’s right! No piping tip needed. Check out my tipless leaf post for a more detailed tutorial on this technique. It’s great to use when you only need a couple of leaves and don’t want to get your piping tips out.
The secret is in how you cut the tip of the piping bag. By cutting two small pieces off the end of the bag and creating an inverted ‘V’ shape, you can replicate a leaf piping tip (more photos in the detailed post above).

Start by holding the piping bag slightly above the surface. Apply a small amount of pressure to the bag to let the icing come out slowly. Move the bag back slowly allowing the icing to ruffle slightly while continuing to put pressure on the bag.
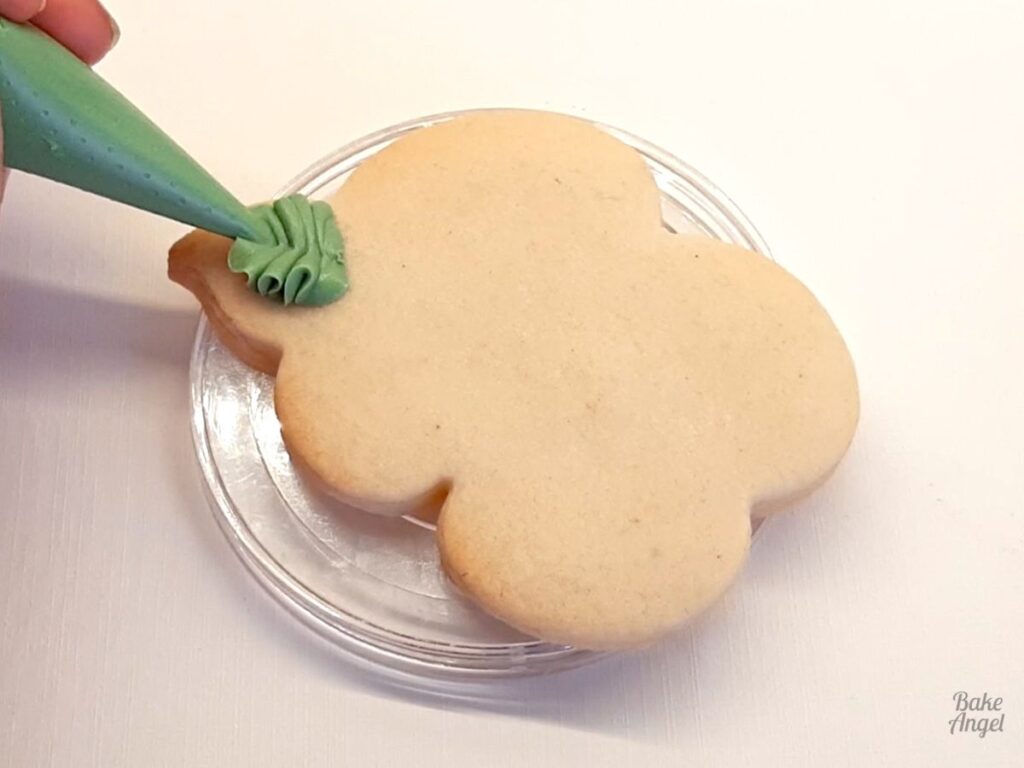
When the leaf is long enough, release the pressure from the bag and pull the tip away. This helps to create the point at the end of the leaf and give it some lift as well.

How to Pipe Petals
We are using piping tip 104 to create the petals. This teardrop tip creates thin edges from the narrow end of the tip and fuller icing from the wider end. You can also create ruffled petals by adjusting the pressure on the piping bag as you pipe.
I recommend practicing a few times on some parchment paper before you start piping directly on the cookie. Don’t worry if your first few petals don’t look perfect – this technique improves quickly with just a little practice.

Positioning: Start by ensuring that the narrow part of the tip is pointing away from the cookie and is slightly hovering above it. This will help to create thinner edges to the petals and a fuller centre.

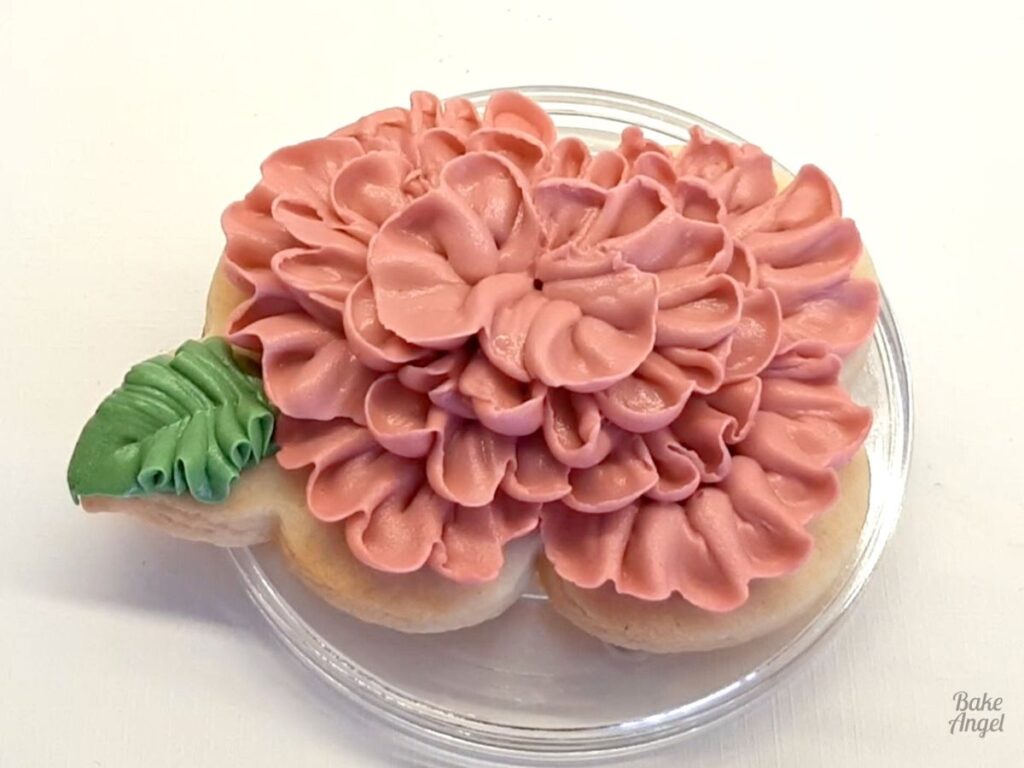
First Layer of Petals
Squeeze the bag as you move the tip in a zig-zag motion to create a ruffled petal shape. While piping, ensure that the tip does not touch the cookie surface. We want the petal edges to appear as though they are floating above the cookie for a more realistic look.

Continue around the cookie, moving the turntable with your free hand as you pipe.

Second Layer of Petals
For the second layer, adjust the angle of the tip slightly so that it is more raised away from the cookie. This will help create volume in the petals as well as separation between the layers.

If at any time you make a mistake or want to change the position of your icing, use a modelling tool to push it back into place. When using stiff consistency, you have more leeway to do this as the icing is more maneuverable than thinner consistency icing and will hold its shape better.

Our second layer is complete. You can see the room between the two layers and the difference that the slight change in angle creates.

Third Layer of Petals
Adjust the angle of the piping tip again and fill in the centre of the cookie. When you are at the end of the last petal, ease off the pressure from the bag and pull it away quickly. Tidy up any stray edges with a modelling tool.

And that’s it – you’ve piped your first 3D royal icing flower! I love the ruffled look of this design, but we still have one final detail to add.
Piping Pollen
Add some stiff consistency yellow royal icing to a tipless bag. Cut a small opening, hold the bag slightly above the surface and pipe little dots. You don’t need to apply much pressure to the bag to pipe dots. In fact, I barely apply any as this also helps to avoid little peaks of icing forming on each dot.

Keep piping until you have enough pollen. If you find that you have peaks on the dots, tap them down with a dry brush or modelling tool.
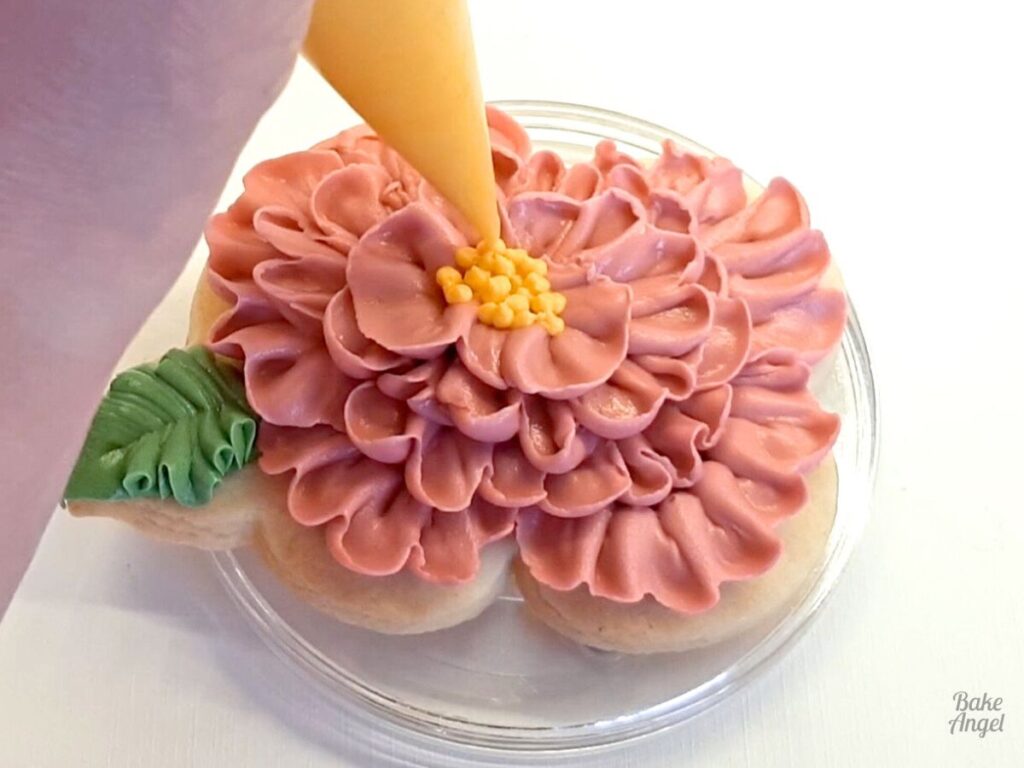
TOP TIP: if you don’t want to pipe pollen with royal icing, use sprinkles instead. I like to add an odd number of sprinkles. There’s just something about odd numbers with florals that seems to work better and is more pleasing to the eye.
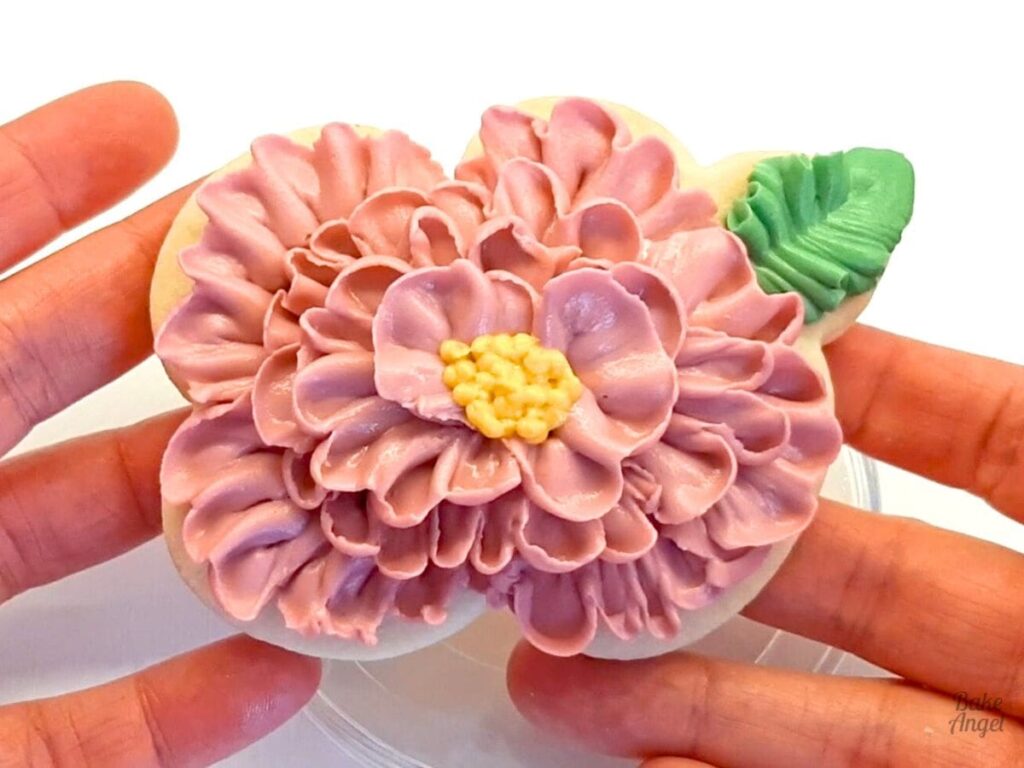
Isn’t she pretty? I adore this style of piping and hope you feel inspired to try it.
Video Tutorial
If you’re more of a visual learner, check out my detailed tutorial for this cookie. I know that sometimes it can be easier to see the process, rather than look at still photos, so I hope this helps you build confidence to try this tutorial.
Left-Handed Piping
You’ll notice in the step-by-step photos that I am left-handed. This means that when I pipe, I generally work in a counter-clockwise motion to avoid smudging my icing.
If you are right-handed, you will feel more comfortable piping in a clockwise direction. The position of the bag above the surface will be the same. You also need to ensure that the narrow end of the piping tip is pointing upwards, away from the cookie.
Drying Tips
While the outer edges of the petals will dry fairly quickly (usually in less than an hour), the centre of the cookie where the bulk of the icing is will take longer to dry. If you are making these cookies in advance for a party or will be packaging them up, I highly recommend letting them dry at least overnight.
Drying time will also vary due to the humidity in your home. You can speed up the drying process by using a dehydrator or placing a fan near the cookies.
Storage Tips
These cookies can be stored at room temperature in an airtight container for up to 1 week. If you prefer to individually bag and heat seal them, they will last much longer. They do not require refrigeration.
You can also freeze the decorated cookies for up to 3 months. I highly recommend freezing them in single layers in an airtight container to avoid freezer burn. To defrost, bring the container out of the freezer and allow it to defrost at room temperature before removing the cookies. This will avoid condensation forming and affecting the icing.
Flower Cookie FAQs
For this design, use a stiff consistency royal icing so the petals hold their shape and create dimension. If your icing is too soft, the petals may lose definition.
Most definitely. I recommend using a thicker consistency of buttercream that will hold the shape of the petals.
I certainly hope not! Although royal icing will dry hard over time, if consumed within a day or two, the icing on this cookie should still have a soft bite in the centre, due to the amount of icing and the recipe used.
Yes, and I highly recommend experimenting with different combination flavours for your icing and cookies. I love to add a dash of vanilla or marshmallow flavouring to my royal icing. Just ensure that whatever flavouring you use for your icing is not oil-based or it will split the icing.
More Decorating Tutorials
If you enjoyed this tutorial and want to improve your cookie decorating skills, here are a few more guides to help you practice and build confidence: Top 15 Cookie Decorating Tips.

And if you need some cookie recipe inspiration, check out my collection of allergy friendly cookies. Always dairy free, kid-approved and packed full of fun and flavour.
Don’t forget to leave a comment and let me know if you try this technique. And if you share your cookies on social media, tag me @itsbakeangel – I’d love to see your creations!
Happy decorating, cookie friend!


This is a fabulous tutorial. I love that you give both pictures and a video. Very helpful and perfect for us beginners.
Thanks for your kind words Andrea. I like to cover all bases in my tutorials as I know people have different preferences for learning. Glad you liked it.
I used this technique to make cookies over the weekend and everyone loved them! They thought I ordered them from a bakery!
Oh that’s wonderful. So happy to hear that Tayler.
These are such helpful tutorials. My daughter has been wanting to learn how to pipe with royal icing and now we can get started!
Oh that’s perfect to hear. I hope your daughter enjoys trying this technique.
This looks beautiful! I can’t wait to try it!
Thanks so much Kim.
I’ve always wanted to do this, and though I definitely need a little more practice, your instructions made it easier than I thought it would be!
So happy to hear that Chenee! Happy decorating!