These gluten-free, dairy-free mini cherry Bakewell tarts are a classic British dessert made allergy-friendly. With a buttery shortcrust base, a layer of tart raspberry jam, soft almond frangipane, and sweet icing topped with a cherry, these mini tarts are perfect for afternoon tea, parties, or small batch baking.
Growing up in the UK, Cherry Bakewells were always a treat, and recreating them allergy-friendly without losing that classic flavour has been such a joy. This easy Bakewell tart recipe uses simple ingredients and can be made in under an hour (plus chill time), with step-by-step instructions to help you get perfect results every time.
The History of Bakewell Tarts
Bakewell Tarts are an evolution of the humble custard-filled Bakewell Pudding that originated in the mid 1800’s in the small rural town of Bakewell in the Peak District in Derbyshire, England. The mistress of a local Inn is believed to have asked her cook to make a dessert, and a misunderstanding led to the unintentional creation of the Bakewell pudding. Years later, the tart was created with its frangipane filling and shortcrust base.
The Old Original Bakewell Pudding Shop on The Square in Bakewell, which has been trading since 1865, continues to make and sell a variety of Bakewell desserts, tarts, puddings and my favourite, the Cherry Bakewell.
I have fond memories of eating Mr. Kipling’s Cherry Bakewells throughout my childhood. And when I eventually visited Bakewell a few times in the late 1990’s, it was so delightful to see the place where it all started and sit by the river eating a traditional Cherry Bakewell.
Why You Need to Try These Mini Tarts
If you love classic British bakes but need allergy-friendly options, these mini cherry Bakewell tarts are a must-try. They’re rich, almondy, and perfectly portioned.
You’ll love this recipe because:
- Made gluten-free and dairy-free (with easy swaps)
- Perfect small batch dessert (4–5 mini tarts)
- Just 10 minutes prep for the pastry
- Ideal for afternoon tea or special occasions
- Freezer-friendly for make-ahead baking
Having enjoyed them in my pre-allergy days, I honestly believe that these taste better than the real thing and love that they’re perfectly allergy safe as well. Don’t be discouraged by the multiple elements that need to be made for this dessert. I’m going to break it down into easily achievable steps for you.

Ready to make these gluten-free, dairy-free mini cherry Bakewell tarts? Keep scrolling for step-by-step instructions, or jump straight to the recipe card if you’re ready to bake.
Ingredients and Substitutions
Cherry Bakewells require a few different elements: shortcrust pastry, frangipane, and almond icing for decoration. This gluten-free, dairy-free Bakewell tart recipe uses simple pantry ingredients with a few allergy-friendly swaps.
For the Shortcrust Pastry

Butter: My go-to fat for the pastry is unsalted plant-based butter. Not dairy-free? Sub with regular dairy butter. Ensure that your butter is at room temperature before you start making the pastry. It will be quicker to incorporate.
Flour: The star of this recipe is gluten-free flour. My preference is Bob’s Red Mill 1-to-1 flour substitute. And this isn’t a sponsored post for them. I really do adore their blend as you don’t need to add anything else to it. Just straight sub in your recipes in place of plain or all-purpose flour. I love easy options like this!
Salt: an integral part of the pastry to balance out the flavours. You could use salted butter if you prefer but I like to control the amount of salt that I add to my recipes. We are using approximately 1/8 of a tsp.
Icing Sugar: I am using icing sugar to lighten the flour, to add a slight amount of sweetness and also create a wonderful melt in your mouth texture. If you want to cut back on the sweetness, sub with cornflour, although it really isn’t that sweet of a pastry.
Egg: to bind our ingredients together, I am using 1 beaten egg (at room temperature). I usually use large eggs in my baking, which are equivalent to approximately 50g once removed from their shell. You can also use a medium egg in this recipe. Replace with a flax egg if you are vegan. To make a flax egg, add 1 tablespoon of flax meal (ground flaxseed) to 3 tablespoons of water. Allow to rest for 15 minutes, then use as directed in the recipe.
For the Frangipane

Almond Flour: Also known as ground almond, this is the real star of the recipe. Not only does it add to the light texture of the frangipane, but it also ensures that our recipe stays gluten-free. There is no substitution for this ingredient as it is such an integral part of the frangipane.
Butter: My preference is unsalted plant-based butter. I always use block-based butter, not one from a tub, as it reacts most closely to dairy butter in terms of richness and colour. Not dairy-free? Sub with regular dairy butter. Ensure that your butter is at room temperature before you start making the frangipane. It will be quicker to incorporate.
Almond Extract: an integral part of the frangipane to add more flavour. I do not recommend using a different flavour for this recipe as it is supposed to be very almondy.
White Sugar: The sugar is needed to add sweetness to the frangipane. You could sub with coconut sugar but this will affect the flavour profile somewhat.
Egg: to bind the frangipane together, I am using 2 beaten eggs (at room temperature). Replace it with 2 flax eggs if you are vegan. To make the flax eggs, add 2 tablespoons of flax meal (ground flaxseed) to 6 tablespoons of water. Allow to rest for 15 minutes, then use as directed in the recipe.
For the Icing
Just three simple ingredients: water, icing sugar and a splash of almond extract. There are no substitutions for this element of the tart.
How to Make Mini Cherry Bakewell Tarts
Let’s break this recipe down into simple steps, so it’s easy to follow. Don’t let the steps overwhelm you – I’ll walk you through each stage so you can make perfect mini Bakewell tarts, even if you’ve never made pastry before.
Step 1: Make the shortcrust pastry
Let’s start by making the gluten-free shortcrust pastry. I know what you’re thinking – pastry is hard to make!! I’m here to show you that it’s not as hard as you think – with a good recipe and solid instructions, you’ll feel like a pro in no time at all. Make sure all of your ingredients for this recipe are at room temperature before starting. This will help bind everything together more easily. Preheat your oven to 340°F / 170°C.
Add 200g (1 1/3 cup) of gluten-free 1-to-1 flour, 100g (7 tbsp) unsalted plant-based butter and a pinch of salt to a mixing bowl. You could make the pastry by hand if you prefer, but I like to use a hand mixer as it doesn’t take long to whisk together. By hand, you’ll need to rub in the butter, then use a wooden spoon to combine everything. Combine everything until it has a sand-like texture and resembles breadcrumbs.

Next, let’s add 30g (1/4 cup) icing sugar and 1 beaten egg. These ingredients will add sweetness and richness to the pastry as well as create a melt-in-the-mouth consistency.

Using your hand mixer, combine until everything starts to clump together. This takes less than a minute.

Scrape down the bowl and turn out onto a floured surface. You don’t need a lot of flour, as this is not an overly sticky pastry.

Knead a few times into a smooth ball of pastry. This recipe makes 380 grams of pastry, which is enough for 4-5 mini tart cases, or one large tart case, depending on how thick you roll it out.

Step 2: Shape the tart cases
On a floured surface, roll out approximately 95g of pastry so that it is slightly larger than the tart case. I usually eyeball it, but you can weigh them for accuracy if you prefer. You will end up with some spare pastry at the end.

I always hold the tart case over the pastry to double-check the size. Look at how cute the little 4 3/4 inch tart case is! These are a dream to use. Here’s the link to my favourite ones from Wilton.

Lay the pastry over the case and then press down gently so that the pastry fits snugly into the case. *No need to grease the tart case*. As the pastry bakes, it will shrink ever so slightly from the edges of the case, which makes it easy to remove. Plus, these mini tart cases have removable bases that just slide right off once the tart case is cool.

Cut off any excess pastry with a sharp knife. You can add this back to the batch of pastry to reuse later.

Prick holes in the base of the pastry case with a fork. This will help with airflow when we bake the tart case.

Baker’s Tip: Chilling is optional for this pastry. Depending on the filling, I will often skip chilling it. As we will be baking the frangipane, there is no need to chill the pastry here. However, if you feel more comfortable chilling it or live in a hot climate, I suggest chilling for no more than 30 minutes. In that case, do not preheat your oven until 5 minutes before removing the pastry from the fridge.
Step 3: Blind Bake the Pastry
If you’ve ever watched the Great British Bake Off, you’ll be familiar with ‘soggy bottoms’. This is essentially when a tart base isn’t cooked properly and the filling seeps through, causing a soggy mess due to the raw spots in the pastry. We’re going to avoid that by blind baking our pastry cases.
Line the tart cases with a circle of parchment paper, then add baking beads. Ceramic baking beads (also known as baking beans) do a wonderful job of transferring heat to pastry without causing it to brown. They are readily available in all good baking supply stores and also on Amazon (affiliate link).

Pop the tart cases on a baking tray and blind bake for 10 minutes. Remove from the oven and carefully take out the baking beads from each case. I recommend using the edges of the parchment paper to lift them out, then place them in a bowl to cool. Immediately place the tart cases back in the oven for 5 minutes to finish baking. See, no raw spots!

Allow the tarts to cool completely before filling them. Now we can go ahead and make the filling.
Pro Tip: Don’t skip blind baking. This step prevents soggy bottoms and ensures your pastry stays crisp even with the jam and frangipane filling.
Step 4: Make the almond frangipane filling
Frangipane is a wonderful almond-based filling that bakes like a sponge cake. The soft texture complements the firm pastry and also works perfectly in a more traditional Bakewell tart. If you’d prefer to watch this process, you can watch my Bakewell Tarts bake along.
Start by adding 100 grams plant based Butter (unsalted) (7 tbsp) and 100 grams of white sugar (1/2 cup) to a mixing bowl and combine together.

In a separate bowl, add two eggs and half a teaspoon of almond extract.

Mix it all together and then add a bit at a time to the butter and sugar mixture.

Stir to combine until you are left with a soft mixture.

Our final ingredient and the star of the frangipane is the almond flour. Add 150 grams of almond flour (1 1/3 cups) and stir until everything is fully combined. That’s our frangipane completed.


Step 5: Fill and Assemble the Tarts
Now we’re going to start building our tarts. To keep it traditional, you could use either raspberry jam or strawberry jam. Add a generous teaspoon of jam to the base of each case and spread it out with the spoon to make sure that it covers all of that pastry base.

I really love raspberry jam with this because it does give that nice tartness to the Cherry Bakewell.

Finally, let’s add the frangipane to each pastry case. You will have enough for at least 4 mini tarts.

All filled and ready for baking.

Step 6: Bake until Golden
Pop the tarts in the oven for 25 minutes at 340°F (170°C). Look how gorgeous they look once they’re baked. The top is nice and firm and smells gorgeous. Allow them to cool completely.

Once the cherry bakewell tarts have cooled off, remove them from the tart cases. Push from the bottom to remove the side piece, and then slide off the bottom piece.

Let’s have a look at the bottom. You can see there’s no sign of a soggy bottom at all because we blind-baked them earlier.

Step 7: Add Icing and Decorate
What really distinguishes a Cherry Bakewell from a regular Bakewell Tart is the little bit of icing on top and a glace cherry. I like to add a tiny drop of almond extract (roughly 1/8 tsp) to the icing for that extra almond taste, but you can leave this out if you’re not a fan of flavoured icing.

Mix together 100 grams of Icing Sugar (1 1/4 cups), the almond extract and 1 tsp of water. Start with less water than you think you need and add little by little until you get the right consistency. This tart needs a slightly pourable consistency that won’t run. I always keep a small spray bottle of water handy to add a few extra sprays as needed.

We are looking for a slightly pourable and spreadable consistency. Test it by drizzling some off your spoon.

When you add the icing to the tarts, it should be spreadable and easy to move around without it rolling down the sides of the tart.

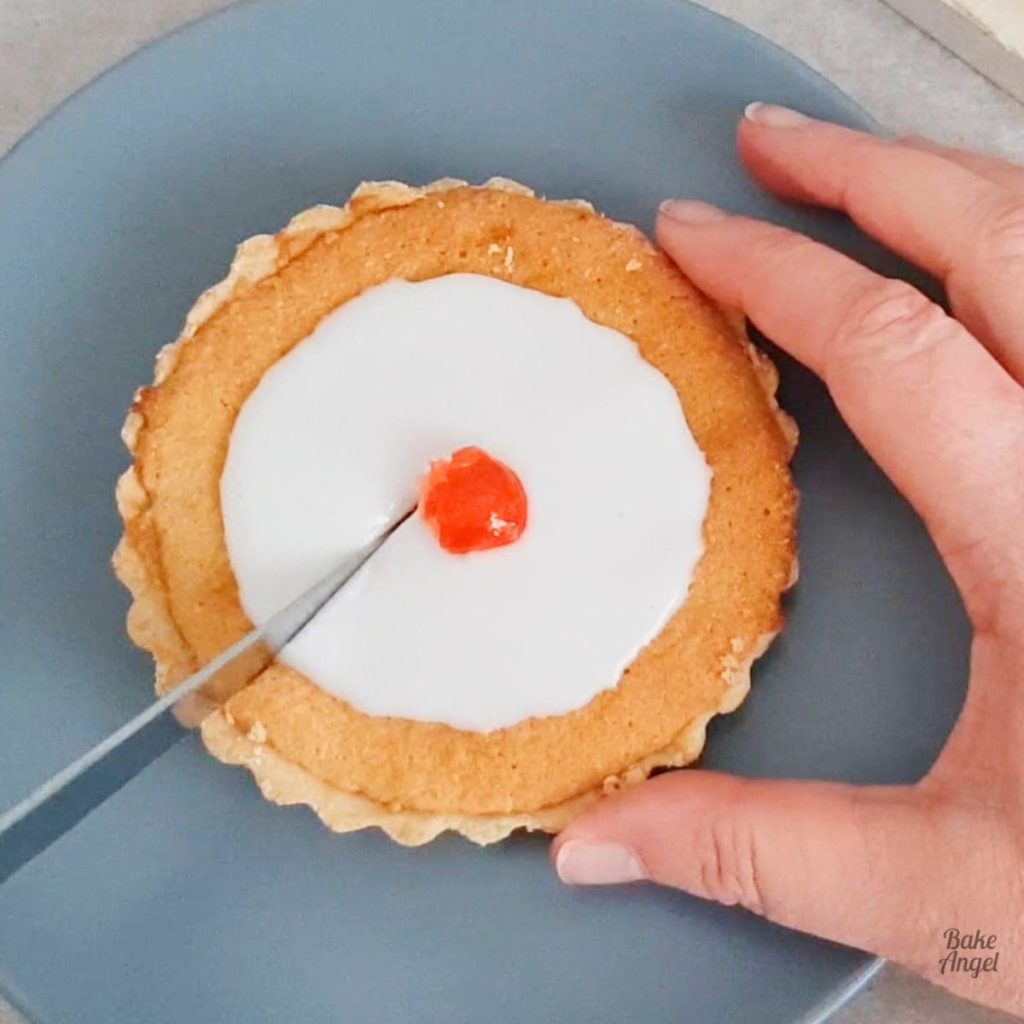
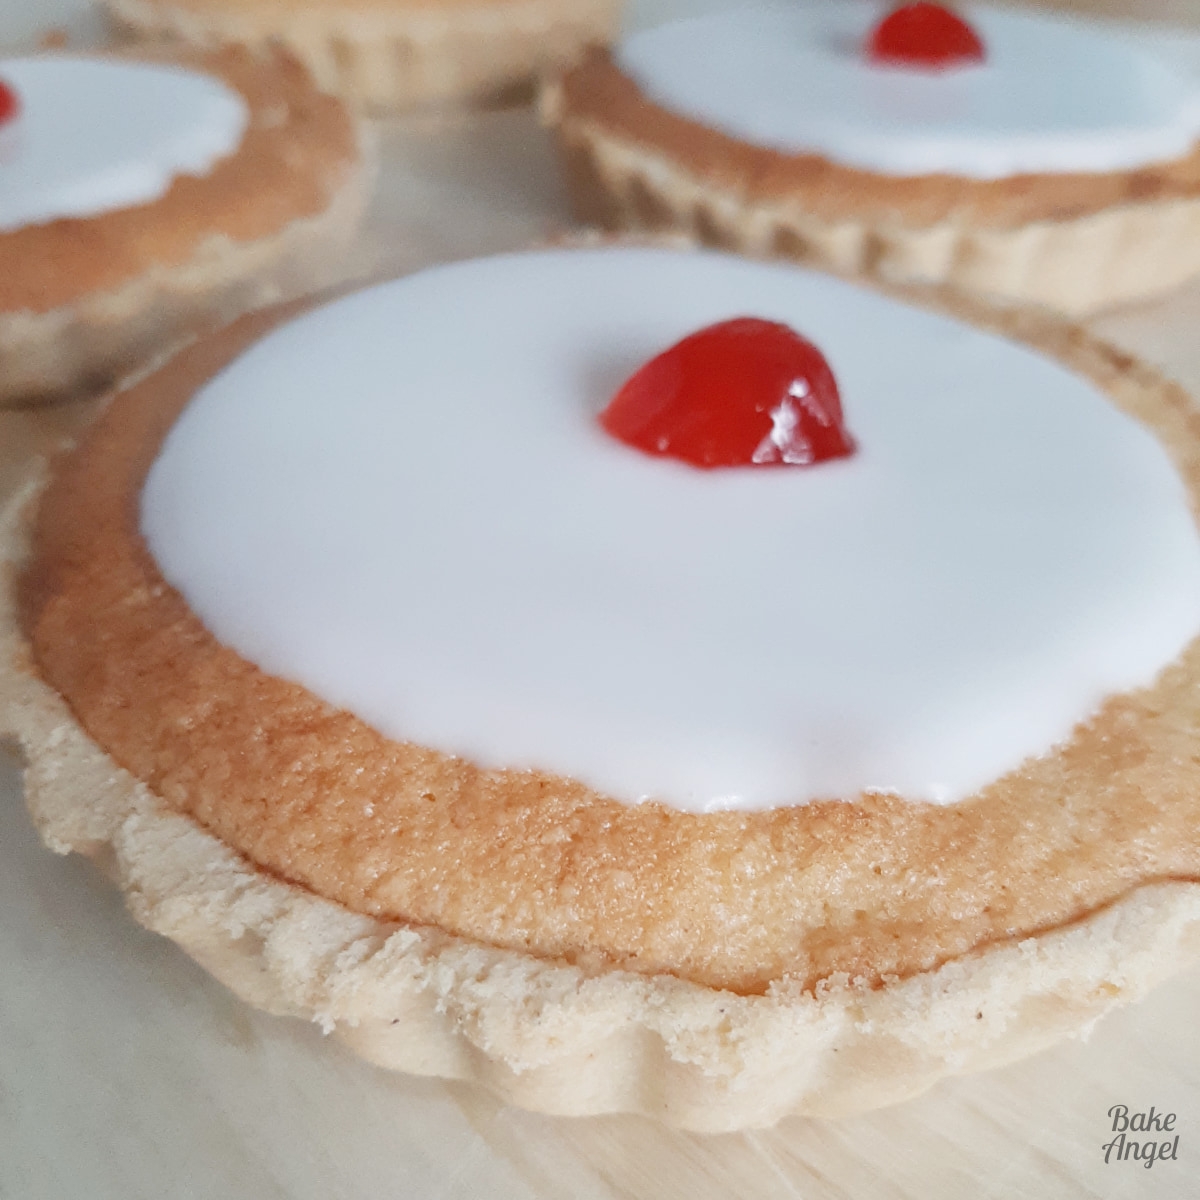
To finish the Cherry Bakewells, cut glace cherries in half and add them to the centre of the icing. Dessert perfection!

Let’s eat!
Let’s take a look inside one of these mini cherry Bakewell tarts.

We’ve got a great ratio of pastry to jam and frangipane, and of course, the icing on top as well, which just finishes it off perfectly. Are you drooling yet?

I love that these are easy to make, once you break down all of the steps. And they are perfect to serve for afternoon tea or a nice little tea party.

Cherry Bakewell FAQs
You can make 4 to 5 mini tarts or 1 larger tart with this recipe. You may have some pastry and frangipane leftover. Freeze any unused items or use the leftovers to make smaller tarts in a muffin tin.
These tarts can be frozen in an airtight container and stored for up to 3 months. Once you’re ready to eat one, remove it from the freezer, pop it on a plate and allow it to defrost on the counter.
No need! The pastry will naturally come away from the tart case slightly as it bakes. I highly recommend using tart bases with a removable base, as these make it a lot easier to remove the pastry from the case once it has been baked.
I have successfully made vegan shortcrust pastry by replacing the egg with 2 tbsp of plant-based milk. You can also substitute the eggs with 2 flax eggs. See my substitution notes for the full flax egg details.
Store any spare tarts in an airtight container at room temperature for 2-3 days. If you live in a hot climate, store in the fridge instead. Allow to come back to room temperature before eating.
Raspberry jam is traditional, but strawberry or cherry jam also works well, depending on your preference.

Craving More Tarts?
Check out these gorgeous tart recipes:
- Indulge with my decadent Gluten Free Chocolate Ganache Tart (Gluten & Dairy Free)
- Create your own afternoon tea spread with my Strawberry Whipped Cream Tart (Dairy Free)
- Keep things fruity with a classic Sable Breton Tart (Dairy Free)
- Try these classic Canadian Maple Butter Tarts (Vegan)
Ready to bake? Here’s the full gluten-free, dairy-free mini cherry Bakewell tart recipe with exact measurements and step-by-step instructions.

Gluten Free Dairy Free Mini Cherry Bakewell Tarts
Angela’s Top Tip
Weigh your dry ingredients in grams with a scale for best results!
Ingredients
For the Shortcrust Pastry
- 200 grams Gluten Free 1-to1 Flour (1 1/3 cups – see note)
- Pinch Salt
- 100 grams Plant Based Butter (unsalted) (7 tbsp)
- 30 grams Icing Sugar (1/4 cup)
- 1 Egg (large – see note)
For the Filling
- Raspberry Jam
For the Frangipane
- 100 grams Plant Based Butter (unsalted) (7 tbsp)
- 100 grams White Sugar (1/2 cup)
- 2 Eggs (large – see note)
- 150 grams Almond Flour (1 1/3 cups)
- ½ tsp Almond Extract
For the Almond Icing
- 100 grams Icing Sugar (1 1/4 cups)
- Small amount of water
- 1 drop Almond Extract (approx 1/8 tsp)
- 2 Glace Cherries (1/2 for each tart)
Instructions
Prep
- Preheat your oven to 340°F / 170°C and gather all your supplies and ingredients.
To Make the Shortcrust Pastry
- Add 200g (1 1/3 cup) Gluten Free 1-to-1 flour, a pinch of salt and 100g (7 tbsp) unsalted plant based butter to a mixing bowl. Mix until it has a sand like texture and resembles breadcrumbs.
- Add 30g (1/4 cup) icing sugar and 1 beaten egg. Mix to combine until it clumps together. Scrape down the bowl and turn out onto a floured surface. Knead a few times into a smooth ball of pastry.
To Make the Tart Cases
- On a floured surface, roll out approx 95g of pastry so that it is slightly larger than the tart case. Lay the pastry over the case and then press down gently so that the pastry fits snuggly in to the case. *No need to grease the tart case*
- Cut off any excess pastry with a sharp knife and prick holes in the base with a fork.
- Cut an oversized circle of parchment paper and line the tart case. Add baking beads, ensuring that they are not stacked on top of each other.
- Place the tart cases on a baking tray and bake for 10 minutes at 340°F / 170°C. Remove from the oven and carefully remove the baking beads from each case. Use the parchment paper to lift them out and place in a bowl to cool down. Immediately place the tart cases back in the oven for 5 minutes to finish baking. Once baked, allow to cool on a cooling rack.
To Make the Frangipane
- Add 100 grams of white sugar to 100 grams of plant based butter and beat together until combined.
- In a separate bowl beat 2 eggs and 1/2 tsp of almond extract together. Pour a bit at a time in to the butter and sugar stirring well between each addition.
- Add 150 grams of almond flour to the mixture and stir with a spatula to combine everything together.
Adding the Filling
- Once the tart cases are cool, add a generous teaspoon of raspberry jam to each base. Use the back of the spoon to smooth the jam out evenly.
- Top with the frangipane mixture, filling the tart cases to about three quarters full.
- Bake at 340°F for 25 minutes until golden. Remove from the oven and allow to cool completely.
To Make the Almond Icing
- Remove the tarts from their baking cases.
- Add 100 grams of icing sugar to a small bowl and add small amounts of water to create a thick paste (start with 1 tsp). Add 1 drop of almond extract and stir to combine. The icing should be thick but spreadable.
- Spread the icing on top of each tart then add half of a glace cherry on top.
- Serve immediately and enjoy!
Video
Notes
- Yield: The shortcrust pastry recipe makes 380g which is enough for 4-5 mini tarts or a larger tart case. I usually make a few different tart flavours when I make a batch of pastry (check out the post for more tart recipes). Spare pastry can be refrigerated for 1 week or frozen for 3 months.
- Modifications: If you are not gluten-free, substitute the GF flour with all-purpose flour.
- Eggs: I usually use large eggs in my baking, which are equivalent to approximately 50g once removed from their shell. You can also use a medium egg in this recipe.
- Vegan Option: To veganise this recipe, use flax eggs in place of regular eggs.
- Storage: Store any unused tarts in an airtight container at room temperature for 2-3 days.
- Freezer: These tarts can be frozen in an airtight container and stored for up to 3 months. Once you’re ready to eat one, remove from the freezer, pop on a plate and allow to defrost on the counter.


Such a classic! Beautiful recipe. We really enjoyed making (and eating!) these! Love that they are gluten free as well. Thank you.
Wonderful recipe, Thank You for sharing this.
You’re welcome – glad you like it.
These tarts look fantastic. Love that it is gluten free. Thanks for sharing.
Hope you enjoy them!
Love this recipe, gonna make one soon. Saving this!
Happy to hear that – I hope you love the tarts as much as we do.
Love this cherry tart, looks delicious and easy to make. Also really like they are gluten free and vegan. Thanks for sharing 🙂
You’re so welcome Elisa. Enjoy!
These mini cherry tarts were positively delightful! My family loved them.
So pleased that you all enjoyed them.