
Every home baker needs a reliable vanilla buttercream recipe that holds its shape, tastes amazing, and works in any climate. This stable dairy-free, vegan vanilla buttercream is my go-to for cakes, cupcakes, cookies, and macarons. Its medium consistency makes it perfect for piping, decorating, or using as a creamy filling, and it slightly crusts over for a professional finish.

Why You’ll Love this Buttercream
Having a great vanilla buttercream recipe is essential for any home baker, and this one is easy to make, versatile, and delivers professional results every time. Here’s why it’s a favourite:
- Vegan & Dairy-Free: Made with plant-based butter and shortening, perfect for allergy-friendly baking.
- Stable in High Humidity: Holds its shape even in warm kitchens, which is ideal for summer baking.
- Medium Consistency: Perfect for piping, filling, and decorating, giving smooth edges and beautiful swirls.
- Versatile: Works beautifully on cakes, cupcakes, cookies, macarons, and layered desserts.
- Easy to Colour: Use clear vanilla extract to keep a bright, white base, perfect for vibrant colours or two-tone designs.
- Reliable & Easy: Minimal ingredients, simple steps, and a fail-proof method make this a staple recipe.
Ingredients and Substitutions
This buttercream uses a few simple, versatile ingredients that you can adapt to suit your dietary needs and flavour preferences:
- Plant-Based Butter or Shortening: The base of your buttercream. A 50/50 mix gives the ideal balance of flavour and stability. For richer flavour, increase the butter portion, but note it may soften more in warm conditions.
- Icing Sugar: Provides sweetness and structure. Sift it for a smooth, lump-free buttercream. For refined sugar-free options, powdered sugar substitutes can be used, though texture may vary slightly.
- Plant-Based Milk or Water: Adds moisture for a creamy, pipeable consistency. Almond, soy, or oat milk work well. Water can be used for a lighter, colour-neutral option.
- Vanilla Extract: Use clear vanilla extract to keep the buttercream bright white. Regular vanilla and vanilla bean paste work too and give a slightly creamier hue. You can experiment with other extracts like almond or maple.
- Salt: A pinch balances sweetness and enhances flavour.
Tip for Substitutions: This recipe is naturally vegan and dairy-free, and it’s adaptable for allergy-friendly variations. For a richer flavour, increase the plant-based butter portion, while for extra stability – especially useful in humid kitchens or when transporting cakes – you can use all shortening. You can also experiment with different plant-based milks and flavour extracts to create your own unique twists.
How to Make Stable Vanilla Buttercream
Before you begin, gather all your ingredients and ensure that both the plant-based butter and the liquid (plant-based milk or water) are at room temperature. This will help the buttercream come together smoothly and achieve the perfect light, fluffy consistency.
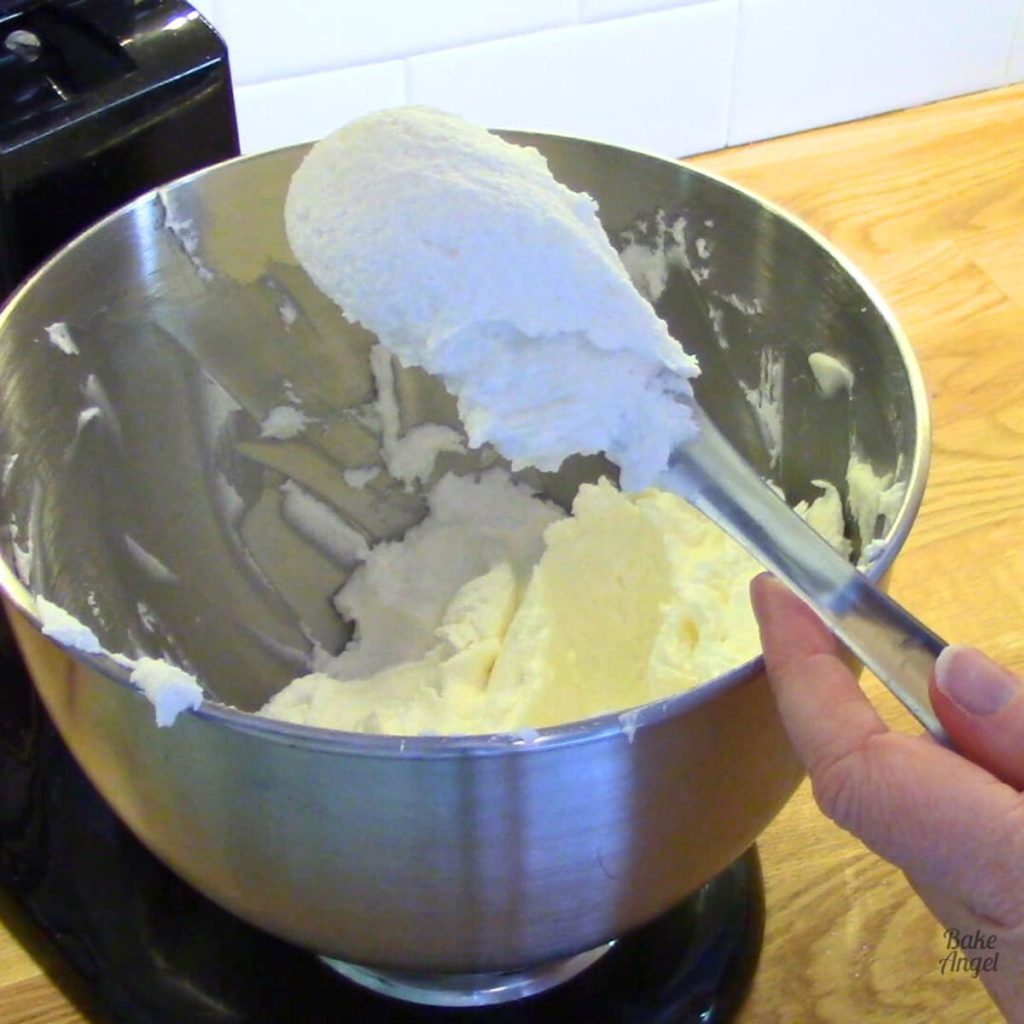
- Soften the Butter: Add plant-based butter or shortening to a mixing bowl. Beat with a paddle attachment for 1–2 minutes until softened. This step ensures a smooth, creamy base.
- Add Icing Sugar Gradually: Slowly add icing sugar in small batches to prevent it from flying out of the bowl. Mix until incorporated. Gradual addition ensures a smooth texture without lumps.
- Add Liquid & Flavourings: Mix in plant-based milk or water, remaining icing sugar, vanilla extract, and a pinch of salt. This step balances flavour and texture.
- Final Mix: Scrape down the sides of the bowl and continue mixing for 1–2 minutes until light, fluffy, and smooth.
- Optional Colouring: Your buttercream is now ready to colour or pipe immediately. For a bright white base, use clear vanilla extract and avoid darker liquid extracts.
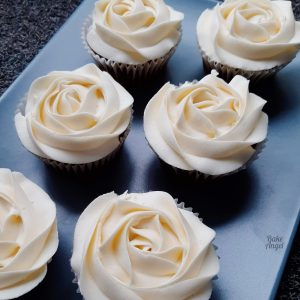
Piping Tips for Perfect Buttercream
This stable vegan vanilla buttercream is ideal for piping thanks to its slightly crusting texture and medium consistency. Here are some tips to get the best results:
- Create Flowers and Two-Tone Designs: The slightly crusting texture allows you to pipe detailed floral patterns and two-tone swirls that hold their shape beautifully. Try using multiple colours in the same piping bag for a stunning ombré or rainbow effect.
- Experiment with Piping Tips: Different piping tips produce different effects. Use rosette tips for elegant swirls, star tips for classic cupcake finishes, and shell tips for borders and accents. Combining tips can give your baked creations a professional, bakery-quality look.
- Control Softness: If your buttercream becomes too soft while piping, don’t worry! Simply refrigerate for 10–15 minutes to firm it up, then re-whip briefly to restore a smooth, pipeable consistency.
- Practice Pressure and Angle: For consistent results, maintain even pressure on the piping bag and hold it at the correct angle for the design you want. Practising on a parchment sheet before decorating your cake or cupcakes can help.
- Keep It Fresh: Work in a cool environment when possible, especially in warmer kitchens. This ensures the buttercream keeps its shape and doesn’t melt while piping.
By following these tips, you can confidently pipe everything from cupcakes and cake borders to intricate flowers and layered designs, making your creations look professional and polished.
Common Buttercream Questions
Yes! Its medium consistency holds up well even in warm or humid kitchens.
Absolutely. The slightly crusting texture makes it ideal for detailed piping and creating patterns that hold their shape.
Yes, it works beautifully as a filling for macarons and layered desserts.
Yes! Store in the fridge or freezer (see storage tips). Bring to room temperature and re-whip before using.
Definitely! Try adding cocoa powder for a chocolate version or a few drops of fruit extract or jam for unique flavour twists. I adore turning this into strawberry buttercream in the Summer by adding a few teaspoons of my homemade strawberry jam.
If too soft, refrigerate for 10–15 minutes and re-whip before piping. If too stiff, add a teaspoon of plant-based milk at a time until you reach the desired consistency.
Storage Tips
- Store in an airtight container in the refrigerator for up to 1 week.
- Bring to room temperature and re-whip before using for best results.
- For longer storage, freeze for up to 3 months; thaw in the fridge overnight and re-whip before piping.
Extra Tip: If your buttercream separates slightly in the fridge, simply let it come to room temperature and beat for 1–2 minutes to restore a smooth texture.
Craving More?
Try these recipes and ideas with your stable vanilla buttercream:
- Cakes: Use to fill and decorate my Vegan Vanilla Cake
- Cupcakes: The perfect icing to decorate some Vegan Vanilla Cupcakes
- Cookies: Use as a filling for sandwich cookies with my Copycat Disney Chocolate Chip Cookies
Stable Vanilla Buttercream (Dairy-Free & Vegan)
Equipment
Ingredients
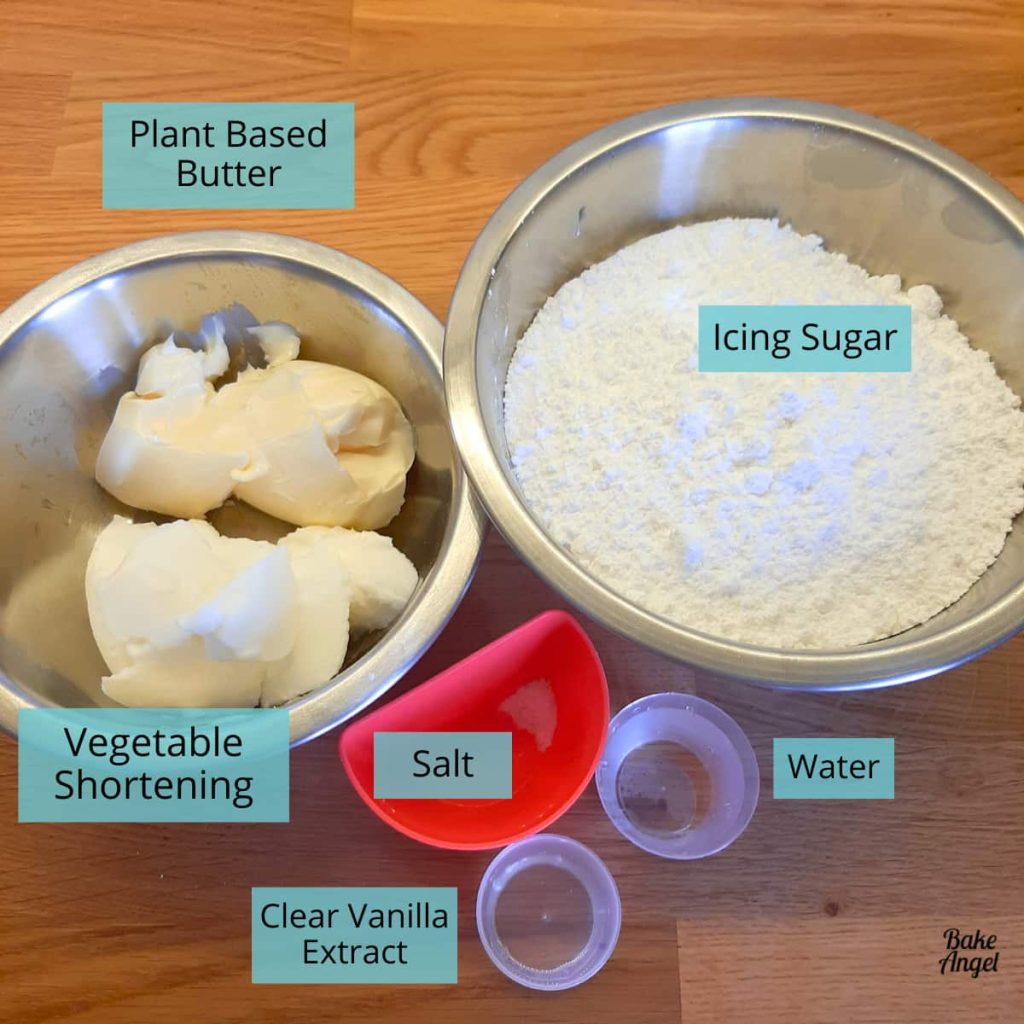
- 100 g Plant Based Butter (unsalted) 1/2 US Cup
- 100 g Vegetable Shortening 1/2 US Cup
- 454 g Icing Sugar 4 US cups
- 2 tbsp Water
- 1 tsp Clear Vanilla Extract
- Pinch of Salt
Instructions
- In a stand mixer bowl, combine 100 g Plant Based Butter (unsalted) and 100 g Vegetable Shortening and beat for 1–2 minutes with the paddle attachment until softened.
- Gradually add 454 g Icing Sugar and mix until smooth.
- While adding in the icing sugar, near the end add in 2 tbsp Water, 1 tsp Clear Vanilla Extract and Pinch of Salt. Continue mixing until combined.
- Scrape down the sides of the bowl and mix for 1–2 minutes until light and fluffy.
- Colour or pipe as desired.
Video
Notes
- Butter to Shortening Ratio: A 50/50 mix gives a balance of flavour and stability. Use all shortening for extra stability or all butter for a richer taste.
- Flavour Variations: Add cocoa powder for chocolate buttercream, or a few drops of almond, maple, or your favourite fruit jam for unique flavours.
- Consistency Tips: For piping, aim for medium consistency; if too soft, chill 10–15 minutes and re-whip.
- Colouring: Use gel or powdered food colouring for vibrant hues; avoid liquid colours that can thin the buttercream.
- Usage Ideas: Works perfectly for cakes, cupcakes, cookies, macarons, or layered desserts.
- Storage: Store in an airtight container in the refrigerator for up to 1 week. Bring to room temperature and re-whip before using.
- Freezing: For longer storage, freeze for up to 3 months; thaw in the fridge overnight and re-whip before piping.


Leave a Reply