These dairy free mini lemon meringue pies are the perfect small batch dessert, with a crisp pastry base, tangy lemon filling, and light, fluffy meringue topping. Made with simple ingredients, this easy lemon meringue pie recipe is ideal for spring baking, afternoon tea, or individual desserts.
As an allergy-friendly baker with over 19 years of experience, I’ve tested this recipe multiple times to create the perfect balance of sweet and tart flavours while keeping it completely dairy-free, so no one needs to miss out.
This recipe evolved from one of the technical challenges from Season 13 of the Great British Baking Show. And as I’m so obsessed with mini desserts lately, I decided to make mini lemon meringue pies instead of the larger one that Prue Leith set for the bakers because individual desserts are just the best!
If you want to watch how my first attempt turned out, watch my week 5 episode of Bake Angel takes on The Great British Bake Off in the recipe card! Fun fact: before this challenge, I had never tried lemon meringue pie! I’m hooked now, and this adapted recipe is always on repeat in the summer when we want something a little fancy for dessert!
Why You’ll Love These Mini Lemon Meringue Pies
This classic lemon meringue dessert may seem intimidating to make with 3 different elements involved, but no need to stress. My step-by-step guide will get you through the recipe in a breeze, and the results are well worth it.
These mini pies are sweet and tangy, with a flaky dairy-free buttery base that will just light up your taste buds. Here’s why you should make this recipe:
- Dairy free dessert
- Small batch (makes 4 mini pies)
- Perfect for spring and Easter baking
- Easy step-by-step method
- Gluten free option available
If you love citrus desserts, you might also enjoy my vegan lemon drizzle muffins.
Ingredients and Substitutions
This dairy free mini lemon meringue pie recipe uses simple ingredients with easy gluten-free substitutions, making it perfect for allergy-friendly baking. Read my suggestions and see my FAQs for more recipe tips.
This recipe comprises 3 elements: the pastry base, the lemon filling and the meringue topping. US Cup measurements are included in the recipe card for those who prefer this method for measuring ingredients.
For the Pastry Bases
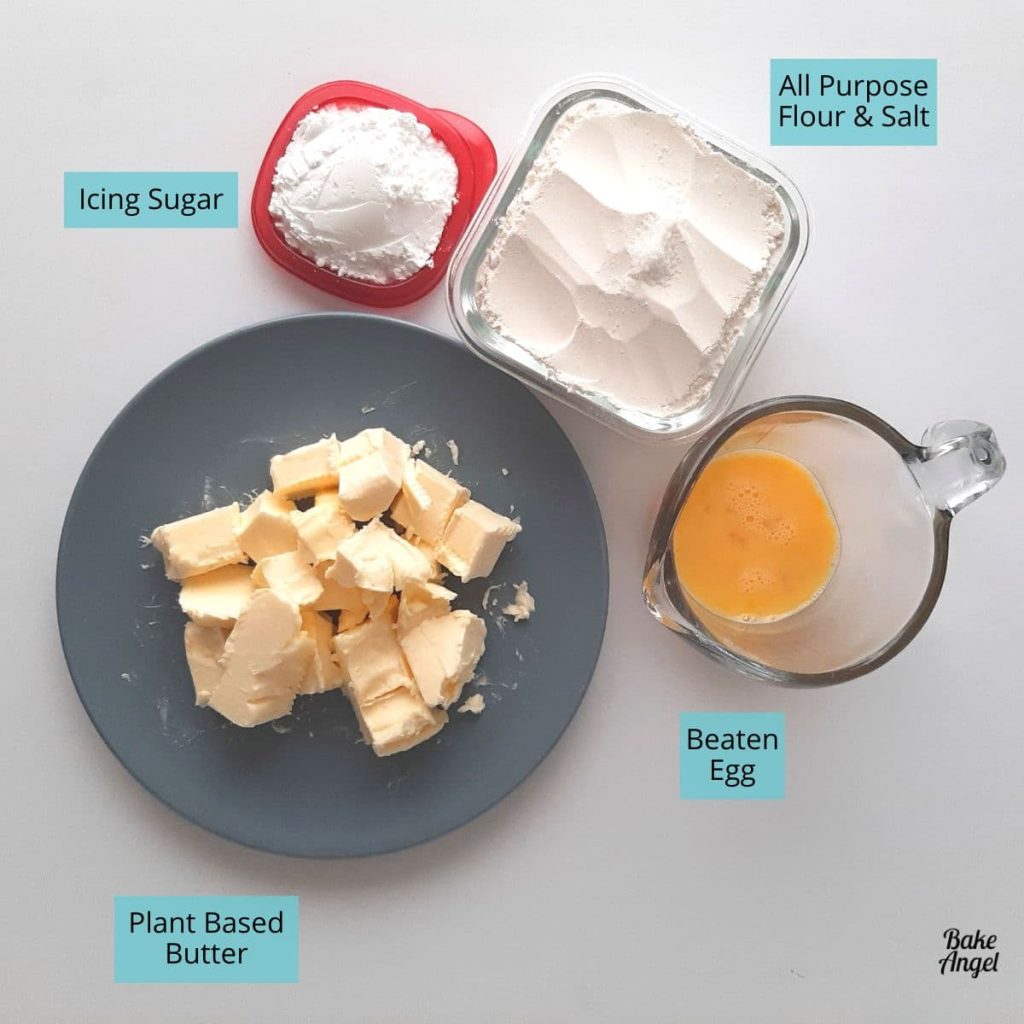
Flour: The pastry base is made with all-purpose (plain) flour. To make this recipe gluten-free, simply swap out the all-purpose flour for a 1-to-1 baking flour blend such as Bob’s Red Mill. I use this GF flour frequently and am always happy with the results.
Flour additions: I am adding salt as a flavour enhancer.
Icing Sugar: This helps create a lighter and sweeter pastry.
Fat: The pastry needs fat to help with the richness, and I am using unsalted plant-based butter. Sub with dairy butter if you are not dairy intolerant.
Egg: The egg adds richness and moisture to the pastry and helps to bind everything together. Sub with 50 grams of apple sauce or 1 flax egg (mix 1 tbsp ground flax with 3 tbsp water) if you are vegan.
For the Lemon Filling
The lemon filling is incredibly easy to make, using just 5 ingredients.

Lemons: 3 lemons are needed to make this tangy filling. We will be using the juice and zest.
Orange juice: I recommend using no-pulp smooth juice. This adds an extra flavour dimension to the filling.
White sugar: for sweetness. This pie filling is meant to be sweet and decadent.
Egg yolks: 3 egg yolks are needed to thicken and add richness to the lemon filling. I have not tried a vegan substitute for this.
Cornflour: to help thicken the filling.
For the Meringue
3 simple ingredients for the meringue.

White Sugar: to sweeten the meringue.
Egg Whites: 3 egg whites are needed to create volume.
Lemon Juice: helps with the stability of the meringue. You can substitute cream of tartar if you prefer. I recommend using 1/2 tsp.
How to Make Dairy-Free Lemon Meringue Pie
Follow these simple steps to make perfectly balanced dairy-free mini lemon meringue pies with a crisp base, smooth filling, and fluffy topping.
Let’s start by making our pastry. To a mixing bowl, add 200 grams of all-purpose flour with a pinch of salt and then crumble 150 grams of unsalted cold butter into it until it resembles a breadcrumb consistency. Then add 25 grams of icing sugar and one beaten egg, which will help to bind everything together. Mix together with your hands until it starts to clump together, and then knead it slightly on a floured surface until it forms a workable ball of dough.
I always roll my pastry dough between parchment paper. First, this method stops everything from sticking to the rolling pin when you’re rolling. Second, it keeps everything nice and smooth. Top Tip: Use paint stirrers on the side as guide sticks to ensure that the dough is at an even depth.
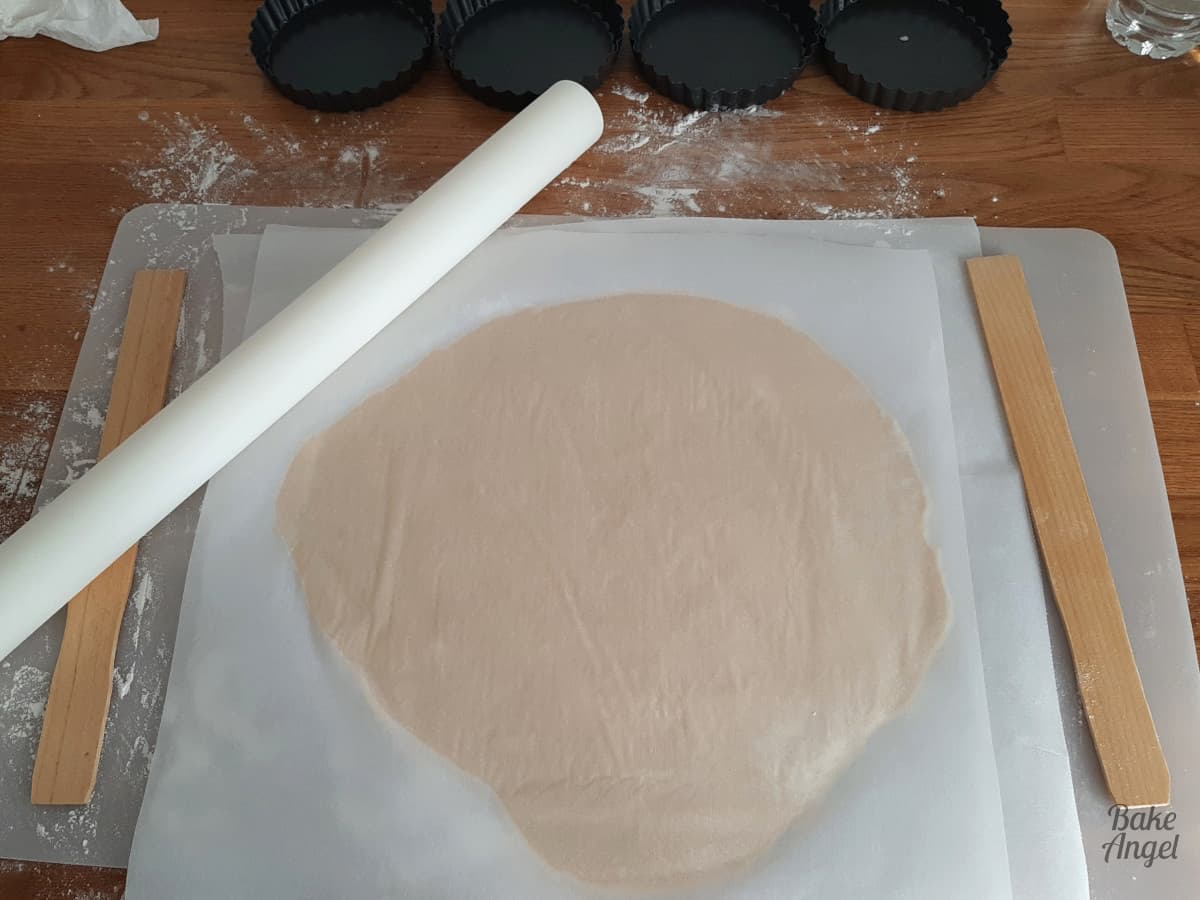
Cut out 4 circles, making sure that each one is slightly larger than the mini tart pans. I recommend mini tart pans with a loose base (like these Wilton ones) as they make removal much easier once the pies are baked.
Next, shape each circle of dough into the tart cases using your fingers lightly to press everything into place. Make sure to press the dough into the sides as well, then cut off any excess with a knife.
Pop them on a baking tray and chill them in the fridge for about 30 minutes. You could also pop them in the freezer for 15 minutes instead if you wanted to speed up this process. With 10 minutes left, preheat your oven to 400 degrees Fahrenheit, which is about 200 degrees Celsius (180C for fan-assisted).

Blind Baking
This is the most important stage that I always recommend you don’t skip whenever you’re making a pastry base for a tart. Blind baking is the process of cooking off the pastry dough before adding any filling. This helps to cook off the flour and prevents a ‘Soggy Bottom’, which is when you have raw spots in the base from undercooking the pastry.
Add a small square of parchment paper to each tart case and weigh them down with baking beans (or beads). You can also use uncooked rice. Bake in the oven for 15 minutes.

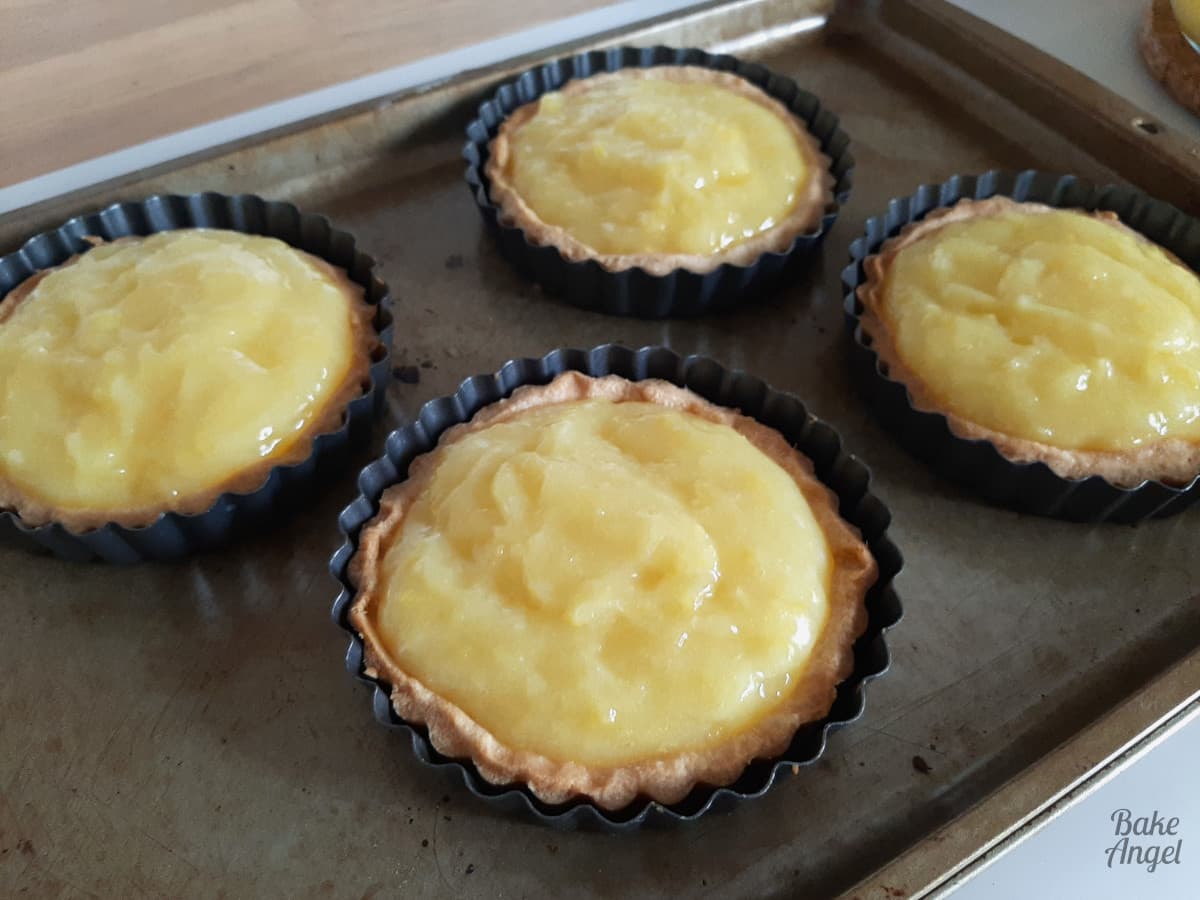
After 15 minutes, remove the baking tray from the oven and take out the parchment paper and the baking beads. Be careful as they will be very hot! The pastry will still be quite pale at this stage, and needs to bake for another five to ten minutes until they look like this. You’ll notice that the pastry cases haven’t puffed up at all, and they are a little bit golden. Set them aside to cool while making the lemon filling.

Making the Pie Filling
Zest and juice 3 lemons, then add both to a small bowl. Stir in 30 grams of cornflour until combined. The cornflour is going to help thicken the lemon pie filling. In a small saucepan, bring 75 ml of smooth orange juice and 75 ml of water to a boil, then stir in the lemon mixture.
Bring it back up to heat while continuing to stir. It will thicken up very quickly and is ready once it coats the back of a spoon. Remove the pan from the heat. Stir together 3 egg yolks and 125 grams of sugar in a large bowl, then pour the hot lemon mixture into it.
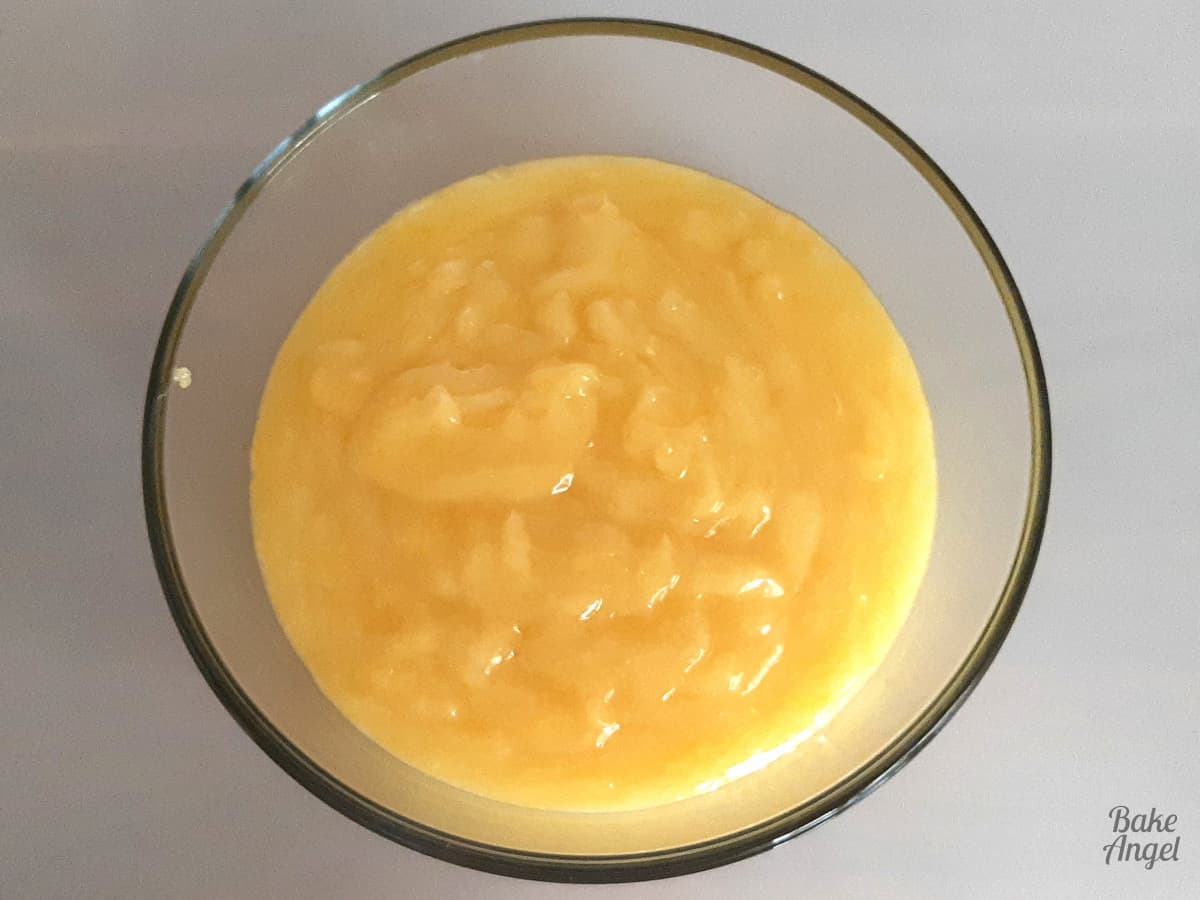
Continue to stir the mixture straight away to quickly combine then pour back into the saucepan and bring it back to a simmer while it thickens up to a custard consistency.
Transfer to a bowl to cool down slightly then spoon the lovely lemon filling into each case, leaving a little bit of room at the top for the meringue. Give each base a quick shake to level everything out.
Making the Meringue Topping
Before making the meringue, preheat your oven to 300 degrees Fahrenheit, which is about 150 degrees Celsius. (130C fan-assisted)
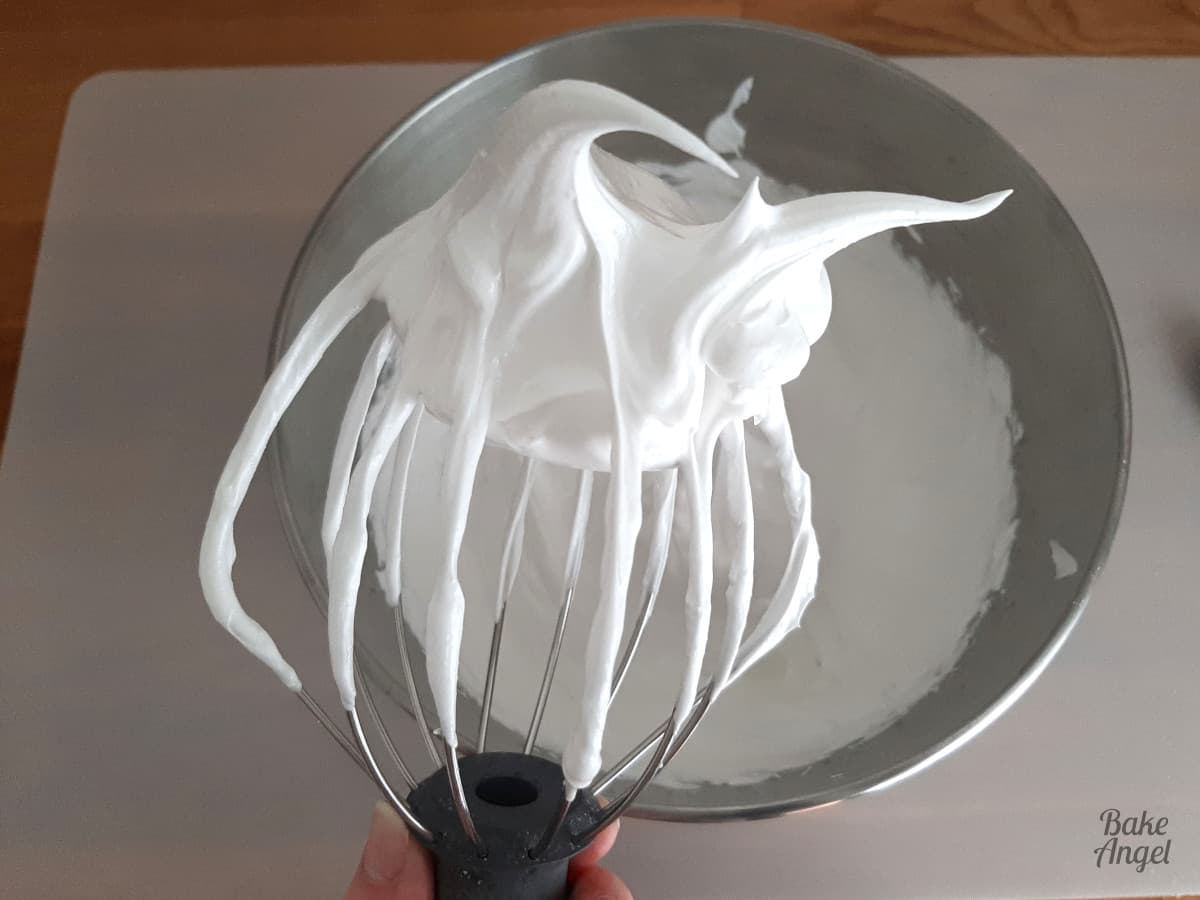
This is a very traditional meringue recipe made with egg whites. In a stand mixer bowl add 3 egg whites and 1.5 teaspoons of lemon juice. Whisk together until soft peaks form. While the mixture continues to whisk, start to add in the white sugar. We’re using 150 grams of sugar in total, and you want to add a spoonful at a time so that it doesn’t deflate the meringue. Once the meringue has a stiff peak, it is ready.
To complete the pies, add dollops of the meringue on top of the lemon filling. You could pipe it on and create fancy designs if you want to.

I ended up just using the edge of a spoon to tease the meringue towards the edge of the pastry and created swirl shapes as well.

Bake in the oven for 15-20 minutes, depending on how set you prefer your meringue to be. They will start to brown slightly if you leave them in for longer. I actually quite like a firmer meringue and left mine in a bit longer, and they still tasted great.
Allow the pies to cool completely on the baking tray. To remove them from the tart pans, carefully hold the pie in one hand and push the underneath with your other hand so you can remove the outer ring, then slide off the base. If you prefer to serve the pies chilled, pop them in the fridge before serving.

Pro Tips for Perfect Lemon Meringue Pies
This dairy-free lemon meringue pie recipe was originally developed in 2022, and over the years, I’ve learned a few extra tips which I’ve now added to this post to ensure your success every time. Here’s a summary:
- Always blind bake the pastry to avoid a soggy base
- Cook the lemon filling until it coats the back of a spoon
- Add sugar gradually to the meringue for stability
- Use fresh lemon juice for the best flavour
I’m pretty sure your family and friends will be wowed when you make these mini pies, as they are the perfect showstopper to serve at your spring and summer parties!
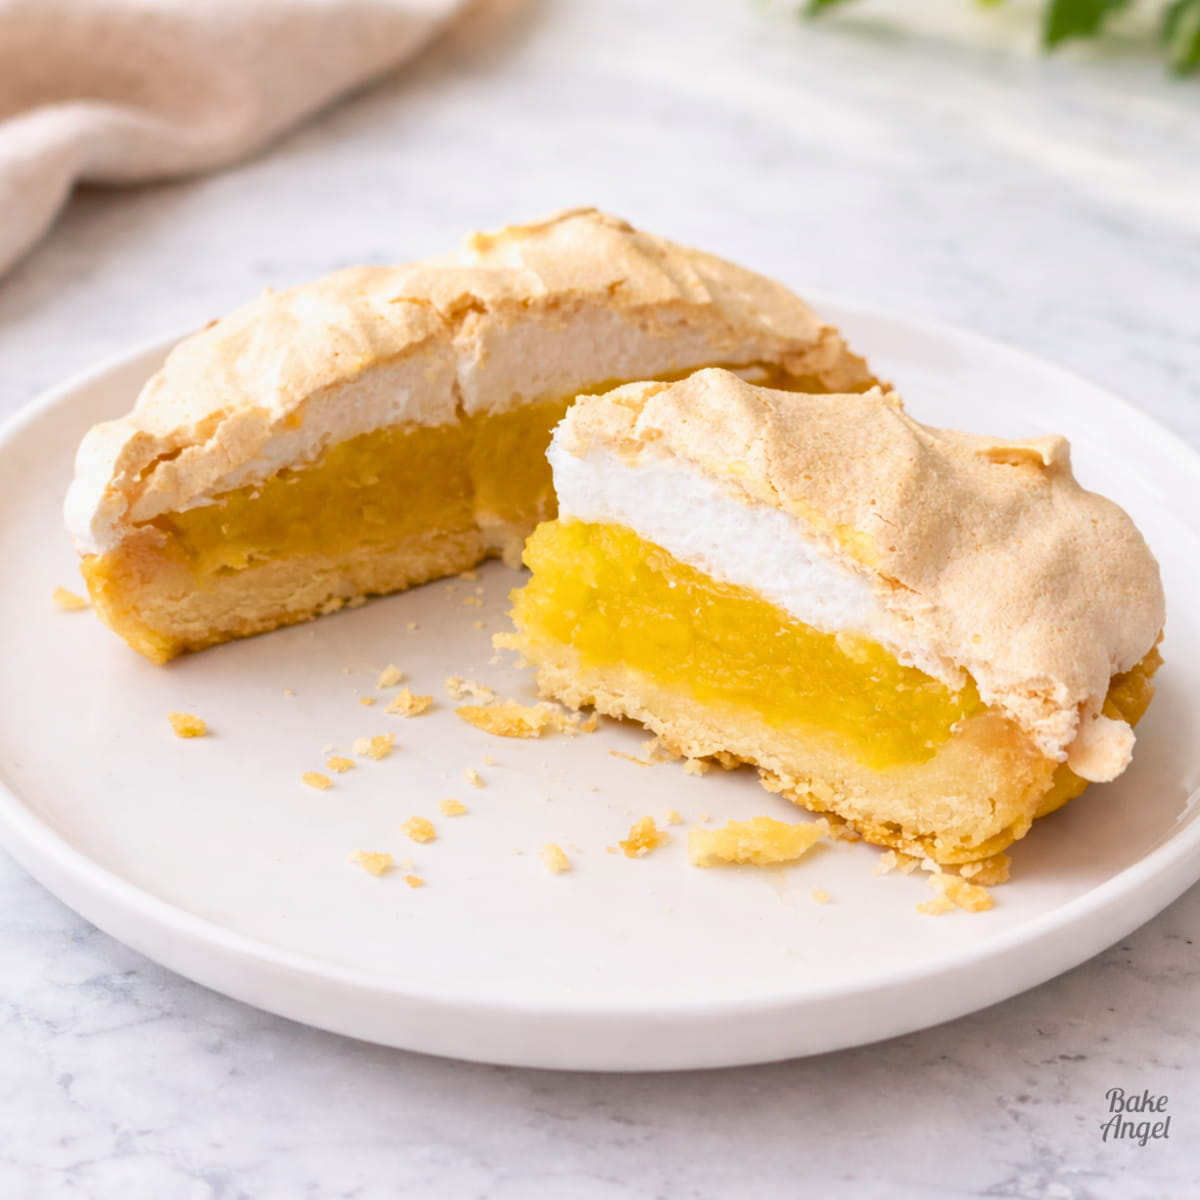
A Slice of Citrus Yumminess
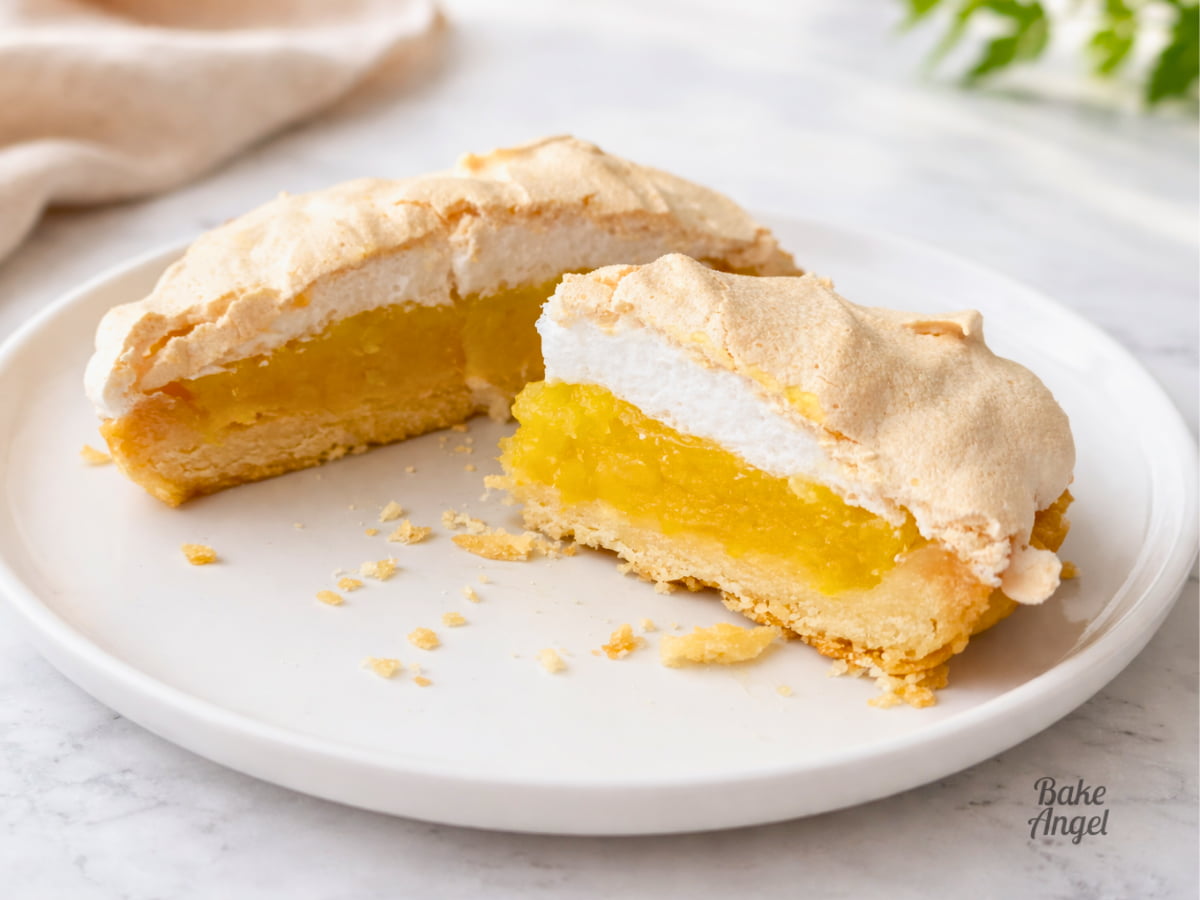
I adore the colours of this mini pie, from the slightly golden top, and the whiteness of the inside of the meringue to the bright yellow of the pie filling. We also have a nice ratio of the base and the lemon filling and the meringue as well, and there is still a little bit of a nice jiggle to the lemon filling itself. Perfect!
Storage and Freezing
These pies are best served on the day of baking. That being said, you can store any leftover pies in the fridge for 2 to 3 days. The meringue will soften up over time but will still taste great.
To freeze a lemon meringue pie, place it in an airtight container and freeze for 1-2 weeks. Allow to defrost in the fridge before serving.
Lemon Meringue FAQs
This recipe will make a 9-inch pie. When you roll out the dough, ensure it is slightly larger than the 9-inch pan. Follow the recipe for the remaining stages and bake for 15-20 minutes. Allow to cool completely before slicing and serving.
To make a gluten-free base, substitute the all-purpose flour with 200 grams 1-to-1 Baking Flour (I highly recommend Bob’s Red Mill). Check out my ingredients guide for substitution tips.
You may have spare meringue and lemon pie filling leftover from this recipe, depending on how much you use in each pie. Use any spare meringue within 24 hours. You can freeze the lemon pie filling in an airtight container for up to 3 months.
If your lemon filling is runny, it likely needs to cook longer. Make sure it thickens enough to coat the back of a spoon before removing it from the heat. The filling will continue to set as it cools.
Recipe Overview
Having never made this dessert before, taking on the Bake Off challenge, I was honestly so impressed with the sharpness of the pie filling, which creates such a clean, refreshing taste. I can see why people love lemon meringue pie, and I hope that you’ll enjoy making my dairy free mini version.
This dairy free mini lemon meringue pie recipe is perfect for anyone looking for an easy, small-batch dessert. These mini lemon pies are bright, tangy, and topped with fluffy meringue, making them ideal for Easter desserts, spring baking, or individual treats.
Love this recipe? Save it to Pinterest for later!
Craving More Fruity Treats?
If you love fruity desserts, check out these flavoursome recipes:
- If you love blueberries, you’ll adore my rustic almond blueberry cake ( vegan)
- Wow your guests with a classic pineapple upside down cake (dairy free)
- And if you love zesty treats, check out my lemon drizzle muffins (vegan)
- Our peach crumble is like a summer party in your mouth (gluten free, vegan)
- Pure comfort eating with our apple blackberry pie recipe (vegan)

Dairy Free Mini Lemon Meringue Pies
Equipment
- Saucepan
- Bowl
Angela’s Top Tip
Weigh your dry ingredients in grams with a scale for best results!
Ingredients
For the Pastry
- 200 grams All Purpose Flour (1 3/4 US Cups)
- Pinch Salt
- 150 grams Plant Based Butter (unsalted) (1 1/3 sticks)
- 25 grams Icing Sugar (1/4 US Cup)
- 1 Egg (large, beaten)
For the Lemon Pie Filling
- 3 Lemons (Zested and juiced)
- 30 grams Cornflour (1/4 Cup)
- 75 ml Orange Juice (No bits)
- 75 ml Water
- 125 grams White Sugar (1/2 Cup + 2 tbsp)
- 3 Egg Yolks
For the Meringue
- 3 Egg Whites
- 1.5 tsp Lemon Juice
- 150 grams White Sugar (3/4 Cup)
Instructions
For the Pastry Base
- To a mixing bowl, add 200 grams of all-purpose flour with a pinch of salt and then crumble 150 grams of unsalted cold butter into it until it resembles a breadcrumb consistency. Then add 25 grams of icing sugar and one beaten egg which will help to bind everything together. Mix until it starts to clump together, then gently knead on a floured surface until a smooth dough forms.
- Line the mini tart cases with pastry, ensuring you press it into the sides. Chill in the fridge for 30 minutes.
- Line each case with parchment and add baking beads. Blind bake the tart cases at 400°F / 200°C for 15 minutes. Remove the paper and beads then bake again for 5-10 minutes until no raw spots remain. Set aside to cool.
For the Lemon Filling
- Zest and juice 3 lemons then add both to a small bowl. Stir in 30 grams of cornflour until combined.
- In a small saucepan bring 75 ml of smooth orange juice and 75 ml water to a boil then stir in the lemon mixture. Bring it back up to heat while continuing to stir. It will thicken up very quickly and is ready once it coats the back of a spoon. Remove the pan from the heat.
- Stir together 3 egg yolks and 125 grams of sugar in a large bowl then pour the hot lemon mixture into it. Continue to stir the mixture straight away to quickly combine then pour back into the saucepan and bring it back to a simmer while it thickens up to a custard consistency. It is ready once it coats the back of a spoon and holds a clear line when you run your finger through it. Transfer to a bowl to cool down slightly.
- Spoon into each tart case, leaving room at the top for the meringue. Give each base a shake to level everything out.
For the Meringue
- Preheat your oven to 300°F / 150°C (130C fan-assisted).
- In a stand mixer bowl add 3 egg whites and 1.5 teaspoons of lemon juice. Whisk together until soft peaks form. While the mixture continues to whisk, start to add 150 grams of white sugar. You want to add a spoonful at a time so that it doesn't deflate the meringue. Once the meringue has a stiff peak, it is ready.
Final Bake
- Add dollops of meringue to each pie then bake for 15 to 20 minutes.
- Serve once cooled. Chill before serving if you prefer. Enjoy!
Video
Notes
- Yield: This recipe makes 4 mini lemon meringue pies. You can also make a 9 inch pie if you don’t have mini tart cases.
- Leftovers: You may have spare meringue and lemon pie filling. Use any spare meringue within 24 hours. You can freeze the lemon pie filling for up to 3 months. See the recipe FAQ section for further details.
- Storage: Store leftover pie in the fridge for 2 days. The meringue will soften up over time but will still taste great.
- Freezer: To freeze a lemon meringue pie, place it in an airtight container and freeze for 1-2 weeks. Allow to defrost in the fridge before serving.
- Gluten Free: To make a gluten free base, sub the all purpose flour with 200 grams 1-to-1 Baking Flour (I highly recommend Bob’s Red Mill).
- US Cups: Please note that US measurements will not increase automatically if you increase the recipe size by 2 or 3 times.
- Nutrition: Information is based on 1 mini pie per serving with 4 mini pies per recipe, and is calculated based on the actual ingredients used to create this recipe. Nutrition will vary based on brands and ingredients used.


These meringue pie looks so gorgeous and delicious. Pinned to try this soon.
I hope you’ll enjoy them!
My first time trying my own crusts, and this was fantastic! So buttery and delicious!
So pleased that you enjoyed making the crust Paula. It’s a great option if you are dairy free.
Great recipe, best when served with coffee.
I agree Charah! Glad you liked it.
Lemon Meringue is my Dad’s favorite so I made it for him for Easter and he totally loved it! Thank you for this great recipe!
I’m so happy to hear that Ned!
I made these mini pies for Easter and they were a huge hit! And a bonus that they were dairy free!
Thanks for sharing Tayler. I’m pleased that you enjoyed them.
I’m in heaven! We made this recipe today and I’m so impressed at how easy this was, especially as this was my first time making pastry! Two pies have been devoured already and we’re planning to eat the rest on the weekend. This was great, thank you so much.
So happy to read this Sarah. I’m glad you enjoyed the pies.