If you’ve ever pulled sugar cookies out of the oven only to find they’ve spread into uneven blobs, this 6-ingredient, no-chill vegan sugar cookie recipe is for you. It holds its shape beautifully, creates clean, sharp edges every time, and is perfect for detailed decorating. Busy bakers love this quick, reliable recipe!
Why I developed this Recipe
After my eldest started school, I dove headfirst into the world of sugar cookies, learning to decorate fun treats for him to take to class. I quickly realized that the secret to a great cookie isn’t just the icing – it’s the base itself.

As a baker with nearly 20 years of experience, I wanted a recipe that gave a perfect blank canvas every time. Many recipes I tried spread too much, lost their shape in the oven, or lacked flavour. This recipe is the result of careful testing, balancing taste, texture, and sharp edges, all while keeping it dairy-free and egg-free.
Why You’ll Love This Recipe
These sugar cookies are firm yet light, crunchy yet soft, and pair beautifully with royal icing, fondant and buttercream. Unlike most sugar cookie recipes, they melt in the mouth and taste great on their own. Plus, they’re dairy free, vegan, and can be easily made gluten free. Not vegan? No worries – my substitution guide has you covered.
This recipe is fail-safe and delivers sharp, clean edges every time, making it perfect for cookies that are:
- Detailed and defined – ideal for decorating
- Hold their shape – no more misshapen cookies
- Delicious and visually appealing – they taste as great as they look
- Easy to scale and store – great for gifts, parties, or selling
Whether you’re a cookie decorator or a busy parent who wants a quick, reliable recipe, these cookies are sure to impress.
How to Avoid Cookie Spread
If you’ve baked cookies before, you’ve probably noticed that some doughs spread more than others. With sugar cookies, there’s actually a bit of science behind it:
- Baking Soda = S for Spread – it encourages cookies to spread.
- Baking Powder = P for Puff – it adds extra rise, which can also change the shape.
This recipe skips the leavening agents entirely, which is one of the reasons these cookies hold their shape perfectly. Add to that the correct balance of fat, flour, and sugar, and you’ve got cookies that are firm on the edges, soft in the centre, and ready for decorating.

Pro-tips for zero-spread cookies:
- Stop mixing your dough as soon as it comes together. Overmixing can activate gluten and cause extra spread.
- Use butter with a lower water content – block-style plant-based butter works best.
- Check dough consistency – too wet, add more flour; too dry, add a splash of milk or water.
Even if you’re a busy parent or new to decorating, these tips make no spread sugar cookies a reality every time. Just look at the photo above to see sharp edges in action!
Why No Chill?
Truth is, I’m a busy procrastibaker – a mum who’s short on time and barely has room in the fridge to pop in a tray of cookies before they’re baked. That’s why this recipe skips chilling entirely.
I even tested chilling the dough, and it made no difference – the cookies held their shape perfectly either way. So whether you’re in a rush or just prefer to skip the fridge, this recipe gives you no spread, no chill sugar cookies every time. If you prefer chilling, go ahead – but it really isn’t necessary with this recipe.

Ingredients and Substitutions
This no spread sugar cookie recipe uses simple pantry staples, carefully balanced to create cookies that hold their shape and don’t require chilling. Because this is a vegan sugar cookie recipe, we’re using plant-based alternatives but I’ve included substitutions if you’re not dairy-free or egg-free.
Why I measure my ingredients
For decorating cookies, especially, accuracy matters. I always weigh ingredients for consistent results and sharp edges every time. Cup measurements are included in the recipe card for convenience.

Dry Ingredients
- Flour: I use all-purpose flour for structure and stability — this is key for cut out sugar cookies that hold their shape. A higher protein flour helps create firm edges while keeping the centre soft. You can substitute with Bob’s Red Mill 1-to-1 Gluten Free Flour with no additional adjustments needed. It works beautifully in this recipe.
- Sugar: White sugar gives a traditional flavour and structure. You can substitute with golden or brown sugar for a slightly deeper flavour. Coconut sugar may also work, although I haven’t tested it with this specific recipe.
- Salt: A small amount enhances flavour and balances sweetness. If using salted butter, omit the salt.
Wet Ingredients
- Plant-Based Butter: This is important – use block or stick butter, not a tub spread. Tub butters have a higher water content, which increases the risk of spread. More water = more spread, and we’re not doing that here! If you can only find spreadable butter, add an extra 30 grams of flour to compensate. You can substitute dairy butter if you are not dairy-free.
- Plant-Based Milk: Instead of eggs, this recipe uses plant-based milk to bind the dough. Eggs add moisture and can contribute to the spread if not properly balanced. By removing eggs and adjusting our flour ratio, we are reducing the risk of spreading. Almond milk is my preference, but any plant milk works. You can also sub room-temperature water in a pinch. If you are not vegan, sub with 1 egg and add 15 grams of extra flour.
- Vanilla Bean Paste: Vanilla bean paste gives that classic sugar cookie flavour. For something special, try adding a touch of almond extract – this is actually my kids’ favourite combo.
Baker’s Tip: If you have a nut allergy, use imitation almond extract. This is usually made from the pit of a peach or apricot. And the bonus is that it’s actually cheaper than the real deal and still has a great flavour profile!
How to Make No Spread Sugar Cookies
With 6 simple ingredients, this cookie dough comes together quickly – no chilling required.
I prefer using a stand mixer with a paddle attachment, as it helps to evenly incorporate ingredients without overmixing (which is key for preventing spread). If you don’t have one, a hand whisk or sturdy wooden spoon works just fine – it’ll just take a little bit longer.
Step 1: Cream the Butter and Sugar
Add the slightly cool plant-based butter and sugar to your mixing bowl. Mix on the lowest setting (stir speed if using a stand mixer), until just combined.
Do not overmix.
Overmixing incorporates excess air throughout the dough and can affect the final texture.

Step 2: Add Milk and Vanilla
Add the vanilla bean paste and plant-based milk. Again, stir/mix on the lowest speed until just combined.
Scrape down the bowl to ensure everything is evenly incorporated.

Step 3: Add Dry Ingredients in Stages
Add the flour and salt gradually. I like to add flour in 2-3 stages to avoid activating the gluten too much, prevent a flour cloud explosion, and keep mixing to a minimum.
Scrape down the bowl between each addition.

Step 4: Stop at the Right Moment
Your cookie dough is ready when it:
- Pulls cleanly away from the sides of the bowl
- Clumps around the paddle
- Feels soft but not sticky
This is where many cookie recipes go wrong – overmixing leads to spread.

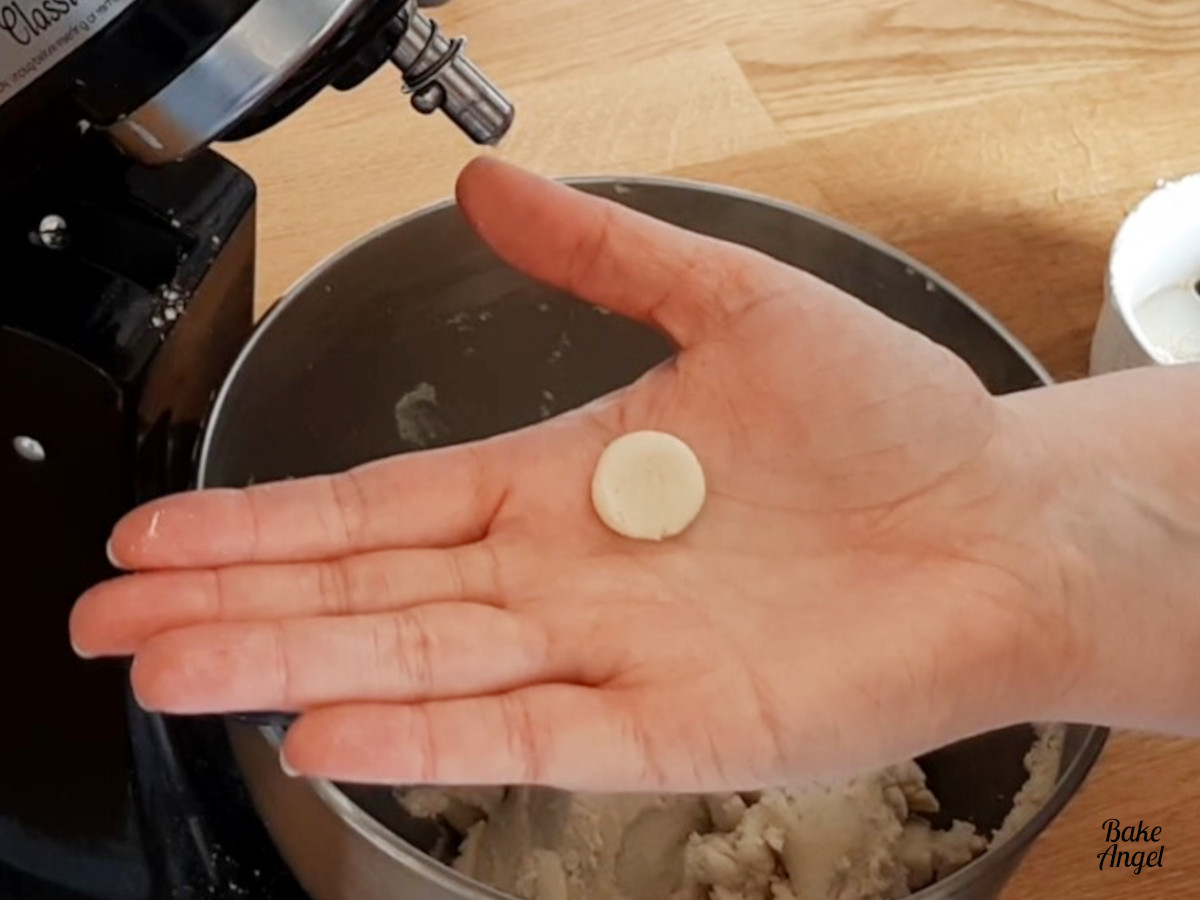
The Perfect Dough Consistency
Before rolling, always test your dough. Take a small piece, roll it into a ball and flatten it slightly. It should not crumble and should not feel sticky.
- If crumbly, add 1/2 tsp of milk or water and re-stir.
- If sticky, add 1-2 tsp flour and re-stir.
Humidity affects dough, and sometimes you might need a little more flour, other times a little more liquid. During our dry Canadian winters, I use less flour, whereas in our hot, humid summers, I add slightly more.
So don’t worry if you need to make slight adjustments – that’s completely normal and baking science! The key is always to check the consistency every time you make a batch of cookie dough.
How to Roll Evenly (Decorator Tip)
Even thickness = even baking = clean edges.
We all know that baking tools can get expensive! I save money by using paint stirrers as inexpensive guide sticks (1/4 inch thick). Next time you’re in the hardware store, pick some up to add to your baking toolkit. They’re usually free in the paint section.
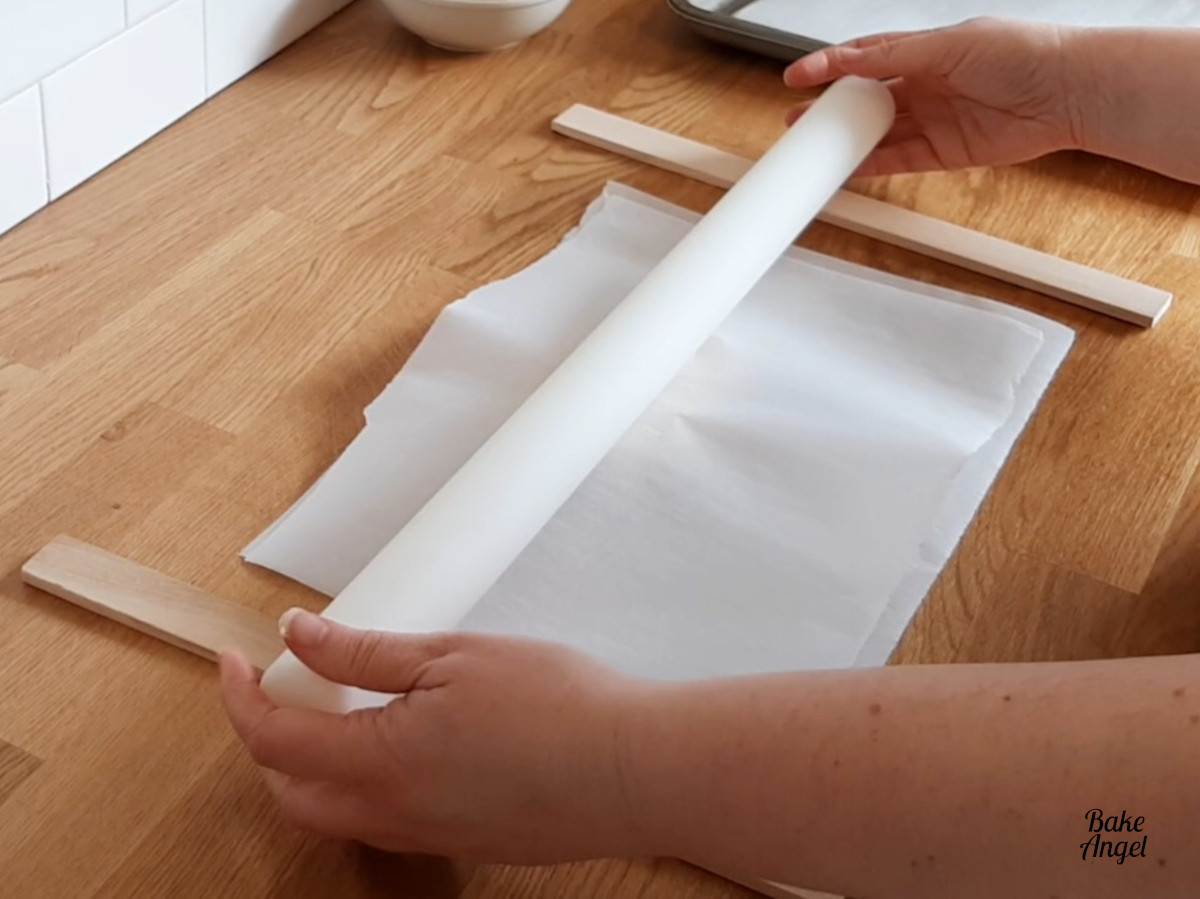
Roll the cookie dough between two sheets of parchment paper to:
- Prevent sticking
- Avoid adding extra flour (this will dry out your dough!)
- Reduce overworking
I also keep a bowl at the side of my workspace for any offcuts. Save your offcuts and reroll only once at the end to avoid adding extra air to your dough and overworking the gluten.

Baking the Cookies
Place cookies on a lined baking pan. Even though this dough does not spread, leave space to allow for better airflow and more even baking.

Bake at 350F for 8-10 minutes until the edges are lightly golden, and the surface looks matte.
Cool for 5 minutes on the tray, then transfer to a cooling rack.
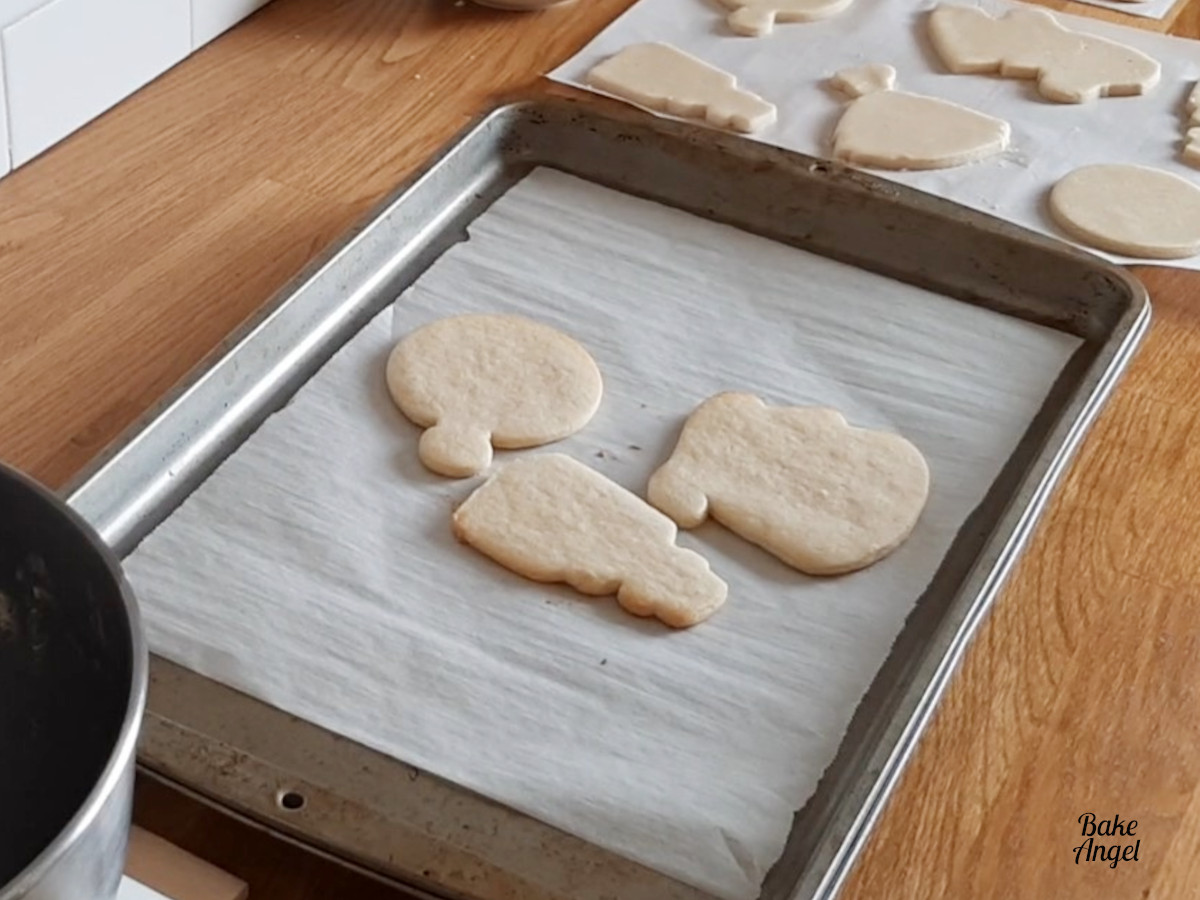
These cookies taste wonderful when warm, but if you plan on decorating, allow them to cool completely before decorating and adding icing.
Ways to Use These No Spread Sugar Cookies
These cookies are delicious on their own, but where they really shine is as a decorating base. Because they hold sharp edges and don’t puff or spread, they’re ideal for elaborate designs, holiday sets, and themed gifts.
Here are my favourite ways to decorate them:
Royal Icing – Best for Detailed Designs
My 2-ingredient Vegan Royal Icing sets firm with a soft bite and pipes beautifully. Perfect forpersonalised cookies, holiday cookie sets, gifts, and intricate royal icing transfers. Avoid oil-based colours or flavourings as they can split the icing. Not vegan? Check out my Small Batch Royal Icing recipe.
Buttercream – Soft and Classic
If you prefer a softer bite, my Small Batch Vanilla Buttercream is perfect. It crusts lightly, pipes cleaning, and is great for kids or beginner decorators.
Marshmallow Fondant – 3D Decorating
Homemade Marshmallow Fondant is a fun way to decorate cookies. It gives smooth coverage, bold shapes, and sculpted designs with better flavour than store-bought alternatives. Trust me when I tell you that you will LOVE this small batch recipe!
Quick Decorating Tips for Busy Parents
Short on time? Try these shortcuts:
- Using a simple glaze – mix water with icing sugar until you get an almost pourable consistency
- Dip half the cookie in icing
- Add sprinkles
- Let kids decorate their own
These cookies are sturdy enough for little hands, making decorating fun and stress-free. It’s also such a great way to create fun memories.
Best Occasions for No Spread Cut Out Cookies
Because these cookies don’t spread and hold sharp edges, they’re ideal for Christmas cookie sets, Valentine’s Day cookies, Easter shapes, birthday themes, and even back-to-school treats.
This is my go-to base recipe whenever I need reliable cut out sugar cookies that look professional and decorate beautifully.

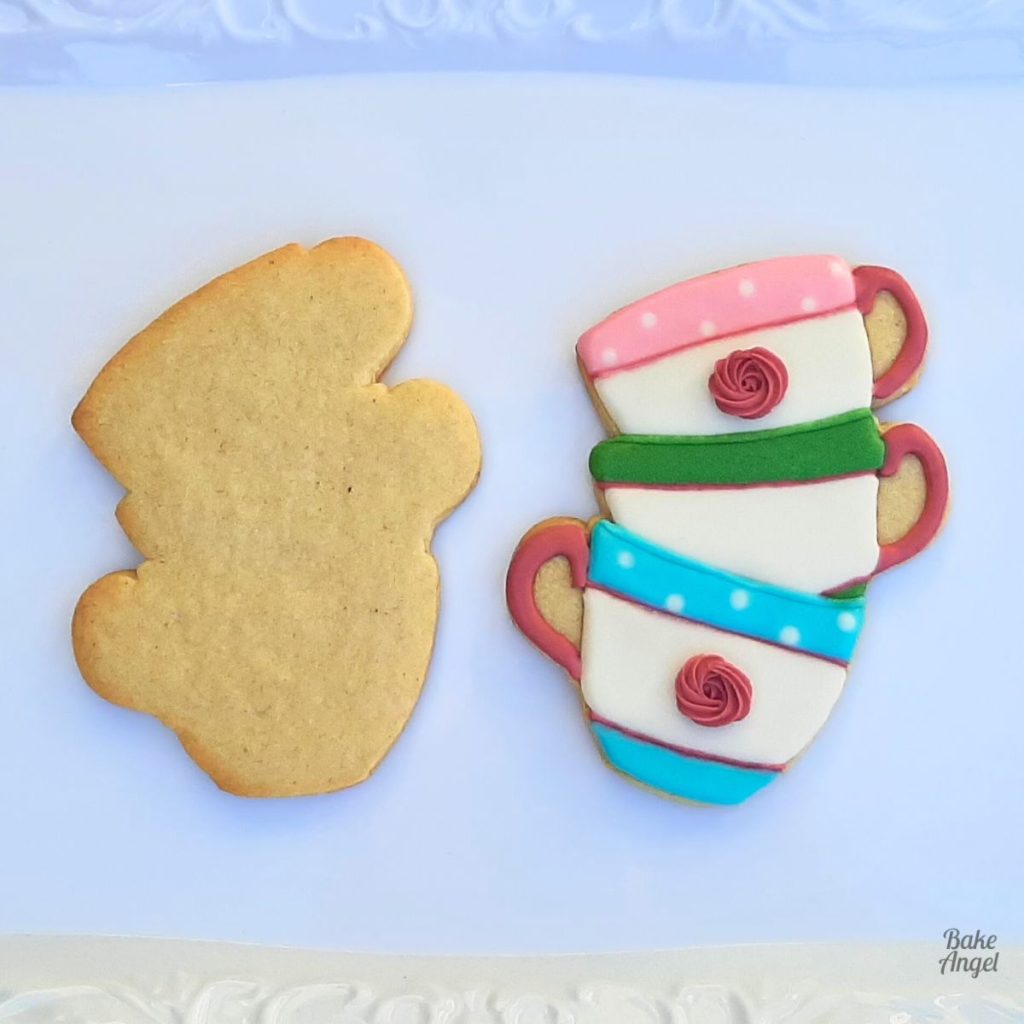
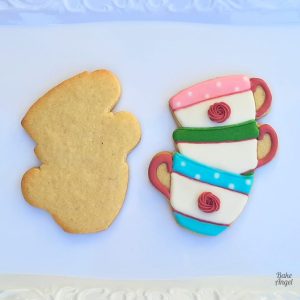
Example of Decorated Cookies
Because these cookies have sharp, defined edges, they’re perfect for creating stunning royal icing designs.
This Alice in Wonderland-inspired cookie set was created using this exact sugar cookie recipe as the base. The clean edges make intricate piping and stacked designs much easier to achieve.
Whether you’re baking simple shapes with the kids or creating themed cookie sets, this dough gives you a reliable blank canvas every time.
If you’d like to see the stacked tea-cups design come to life, watch the full decorating tutorial on my youtube channel.

Storage Tips for Cookie Dough
Not ready to bake? No problem. As a busy mom, I love that this dough can be made ahead of time and stored in the fridge or freezer, so you can grab it whenever cookie cravings (or decorating plans) strike.
Fridge: Wrap the ball of dough in plastic wrap, then place it in an airtight container. It will keep for 2-3 days. Allow it to come to room temperature before rolling.
Freezer: Flatten the dough into rectangles, double wrap with plastic wrap, and store in a sealed container or Ziploc bag for up to 3 months. If you have more freezer space, you can roll the cookie dough to your desired thickness before freezing – this speeds up cookie prep later. Thaw at room temperature before rolling (if needed), cutting and baking.
How to Store Baked Sugar Cookies
Whether you’re prepping for a party, decorating in stages, or baking ahead for the week, these cookies store well, leaving you more time for the fun part: decorating!
- Undecorated cookies: Store on parchment paper in an airtight container at room temperature for up to 7 days. You can stack them on their side with parchment between layers, if you like.
- Freezing baked cookies: Cool completely, layer with parchment to protect the smooth tops, and store in an airtight container for up to 3 months. Thaw at room temperature before decorating.
- Decorated cookies: Fully dried royal icing cookies can be made 3-5 days in advance and stored in an airtight container at room temperature. For longer storage, seal in a food-safe bag for up to 2 weeks. Avoid refrigerating once decorated, as the condensation can affect the icing.
Frequently Asked Questions
Here are answers to some of the most common questions about these no chill, no spread vegan sugar cookies.
This recipe typically yields 15-18 cookies, depending on the size and shape of your cookie cutters. I usually use 3.5-4 inch sized cookie cutters. If you’re making smaller shapes, you’ll get more cookies.
No – chilling is not required for this recipe. I tested chilling the dough, and it made no noticeable difference in spread or texture. Because the dough is already well-balanced, it holds its shape without the extra step. If you like chilling your dough as part of your cookie-making routine, you absolutely can, but it’s completely optional.
For best results, roll the dough about 1/4″ thick. This ensures even baking, soft centres, crisp edges, and a strong structure for decorating. I use inexpensive paint stirrers to roll evenly every time.
If you’re using this recipe, spreading shouldn’t be an issue. If you do notice it, check that your butter isn’t too soft, your flour is measured correctly, your dough has the right consistency before rolling, and your oven is fully preheated. These small details make a big difference.
Recommended Cookie Posts
These no chill, no spread sugar cookies are perfect to enjoy just as they are or to decorate with royal icing, buttercream, or even fondant! Looking for some inspiration?
- Learn how to decorate sugar cookies with my Top 15 Cookie Decorating tutorials.
- Need the perfect topping? Try my Vegan Royal Icing.
- New to royal icing? Start with this Small Batch Royal Icing recipe.
- For even more cookie recipe ideas, check out my Cookie Recipe Collection.
Here’s an example of some Valentine’s Day royal iced cookies that I decorated – sharp edges make all the difference for stunning designs!

Whether you’re baking for school lunch treats, last-minute parties, or just a sweet snack, these cookies are quick, reliable, and fun to decorate.
I hope you enjoyed reading about the science behind sugar cookies and why these cookies hold their shape so well. Keep this recipe handy for the next time you’re craving some sweet treats. If you try it out, I’d love to see your creations – tag me on Instagram @itsbakeangel.
Happy Baking!

Vegan No Spread Sugar Cookies (No Chill, Easy to Make)
Equipment
- Paint Stirrers (from hardware store)
- Cookie Cutters
Angela’s Top Tip
Weigh your dry ingredients in grams with a scale for best results!
Ingredients
- 200 grams White Sugar (1 US Cup)
- 220 grams Plant Based Butter (unsalted) (1 US Cup)
- 2 tbsp Plant Based Milk
- 2 tsp Vanilla Bean Paste
- 375 grams All Purpose Flour (3 US Cups + 2 tbsp. Also known as plain flour)
- 0.5 tsp Salt
Instructions
- Preheat oven to 350℉ (180℃). Line baking pans with parchment paper. Butter should be slightly cool, milk at room temp.
- In a stand mixer with paddle attachment, cream 220 grams Plant Based Butter (unsalted) and 200 grams White Sugar on low speed for ~30 seconds. Do not overmix as this can cause spreading.
- Add 2 tbsp Plant Based Milk and 2 tsp Vanilla Bean Paste; mix until just combined.
- Gradually add 0.5 tsp Salt and 375 grams All Purpose Flour in thirds, scraping the bowl each time. Dough is ready when it forms a ball and pulls cleanly from the sides.
- Check consistency: roll a small piece of dough into a ball. If it’s too crumbly, add a tiny bit of milk or water; if too sticky, add a bit more flour.
- Place dough between two sheets of parchment (use paint stirrers under the bottom sheet if needed as a guide). Roll to ¼ inch thick.
- Use cookie cutters to cut out shapes and place on prepared baking pans.
- Bake at 350℉ (180℃) for 8-10 minutes until edges are lightly golden, and the cookies have a matte appearance.
- Allow cookies to cool completely before decorating with royal icing, fondant, or buttercream.
Video
Notes
- Yield: Makes approximately 18 cookies, depending on thickness and cutter size. I roll my dough to 1/4 inch thickness and use 3.5-4 inch cutters.
- Time Saver Recipe: No chilling required. Make dough, roll, cut, and bake.
- Storage: Best enjoyed on the day of baking. Store at room temperature for up to 7 days. Freeze dough or baked cookies as needed. See the full post for more storage tips.
- Decorating Tips: Pairs well with royal icing, fondant, and buttercream. See my Top 15 Decorating Tutorials for more ideas.
- Perfect for: Holiday decorating, birthday cookies, or last minute treats.
- Nutrition: Info is an estimate based on the ingredients used.


I have my first vegan, gluten & dairy-free request for cookies! Can’t wait to try your recipe & tips!
I’m so excited for you to try these! I hope your customer enjoys them as much as we do.
So glad I found your recipe. I’ve baked it a couple of times and the cookies are perfect. My family loved the flavor as well. Thank you so much!
That makes me so happy! Happy baking!
I was sceptical. A lot of recipes claim to be no spread, no chill, but this one actually is! It’s now my go to recipe. Thanks for sharing!
This is such a great recipe! I’ve been using it for a few years and it never fails! Thank you so much for sharing this.
Love hearing this!