For those times when you only need a small batch of royal icing for cookies, this easy 3-ingredient royal icing recipe is perfect for beginners and experienced bakers alike. It makes approximately 225 grams (1.5 US cups) of stiff royal icing that can be thinned for piping, flooding, or detailed cookie decorating. Ideal when you want to decorate a small batch of sugar cookies without wasting leftover icing.

Quick Summary: This small batch royal icing makes approx. 1.5 cups (200g) of icing. It has a stiff consistency by default and can be thinned for piping, flooding, or detailing sugar cookies.
This small batch royal icing recipe is perfect for beginners and experienced bakers alike, especially if you’re looking for an easy, reliable royal icing for cookies that doesn’t leave you with excess.
Why You Need This Small Batch Royal Icing Recipe
How many times have you been in the middle of piping some cookies and you realize that you’re running out of royal icing? Or perhaps you’re new to cookie decorating and want to have a go at decorating with royal icing.
In this recipe. I’ll walk you through how easy it is to make a small batch of royal icing, which equates to roughly 1.5 cups or 200g of icing. This is enough icing to decorate up to 12 cookies with a simple design – try my no spread, no chill sugar cookie recipe for best results.

Ingredients and Substitutions
This dairy-free, nut-free, gluten-free royal icing uses 3 ingredients. Read on for recipe suggestions in my FAQ section.

Icing Sugar: I recommend sifting your icing sugar to ensure there are no lumps in your icing.
Meringue Powder: This egg-white substitute is used to create meringues and royal icing, and can also be used to stabilize buttercream. It contains egg white powder as well as a variety of stabilizing ingredients.
My go-to brand is Wilton, and while theirs does not contain dairy, eggs, gluten, or nuts, it does have a cross-contamination warning on the label. If you prefer to use other brands, check the ingredients for allergens.
Water: I prefer to use lukewarm water as it helps dissolve the meringue powder more quickly.
How to Make Royal Icing (Step-By-Step)
Step 1: Add meringue powder and lukewarm water to a mixing bowl. You can make this recipe in a stand mixer, but I find it’s such a small amount of icing that it’s easier to use a hand mixer.

Stir together with the hand mixer until just combined. You’ll notice that small bubbles will form. Stop at this stage as we don’t want to overwhip it.

Step 2: Add in icing sugar and mix on medium speed for 5 minutes. Top tip: to avoid the puff of icing sugar, give everything a quick stir with the whisk attachments before turning on the mixer.

Very quickly, the icing will start to come together, thicken up and increase in volume. It will be slightly glossy in appearance.

Step 3: After 5 minutes, the icing will hold a stiff peak. I prefer to make stiff consistency icing as it is easier to thin icing than to thicken it back up. Adjust the consistency as needed by adding small amounts of water (to thin) or sifted icing sugar (to thicken).

And that’s it! See, I told you it was easy.

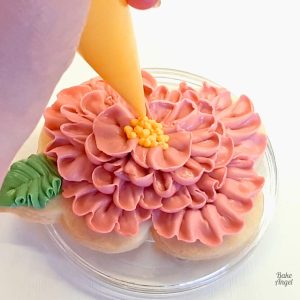
Your icing is ready to experiment with. You can portion some out into smaller bowls and add food colouring, or simply add to a piping bag and start decorating – try my royal icing flower tutorial for a simple beginner design.

Royal Icing Consistencies Explained (Stiff to Flood)
The great thing about royal icing is that it is extremely versatile and can be used to create many different types of decorating. Consistency is everything when it comes to decorating, and four consistencies of icing are generally used:
- Stiff: this recipe makes a stiff consistency, which is most suited to piping detailed flowers such as roses, 3D designs that need to hold their shape and intricate string work.
- Medium: used for writing, softer flowers and leaves, small details and royal icing transfers.
- Hybrid: a thicker flood icing which gives a puffier finish.
- Flood: used to fill cookies and dries with a flat, smooth surface.
For a visual look at the different consistencies, check out my Royal Icing Consistencies 101 video.
Here’s an example of how it should look when piping onto cookies:

Troubleshooting Royal Icing
Royal icing can take a little practice, especially when it comes to consistency. If something doesn’t look quite right, don’t worry – most issues are quick and easy to fix!
Icing too thick
If your icing feels stiff or difficult to pipe, add water a little at a time (start with 1 teaspoon). Mix well after each addition until you reach your desired consistency. This is especially helpful when adjusting icing for flooding cookies.
Icing too thin
If your icing is runny and won’t hold its shape, add sifted icing sugar a tablespoon at a time. Mix slowly to avoid incorporating too much air until it thickens up.
Air bubbles in the icing
Air bubbles can appear when the icing is mixed too quickly. To fix this, gently stir the icing with a spatula or tap the bowl on the counter to release trapped air. You can also pop bubbles with a scribe tool or toothpick when decorating.
Grainy or lumpy texture
This usually happens when the icing sugar hasn’t been sifted properly. To avoid this, always sift your sugar before mixing. If your icing is already grainy, try mixing a little longer to smooth it out, but be careful not to overwhip.
Flavouring
Feel free to add your flavour of choice to this recipe. I love adding a dash of almond extract or vanilla bean paste. Just ensure that your flavouring is not oil-based, as it will split the icing.
How to Store and Freeze Royal Icing
Storage: If you are not using the icing straight away, transfer it to an airtight container and place some plastic wrap (cling film) directly on top of the icing. This will prevent it from drying out. Store at room temperature for up to 1 week. You can also keep it in the fridge for up to 2 weeks if you prefer.

I recommend pressing the plastic wrap directly onto the icing. This prevents it from crusting over.

Freezing: You can also freeze royal icing for up to 3 months. Allow to defrost at room temperature, then re-whip before using.

Common Royal Icing Questions
Approximately 1.5 US cups or 225 grams – enough for 12 cookies with simple decorating.
This recipe makes a stiffer consistency royal icing. Add water to thin it down to the desired consistency. Learn more about the different types of consistencies in this icing consistencies 101 video.
Meringue powder contains egg white, making it unsuitable for those who follow a vegan lifestyle or egg-free diet. Check out my 2 ingredient vegan royal icing which uses aquafaba.
I use water-based gel food colouring, which is highly concentrated and easy to mix. Powdered food colouring also works well. Avoid oil-based food colouring as it can split the icing.
Yes. I recommend using powdered or liquid flavouring. Just ensure the flavouring doesn’t contain any oil as it will affect the icing. My personal favourite is a dash of almond extract.
Recommended Uses
If you want to decorate sugar cookies, this royal icing pairs well with the following recipes:
- My most requested No Spread No Chill Sugar Cookies recipe (Vegan with easy GF option)
- Add a pop of colour to your desserts with my Funfetti Sugar Cookies (Vegan with easy GF option)
- Wake up your taste buds with my Strawberry Lemonade Sugar Cookies (Dairy Free with Vegan & GF options)
Cookie Decorating Tutorials
Whether you are a beginner or someone with previous royal icing knowledge, my Top 15 Cookie Decorating Tips will help you on your cookie decorating journey.
I also have some step-by-step decorating posts available, including:
- How to Pipe a Floral Cookie
- How to Make a Honeycomb Cookie with Royal Icing
- How to Pipe Leaves with a Tipless Piping Bag
- Black Icing in Less than 15 Minutes

Small Batch Royal Icing for Cookies (Easy Recipe)
Equipment
- Sieve (optional)
Angela’s Top Tip
Weigh your dry ingredients in grams with a scale for best results!
Ingredients
- 1 tbsp Meringue Powder
- 2.5 tbsp Lukewarm Water (37ml)
- 200 grams Icing Sugar (1 2/3 US Cups)
Instructions
- Add 1 tbsp Meringue Powder and 2.5 tbsp Lukewarm Water to a mixing bowl. Stir together with the hand mixer until just combined.
- Add in 200 grams Icing Sugar and mix on medium speed for 5 minutes. Top tip: to avoid the puff of icing sugar, give everything a quick stir with the whisk attachments before turning on the mixer.
- After 5 minutes, the icing will hold a stiff peak. For a thinner icing consistency (for flooding or writing), add water a little at a time and mix until desired consistency is reached.
Video
Notes
This recipe makes a stiff consistency royal icing, ideal for piping details and flowers. Add water a little at a time to create outline, writing, or flood consistency. Learn more about icing consistencies in this video. Flavouring:
Add vanilla, almond extract, or other flavourings if desired. Avoid oil-based flavourings as they can cause the icing to split. Colouring:
Use gel or powdered food colouring for best results. Avoid oil-based colours as they can affect the texture of the icing. Storage:
Store in an airtight container with plastic wrap pressed directly onto the surface to prevent crusting. Keep at room temperature for up to 1 week or refrigerate for up to 2 weeks. Freezing:
Freeze for up to 3 months. Defrost at room temperature and re-whip before using. Troubleshooting Tip:
If your icing is too thick, add water 1 tsp at a time. If too thin, add sifted icing sugar gradually until it thickens. More Info:
Check out my Top 15 Cookie Decorating Tips for more help with consistencies, colour mixing, and decorating techniques. Vegan Option:
For an egg-free version, try my 2 ingredient vegan royal icing made with aquafaba.


I have a question, can I use this royal icing to outline a design on chocolate?
Yes, absolutely. You can use royal icing on chocolate to create designs, intricate details and more. I recommend using medium consistency so that it holds its shape. Hope that helps.
Just made up a double batch of this recipe and it’s perfect! Thank you so much.
Thanks Kristi. Happy to hear that! Happy decorating.
Thank you so much. Just made it, it’s silky smooth. Will use your recipes over and over again.
Thanks for sharing Mary! I’m so happy to hear that.